Haptic Feedback Joystick with Arduino
A vibration motor and joystick are used to create a haptic feedback device using the Arduino platform. As a response to specific changes in joystick position, we prescribe vibration motor actions corresponding to the movement of the joystick. This allows for creation of vibrational feedback similar to that used in video games and virtual reality systems. The goal of this tutorial is to introduce users to haptic technology that can immerse users into the digital world using physical feedback mechanisms, such as vibration. Different tunings of the vibration motor can provide users with instructions based on their input, which makes this type of application useful for enhancing digital media, as referenced above, or situations such as visually impaired navigation, feedback in auditory-restricted environments, and delivering quiet notifications to users. Haptics can be incredibly useful in emulating the real world and immersing users into scenarios that may otherwise be dangerous or difficult to experience. Vibrational haptic feedback is just one of a series of haptic mechanisms, and this tutorial was just a simple entry into a wide ranging and evolving field of human computer interaction.

Water Metering with the WaWiCo USB Kit and Raspberry Pi
For this project, we will be comparing the WaWiCo sensor with a conventional hall-effect mechanical flow meter. The WaWiCo sensor introduces a novel method for water metering, with non-invasive acoustic analysis. The benefit of the WaWiCo method is evident during the mechanical flow meter analysis, where we need to match pipe diameters and fittings and ensure that the flow terminates at a point. Otherwise, mechanical meters require cutting in piping — which is not an option for many users. Using a Raspberry Pi computer and a WaWiCo USB water meter kit, the frequency content of water flow for a given pipe is analyzed. Additionally, this frequency response will be used to correlate to the flow rate (in L/s) approximated by the mechanical flow meter. This brings us one step closer to being able to non-invasively measure water flow using the WaWiCo method.

Raspberry Pi Pico OLED Display (SSD1306)
This is the third tutorial in a series dedicated to exploring the Raspberry Pi Foundation's groundbreaking new microcontroller: the Raspberry Pi Pico. The first entry centered on the basic principles of interfacing with the Pico and programming with Thonny and MicroPython, while the second entry focused on emulating the Google Home and Amazon Alexa LED animations with a WS2812 RGB LED array. In this tutorial, an SSD1306 organic light emitting diode (OLED) display will be controlled using the Pico microcontroller. A MicroPython library will be used as the base class for interfacing with the SSD1306, while custom algorithms are introduced to create data displays. Additionally, a custom Python3 algorithm will be given that allows users to show a custom image on the display. Lastly, a real-time plot will be created that shows an audio signal outputted by a MEMS microphone, emulating a real-time graph display. The SSD1306 is a useful tool for smaller scale projects that require real-time data displays, control feedback, and IoT testing. The power of the Pico microcontroller makes interfacing with the SSD1306 fast and easy, which will be evident when working with the Pico and SSD1306.

An Introduction to the Raspberry Pi Pico with MicroPython
The Raspberry Pi Pico was recently released by the Raspberry Pi Foundation as a competitive microcontroller in the open-source electronics sphere. The Pico shares many of the capabilities of common Arduino boards including: analog-to-digital conversion (12-bit ADC), UART, SPI, I2C, PWM, among others. The board is just 21mm x 51mm in size, making it ideal for applications that require low-profile designs. One of the innovations of the Pico is the dual-core processor, which permits multiprocessing at clock rates up to 133 MHz. One particular draw of the Pico is its compatibility with MicroPython, which is chosen as the programming tool for this project. The focus on MicroPython, as opposed to C/C++, minimizes the confusion and time required to get started with the Pico. A Raspberry Pi 4 computer is ideal for interfacing with the Pico, which can be used to prepare, debug, and program the Pico. From start to finish - this tutorial helps users run their first custom MicroPython script on the Pico in just a few minutes. An RGB LED will be used to demonstrate general purpose input/output of the Pico microcontroller.

Raspberry Pi Stepper Motor Control with NEMA 17
The NEMA 17 is a widely used class of stepper motor used in 3D printers, CNC machines, linear actuators, and other precision engineering applications where accuracy and stability are essential. The NEMA-17HS4023 is introduced here, which is a version of the NEMA 17 that has dimensions 42mm x 42mm x 23mm (Length x Width x Height). In this tutorial, the stepper motor is controlled by a DRV8825 driver wired to a Raspberry Pi 4 computer. The Raspberry Pi uses Python to control the motor using an open-source motor library. The wiring and interfacing between the NEMA 17 and Raspberry Pi is given, with an emphasis on the basics of stepper motors. The DRV8825 control parameters in the Python stepper library are broken down to educate users on how the varying of each parameter impacts the behavior of the NEMA 17. Simple characteristics of stepper control are explored: stepper directivity (clockwise and counterclockwise), step incrementing (full step, half step, micro-stepping, etc.), and step delay.

Audio Processing with The QuadMic 4-Microphone Array on the Raspberry Pi
The QuadMic Array is a 4-microphone array based around the AC108 quad-channel analog-to-digital converter (ADC) with Inter-IC Sound (I2S) audio output capable of interfacing with the Raspberry Pi. The QuadMic can be used for applications in voice detection and recognition, acoustic localization, noise control, and other applications in audio and acoustic analysis. The QuadMic will be connected to the header of a Raspberry Pi 4 and used to record simultaneous audio data from all four microphones. Some signal processing routines will be developed as part of an acoustic analysis with the four microphones. Algorithms will be introduced that approximate acoustic source directivity, which can help with understanding and characterizing noise sources, room and spatial geometries, and other aspects of acoustic systems. Python is also used for the analysis. Additionally, visualizations will aid in the understanding of the measurements and subsequent analyses conducts in this tutorial.

Thermal Camera Analysis with Raspberry Pi (AMG8833)
The AMG8833 infrared thermopile array is a 64-pixel (8x8) detector that approximates temperature from radiative bodies. The module is wired to a Raspberry Pi 4 computer and communicates over the I2C bus at 400kHz to send temperature from all 64 pixels at a selectable rate of 1-10 samples per second. The temperature approximation is outputted at a resolution of 0.25°C over a range of 0°C to 80°C. A real-time infrared camera (IR camera) was introduced as a way of monitoring temperature for applications in person counting, heat transfer of electronics, indoor comfort monitoring, industrial non-contact temperature measurement, and other applications where multi-point temperature monitoring may be useful. The approximate error of the sensor over its operable range is 2.5°C, making is particularly useful for applications with larger temperature fluctuations. This tutorial is meant as the first in a series of heat transfer analyses in electronics thermal management using the AMG8833.
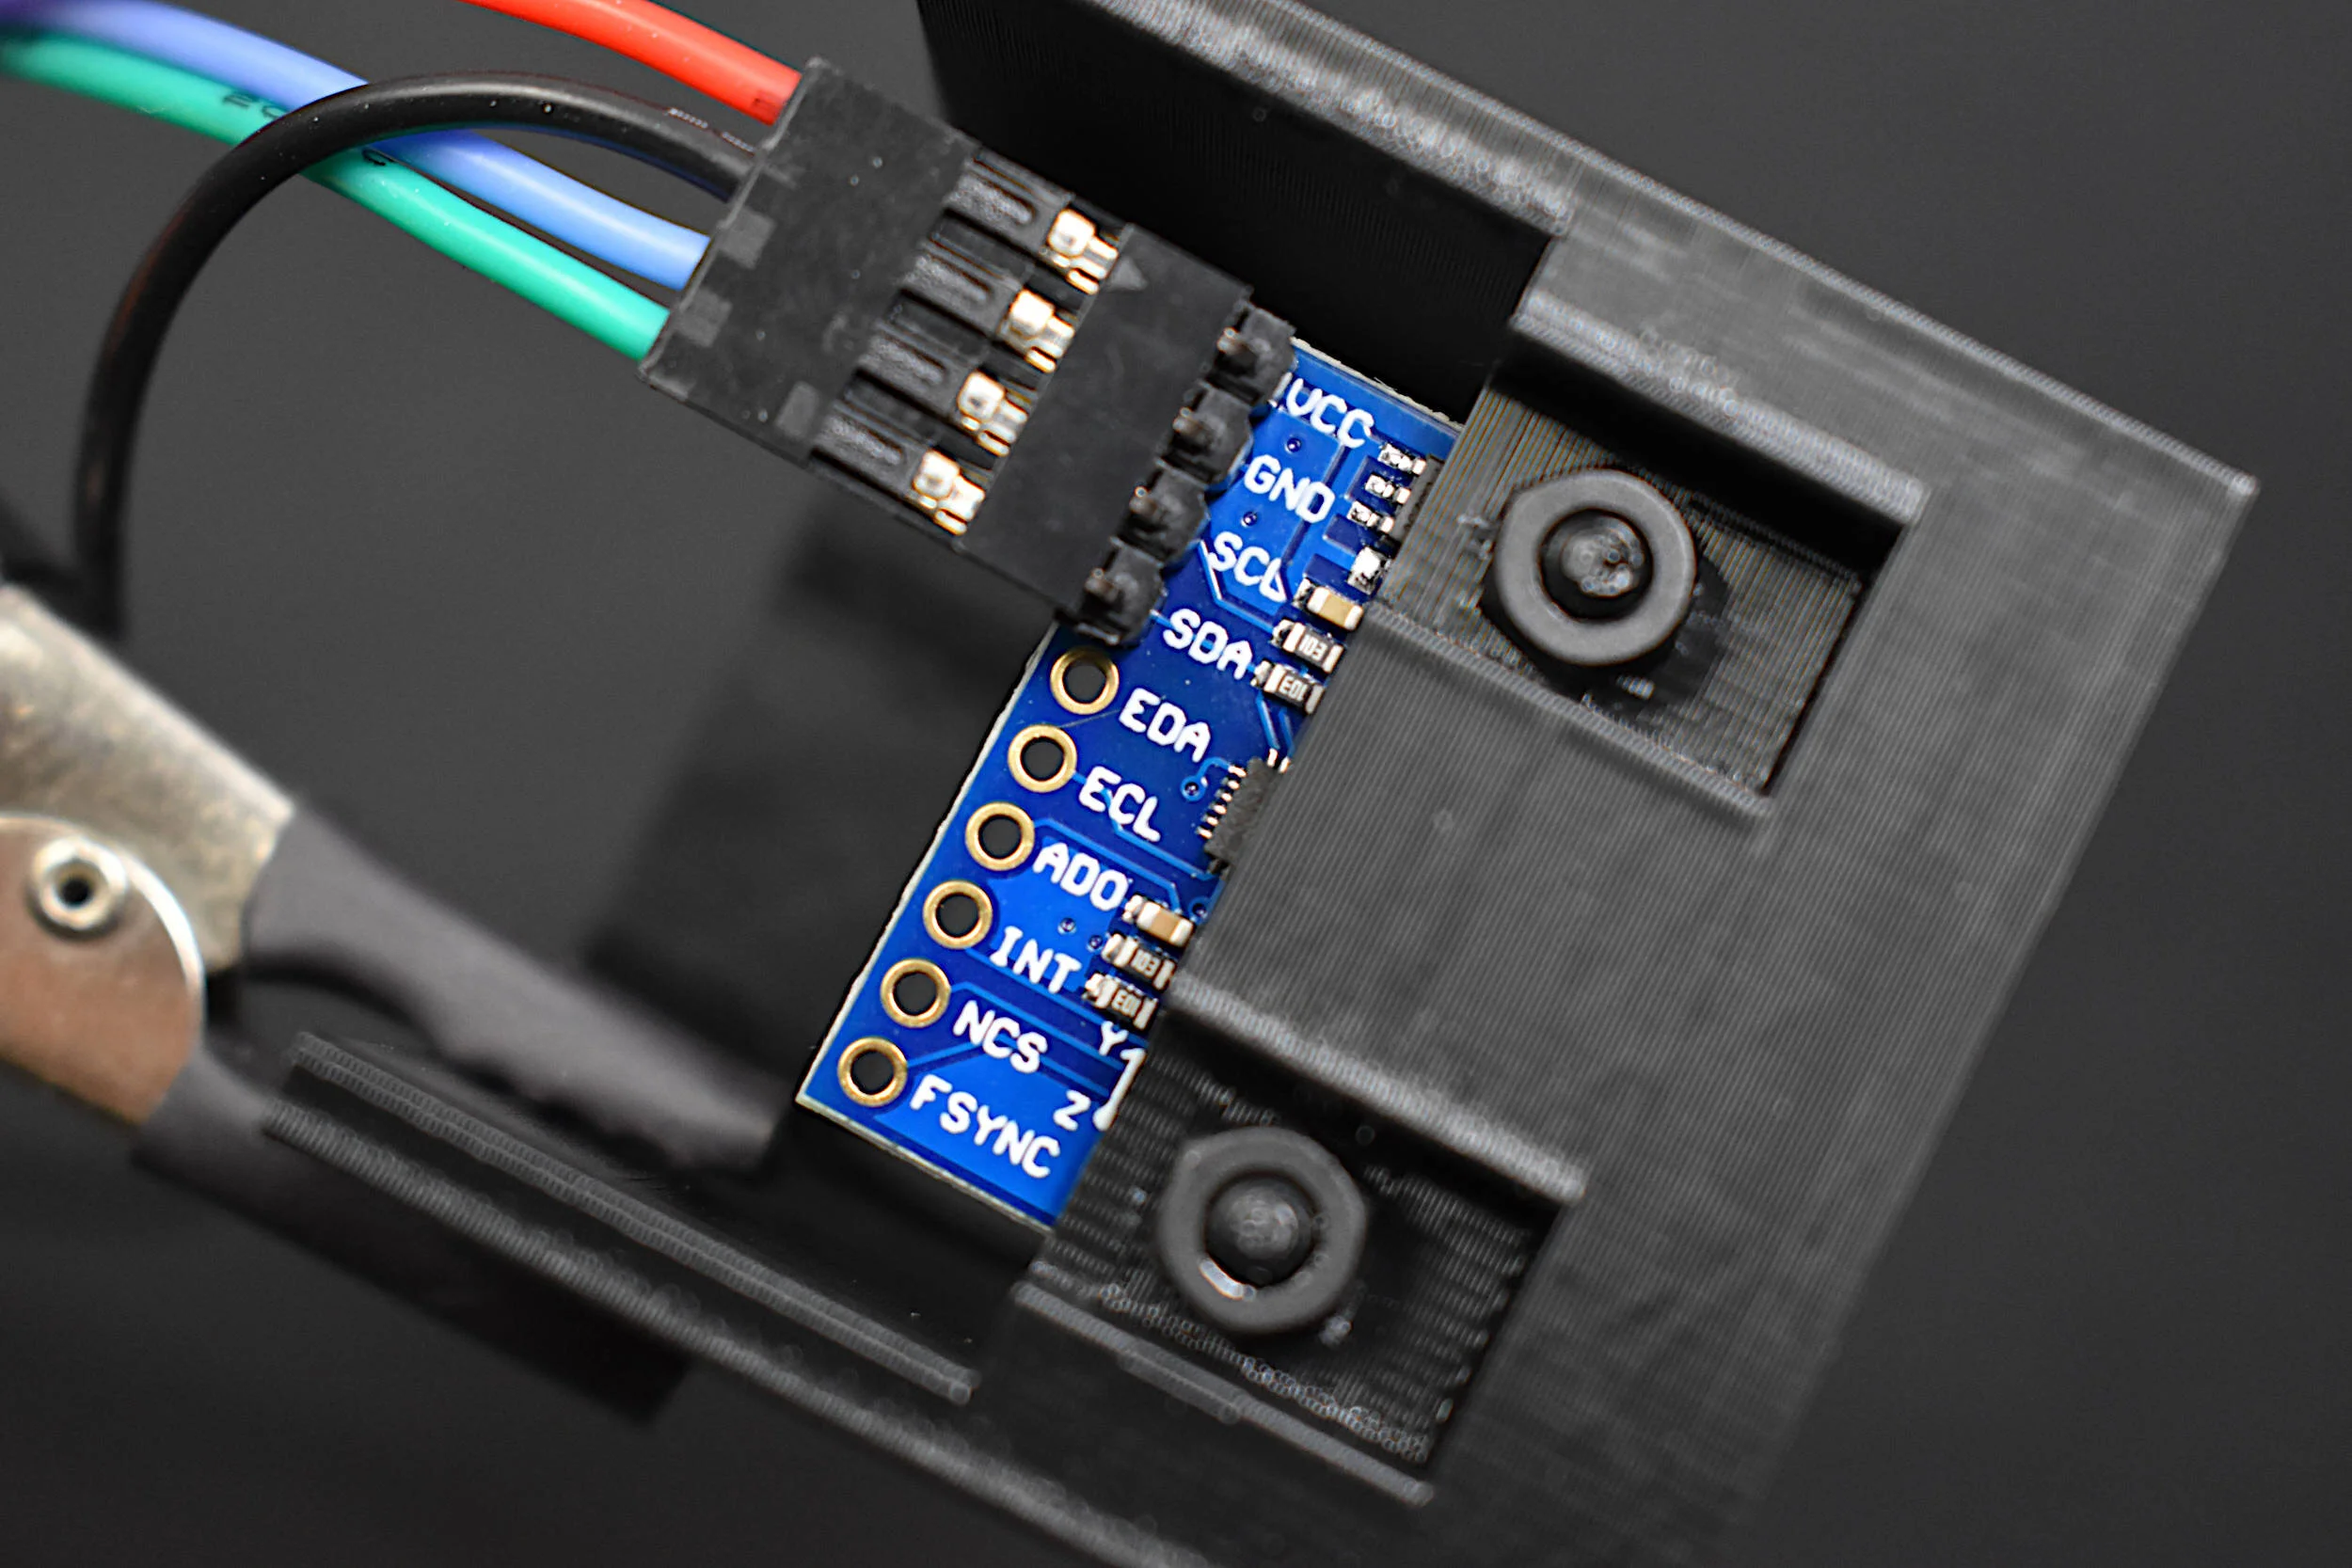
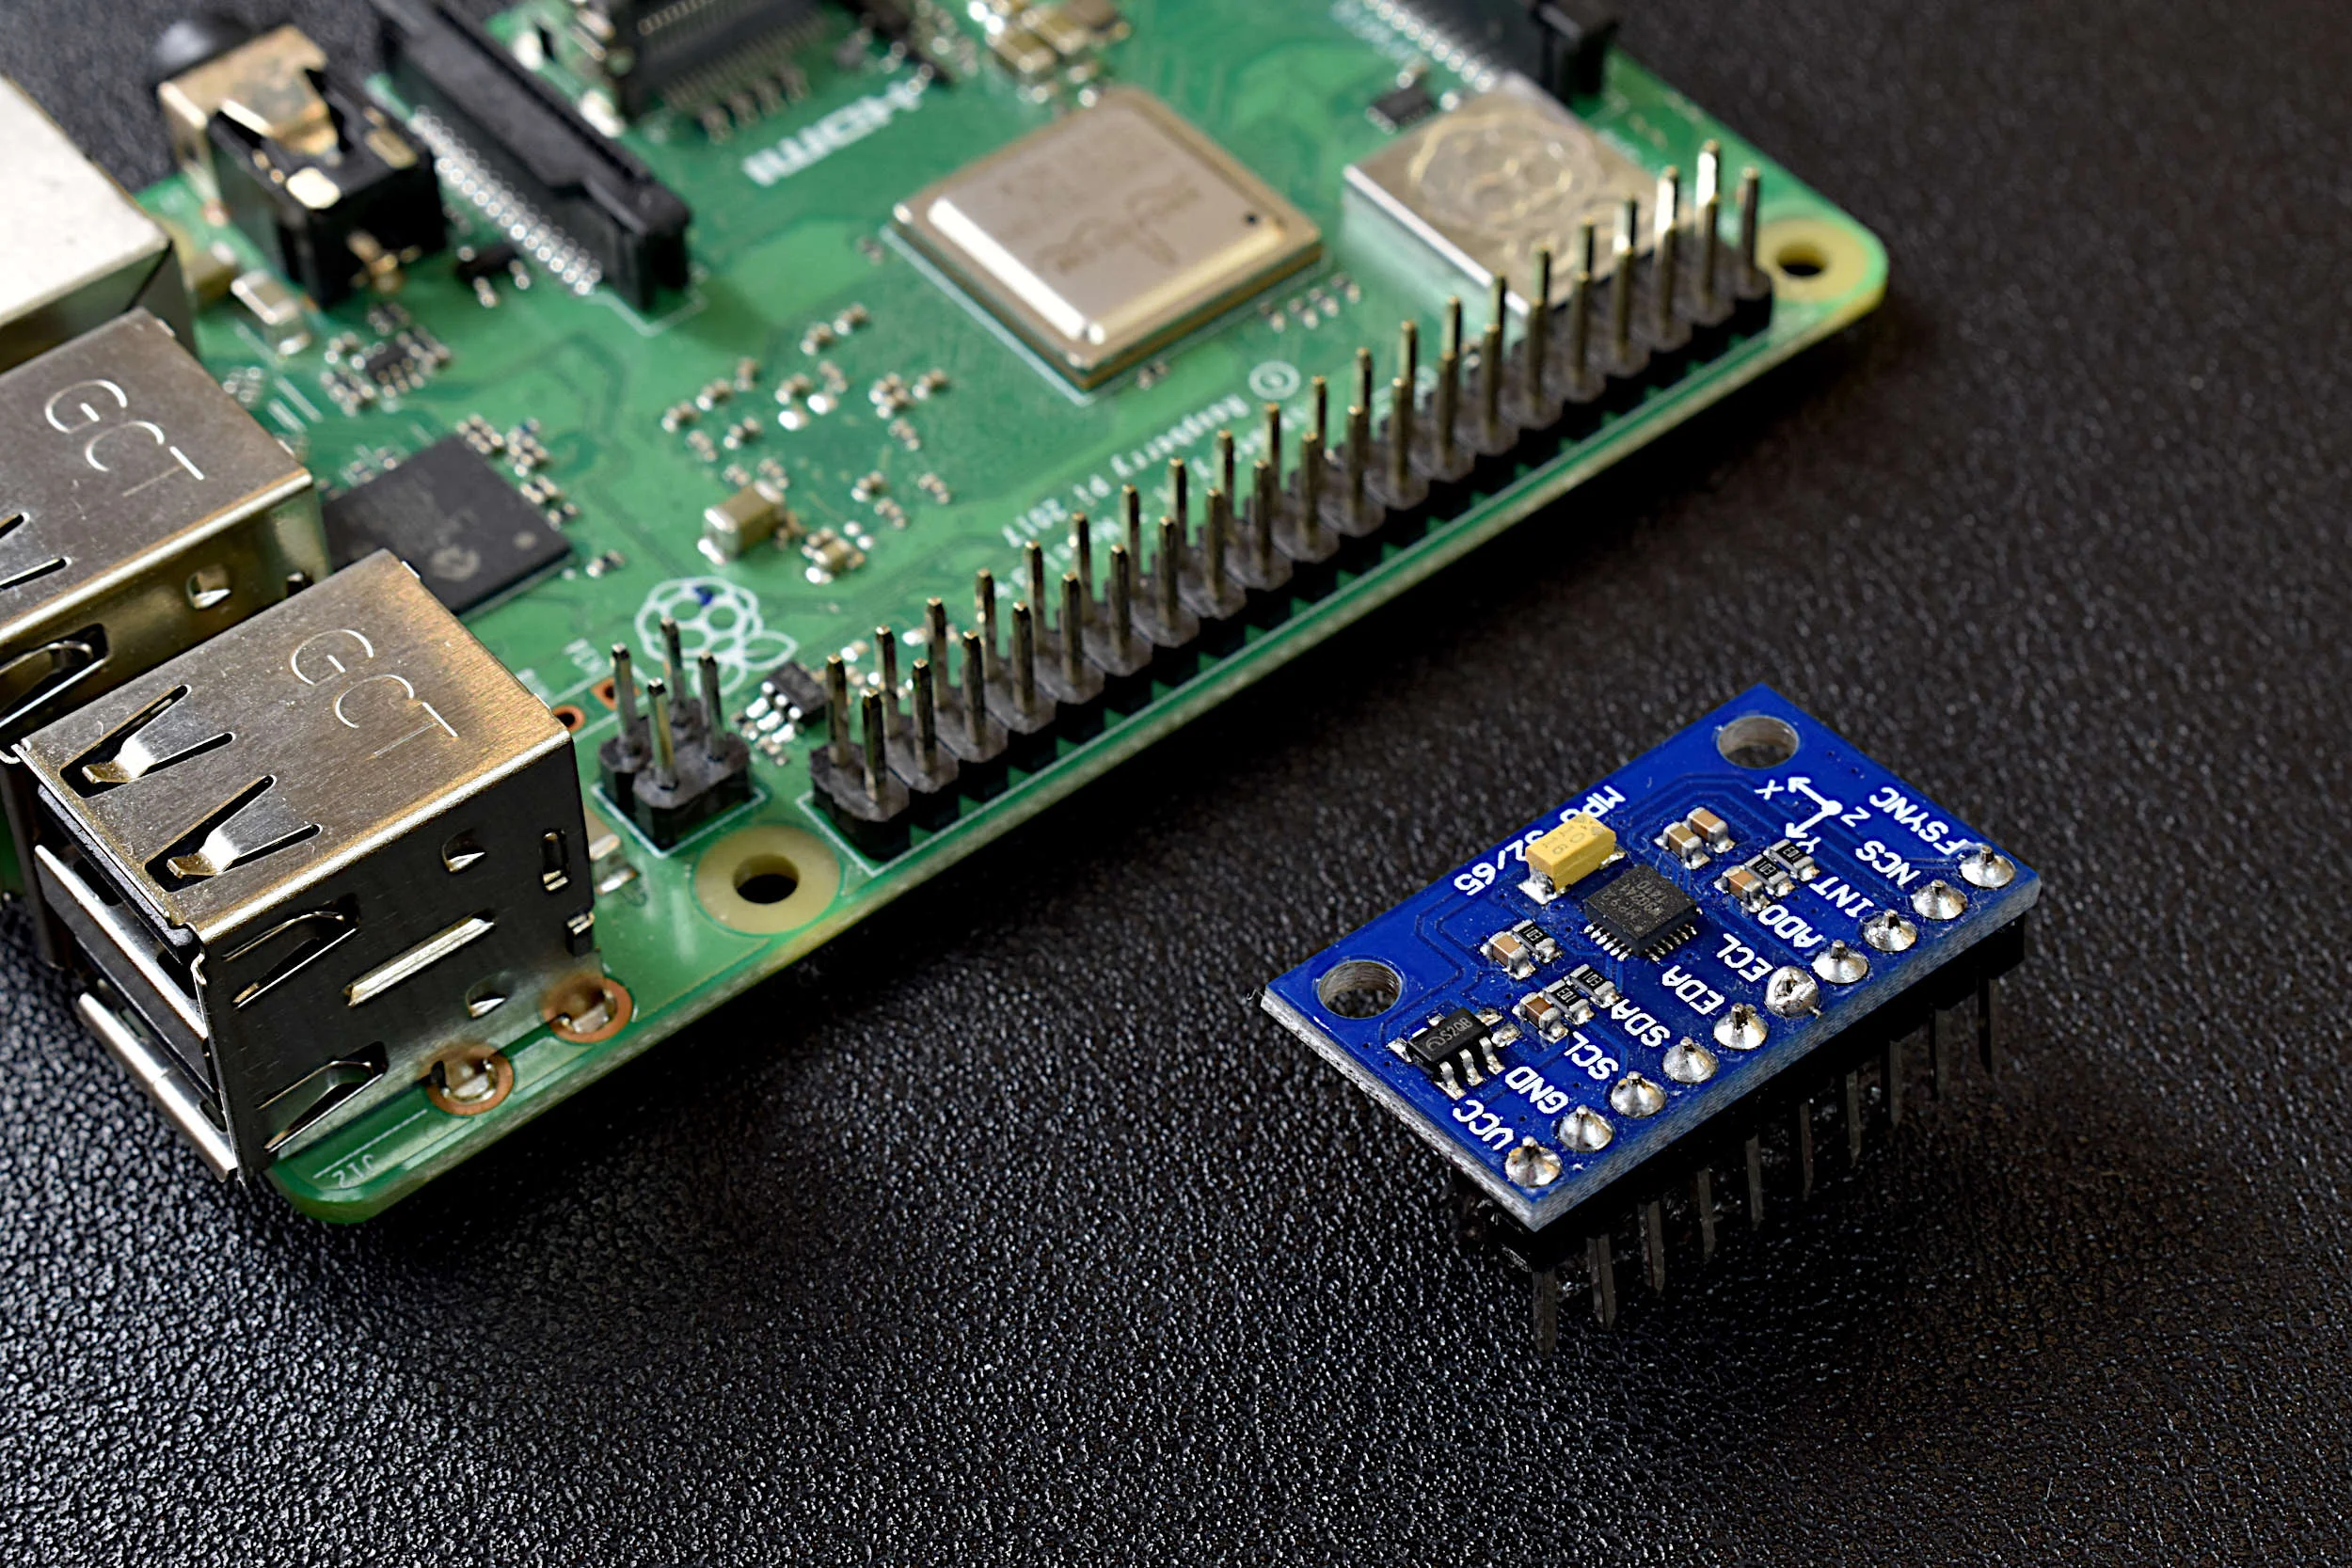
Calibration of an Inertial Measurement Unit (IMU) with Raspberry Pi - Part I
Inertial measurement units (IMUs) can consist of a single sensor or collection of sensors that capture data meant to measure inertial movements in a given reference frame. Acceleration, speed of rotation, and magnetic field strength are examples of sensors contained in an IMU. IMUs can be found in applications ranging smart devices, medical rehabilitation, general robotics, manufacturing control, aviation and navigation, sports learning, and augmented and virtual reality systems. Inertial measurement units have become increasingly popular as their form factors shrink and computational power increases. The ability to use IMUs for indoor/outdoor tracking, motion detection, force estimation, orientation detection, among others has caused the use and availability of inertial sensors to become nearly widespread in smart phones, smart watches, drones, and other common electronic devices. The internet is full of projects involving accelerometers, gyroscopes, and magnetometers, but few cover the full calibration of all three sensors. In this project, the manual calibration of a nine degree-of-freedom (9-DoF) IMU is explored. A common MPU9250 IMU is attached to a cube to manually find the calibration coefficients of the three sensors contained within the IMU: accelerometer, gyroscope, and magnetometer. The IMU is wired to a Raspberry Pi - which will allow for high-speed data acquisition rates of all nine components of the IMU.
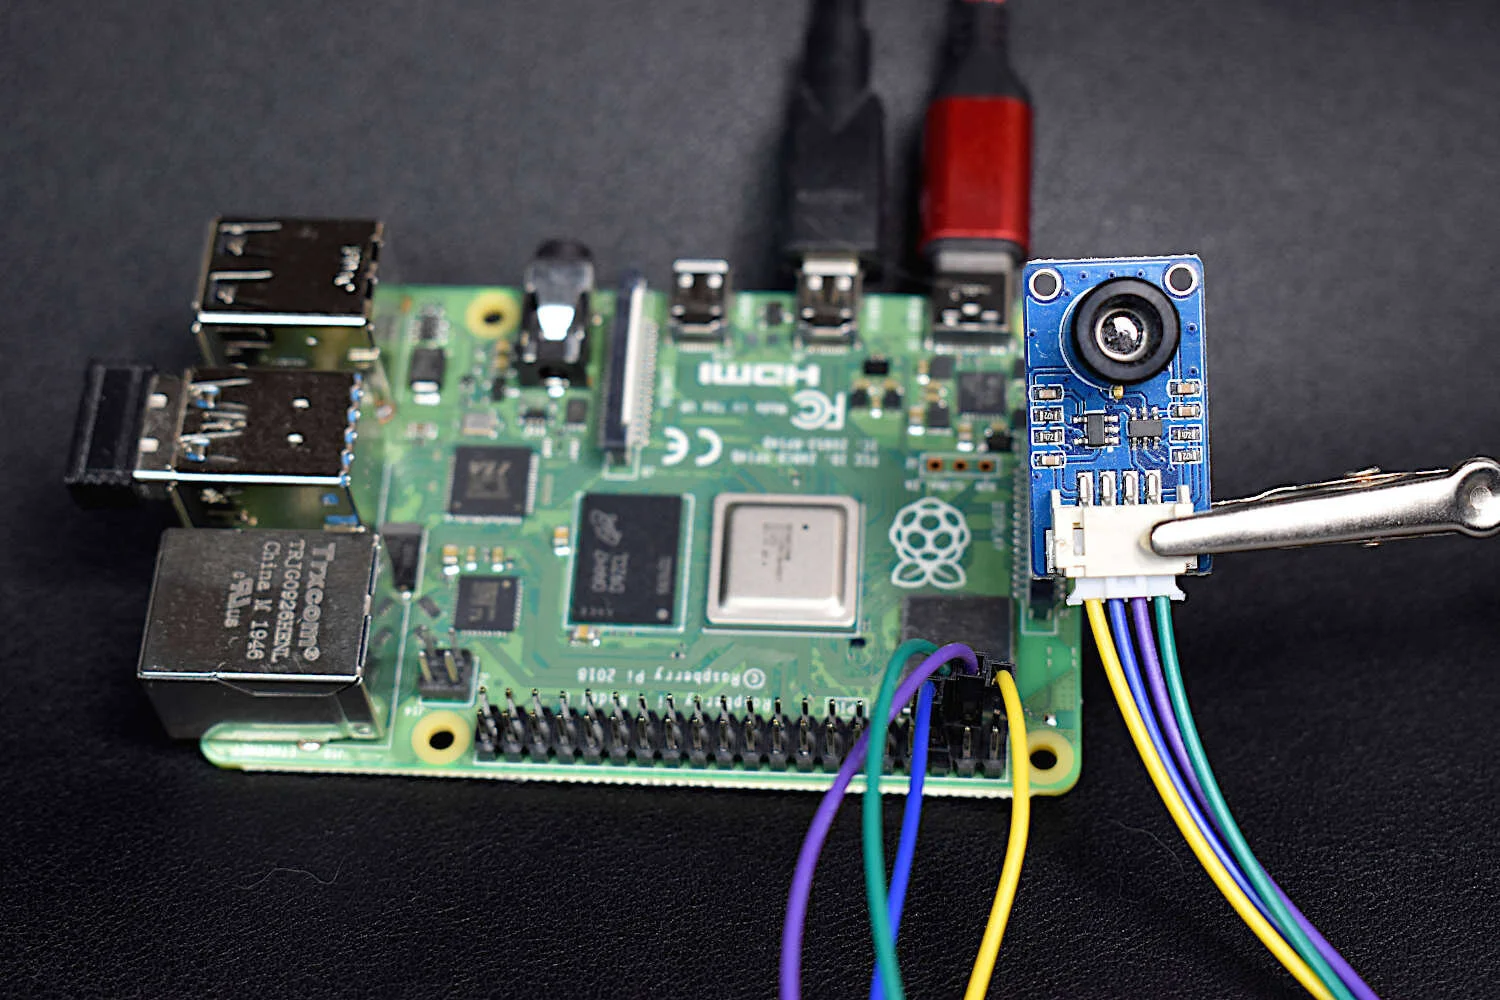
High Resolution Thermal Camera with Raspberry Pi and MLX90640
Thermal cameras are similar to standard cameras in that they use light to record images. The most significant distinction is that thermal cameras detect and filter light such that only the infrared region of the electromagnetic spectrum is recorded, not the visible region [read more about infrared cameras here]. Shortly after the discovery of the relationship between radiation and the heat given off by black bodies, infrared detectors were patented as a way to predict temperature via non-contact instrumentation. In recent decades, as integrated circuits shrink in size, infrared detectors have become commonplace in applications of non-destructive testing, medical device technology, and motion detection of heated bodies. The sensor used here is the MLX90640 [datasheet], which is a 768 pixel (24x32) thermal camera. It uses an array of infrared detectors (and likely filters) to detect the radiation given off by objects. Along with a Raspberry Pi computer, the MLX90640 will be used to map and record fairly high-resolution temeperature maps. Using Python, we will be able to push the RPI to its limits by interpolating the MLX90640 to create a 3 frame-per-second (fps) thermal camera at 240x320 pixel resolution.
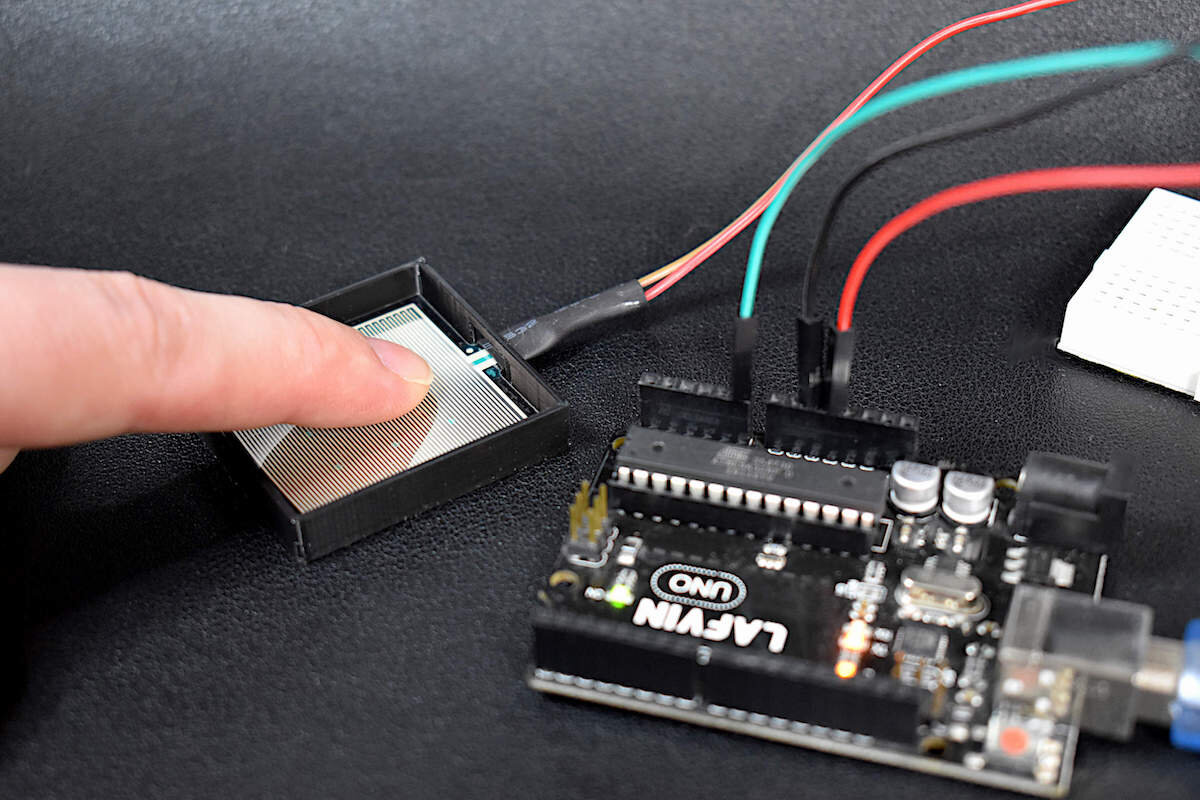
Force Sensitive Resistors (FSRs) with Arduino
A force sensitive resistor (FSR) is comprised of a conductive polymer material pressed between two electrode layers, giving it the ability to electrically respond to changes in stress and strain. FSRs are often used in ergonomic or rehabilitation applications where pressure is applied from human interaction and the response is recorded or translated. Force sensitive resistors are incredibly useful for human interactivity because of their slim profile, inexpensive construction, and multiplicative geometries. The sensor used in this tutorial is the RP-S40-ST, which is a 40mm x 40mm thin film FSR. An Arduino board will be used to read the analog signals outputted by the FSR in a voltage divider configuration, where the force applied to the FSR can be approximated using the sensor’s calibration curve.

DIY Arduino Board
A DIY Arduino board is presented here, with most of the capabilities of the classic Arduino Uno board, but with a slimmer profile and more flexibility in hardware. The advantage to using the DIY Arduino board is its ability to change the input voltage (2.7V - 5.5V), the crystal oscillator (0-16MHz), and the use of LEDs and regulators when needed. The DIY board is capable of very lower power modes, without the requirement of draining components such as LEDs or regulators. The ATmega328P chip is at the center of every Uno board (in recent years), and is also at the center of the DIY board, which allows the DIY Arduino to behave almost identically to the Uno board.
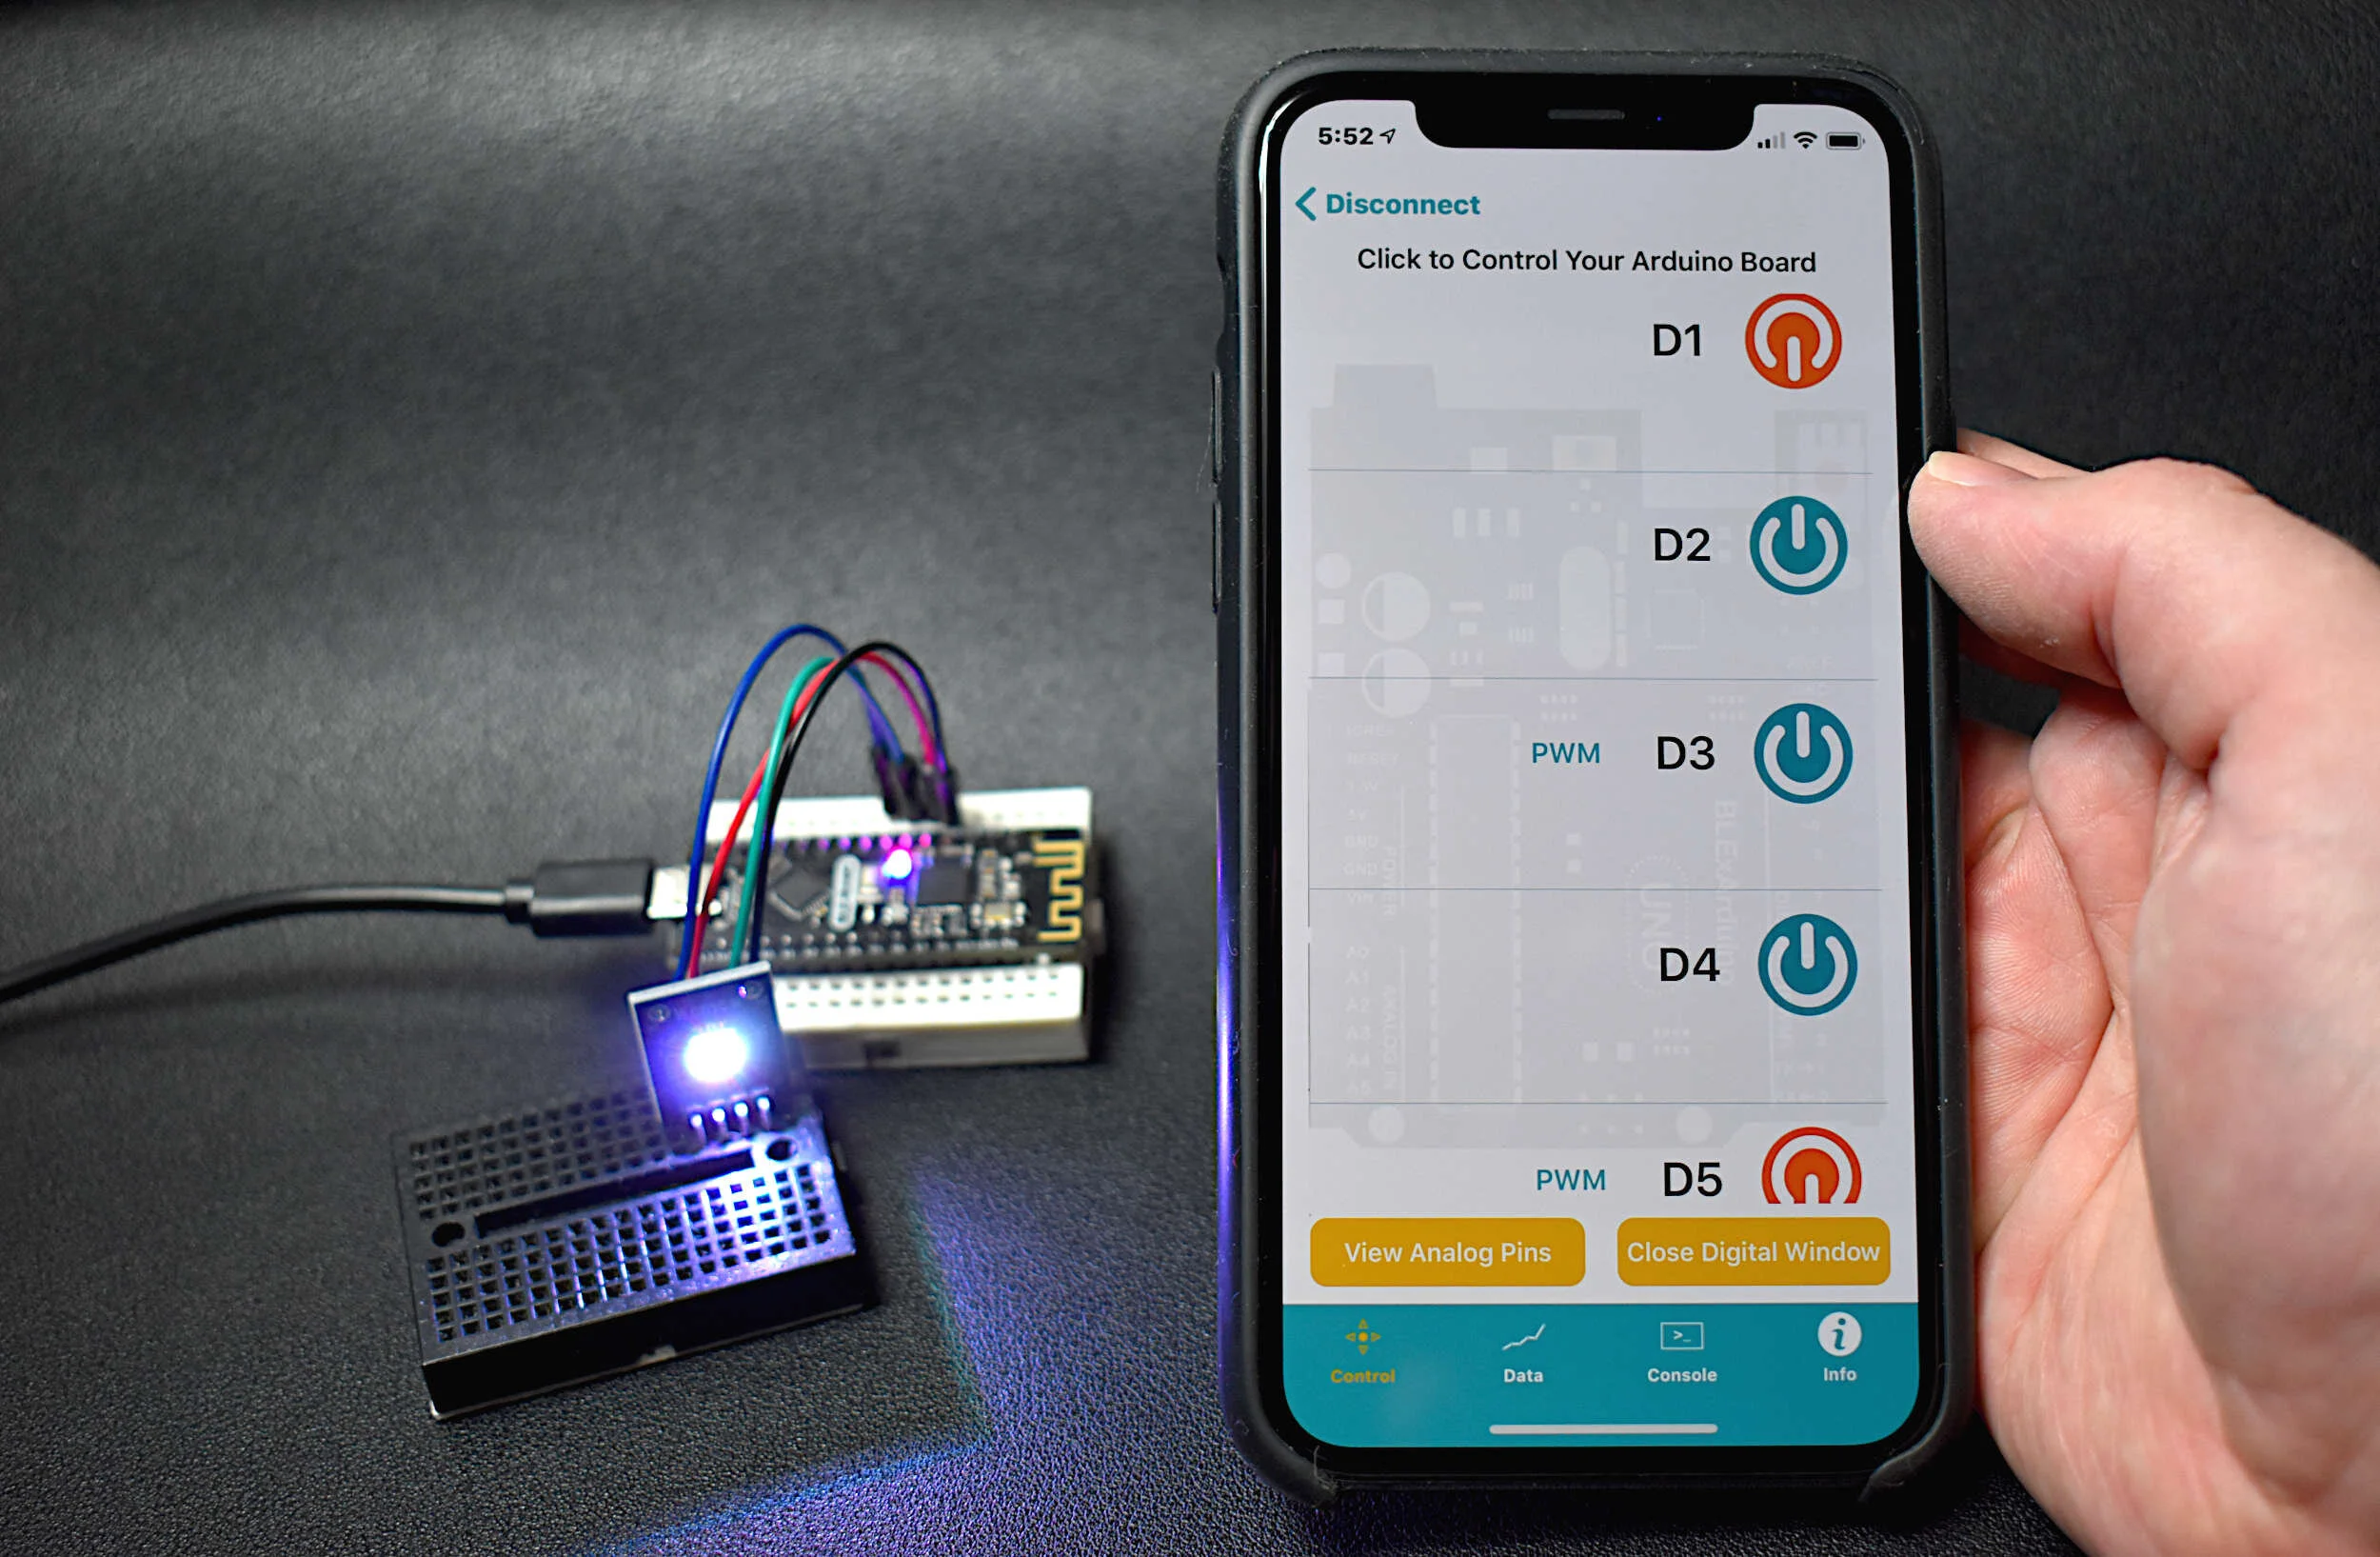
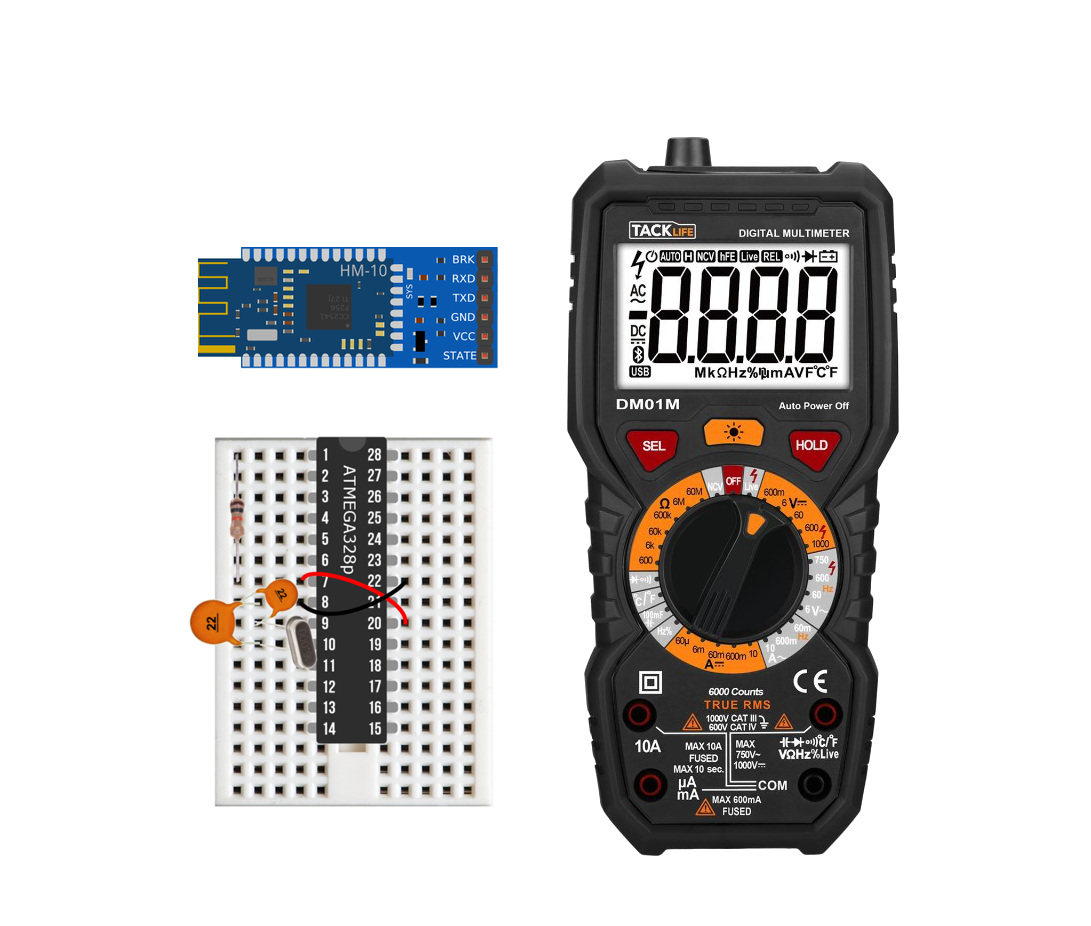
BLE Nano Arduino Board - Bluetooth Control with an iPhone (BLExAR App)
The BLE Nano is introduced as a hybrid between an Arduino Nano and a CC2540 Bluetooth Low Energy (BLE) module. The Arduino Nano has an ATmega328P as its main microprocessor, which communicates over the serial port to send and receive Bluetooth packets from the CC2540 BLE chip. This creates a Bluetooth-enabled Arduino device - encased in a Nano-sized circuit board! Using the BLExAR iOS app, the BLE-Nano will be controlled using an iPhone. BLExAR allows users to control the pins on the Nano, which will be demonstrated by switching an RGB LED on and off.
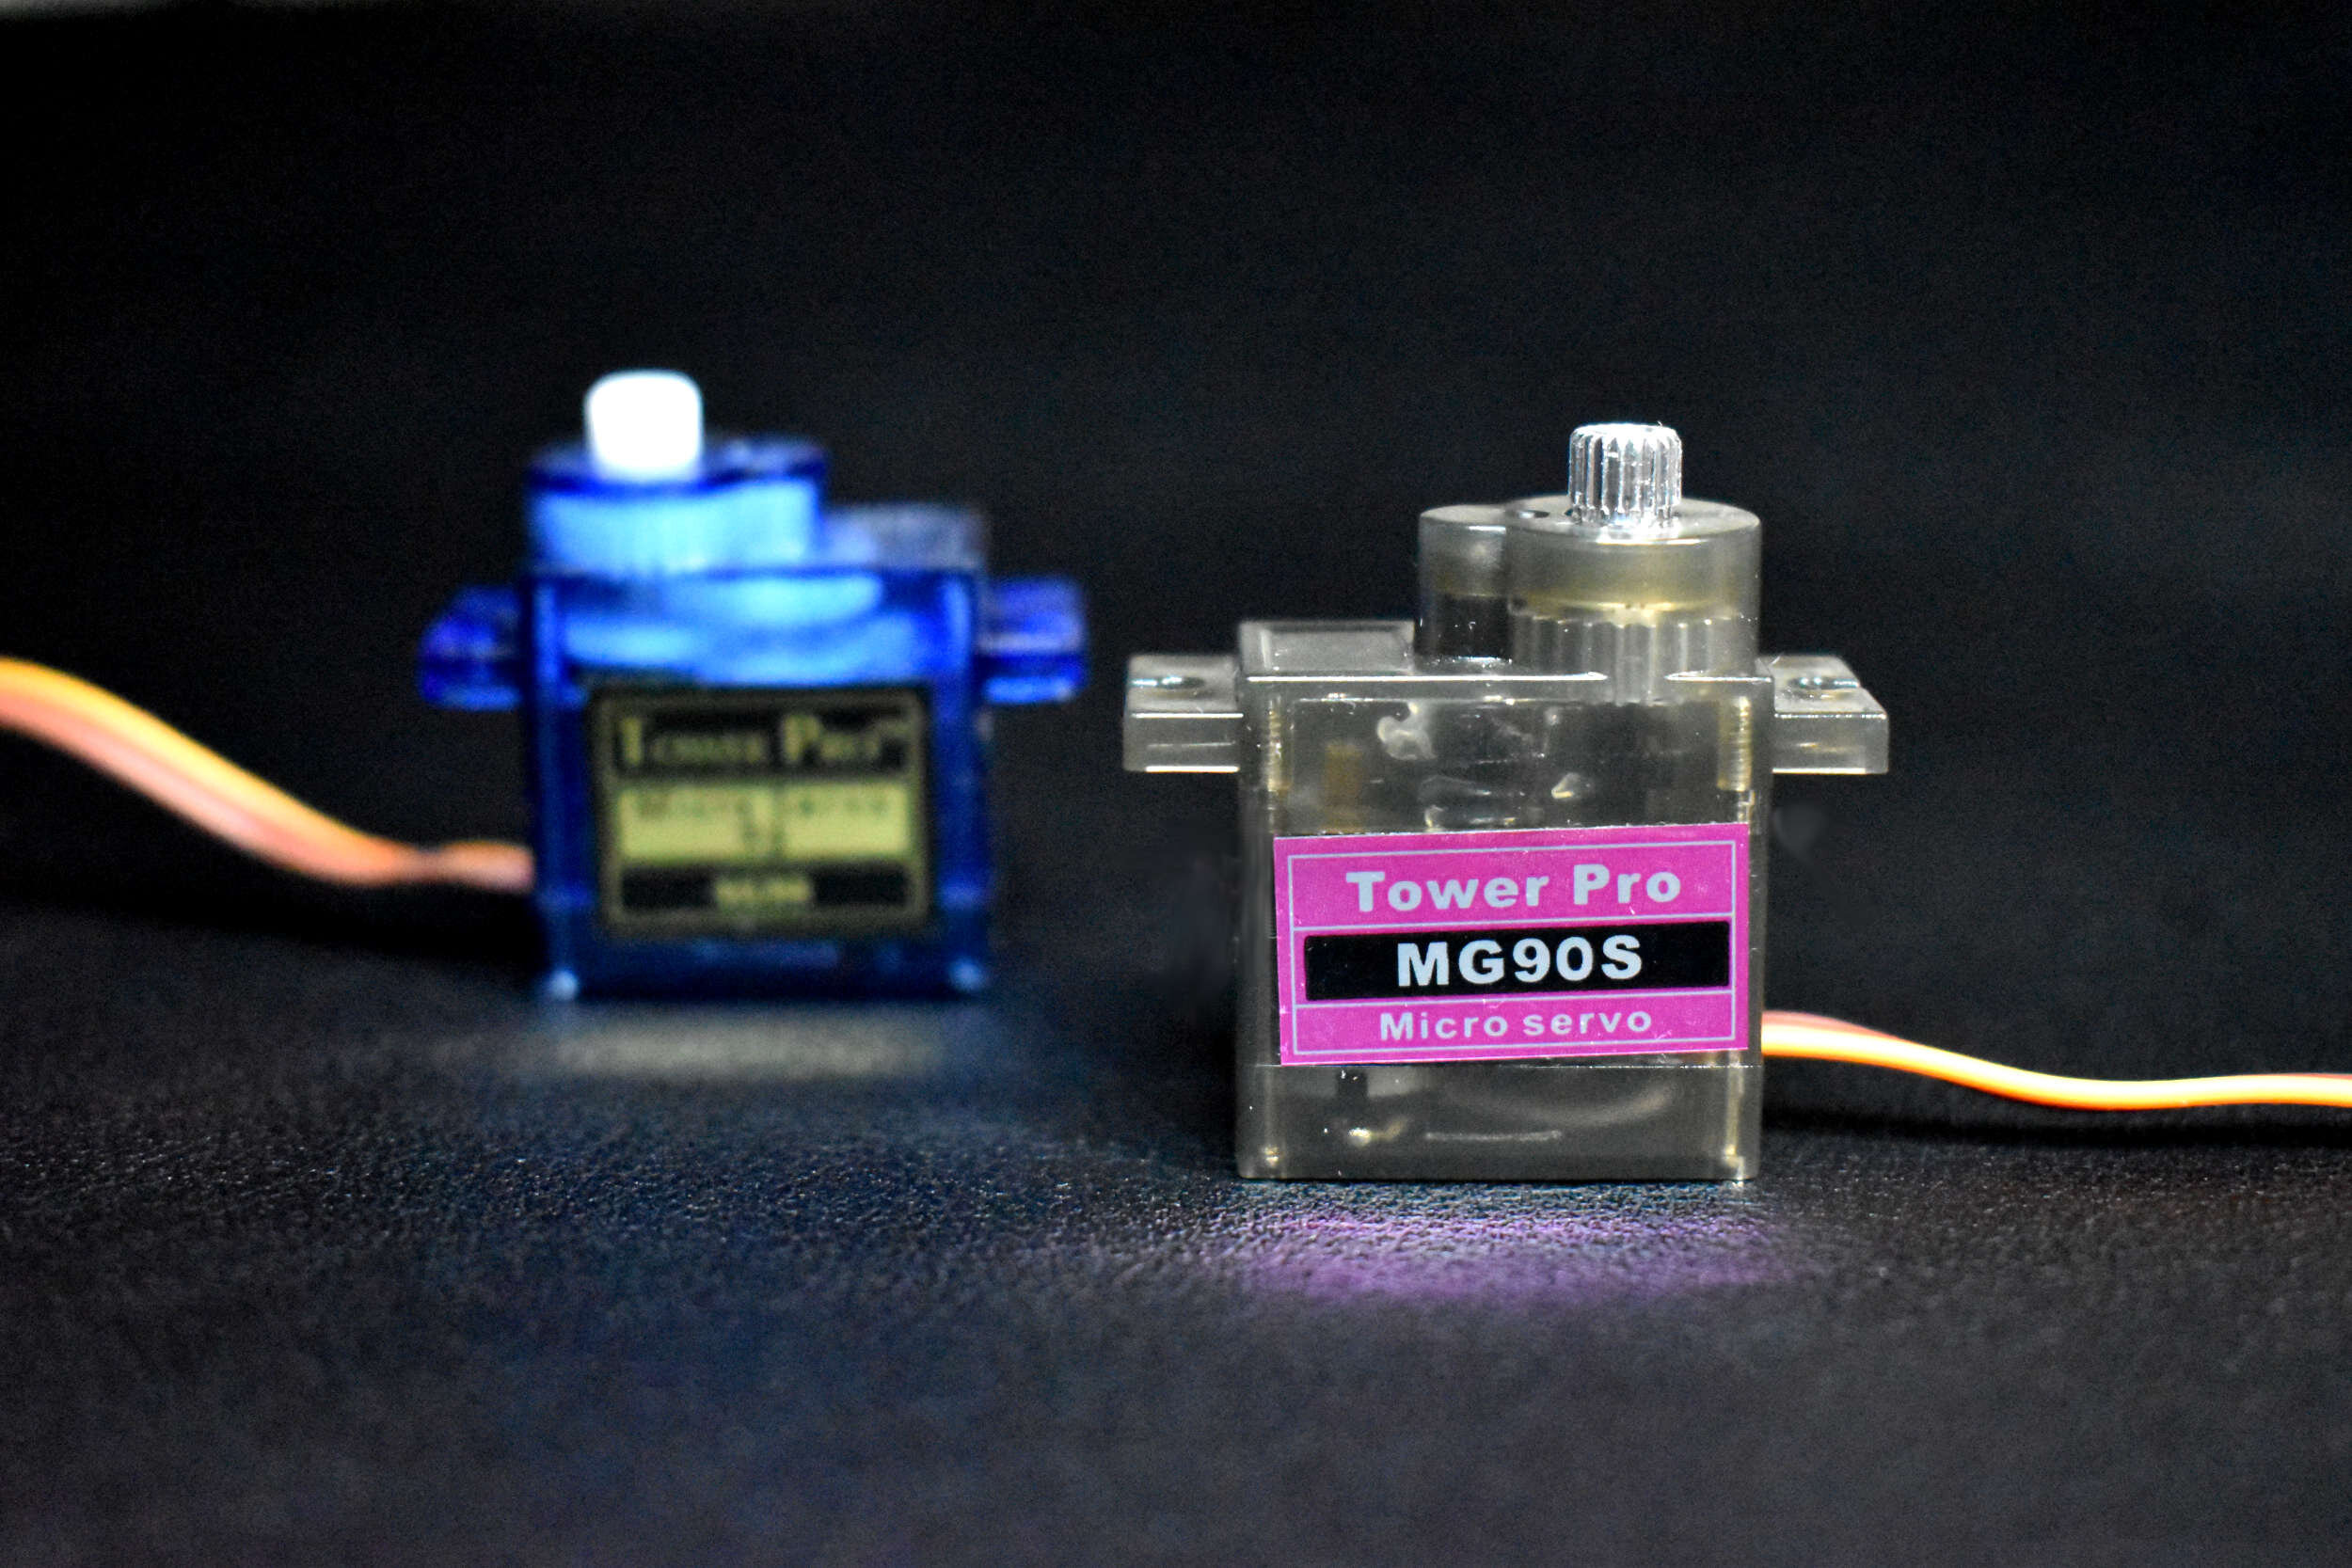
Arduino Servo Motor Basics and Control
In this tutorial, an Arduino board will be used to power and control a small servo motor. The basics and composition of an SG90 will be explored, and the application of several servo codes and applications will be given for another type of servo motor, the MG90S. The goal of this project is to introduce users into the workings of a servo motor, how PWM (pulse-width modulation) controls a servo motor, and how Arduino can interface with servo motors to produce desired movements to great precision.
Accelerometer, Gyroscope, and Magnetometer Analysis with Raspberry Pi Part I: Basic Readings
A Raspberry Pi will be used to read the MPU9250 3-axis acceleration, 3-axis angular rotation speed, and 3-axis magnetic flux (MPU9250 product page can be found here). The output and limitations of the MPU9250 will be explored, which will help define the limitations of applications for each sensor. This is only the first entry into the MPU9250 IMU series, where in the breadth of the articles we will apply advanced techniques in Python to analyze each of the 9-axes of the IMU and develop real-world applications for the sensor, which may be useful to engineers interested in vibration analysis, navigation, vehicle control, and many other areas.

Arduino SD Card Module Data Logger
This tutorial will explore the range of capabilities available to the Arduino SD library by using a real-world example of data logging. The SD library allows users to read/write, list files, create/remove files, and make/delete directories. Additionally, we will develop an algorithm that creates a new file every time the Arduino board is restarted, which will prevent overwriting of existing data records. The resulting data file will be in comma separated format and contain multiple data points, including a time stamp in milliseconds since the program started. Therefore, it is important to record the program start time. For very accurate time monitoring tasks, a real-time clock is recommended, however, for the experiments conducted here, relative time suffices.
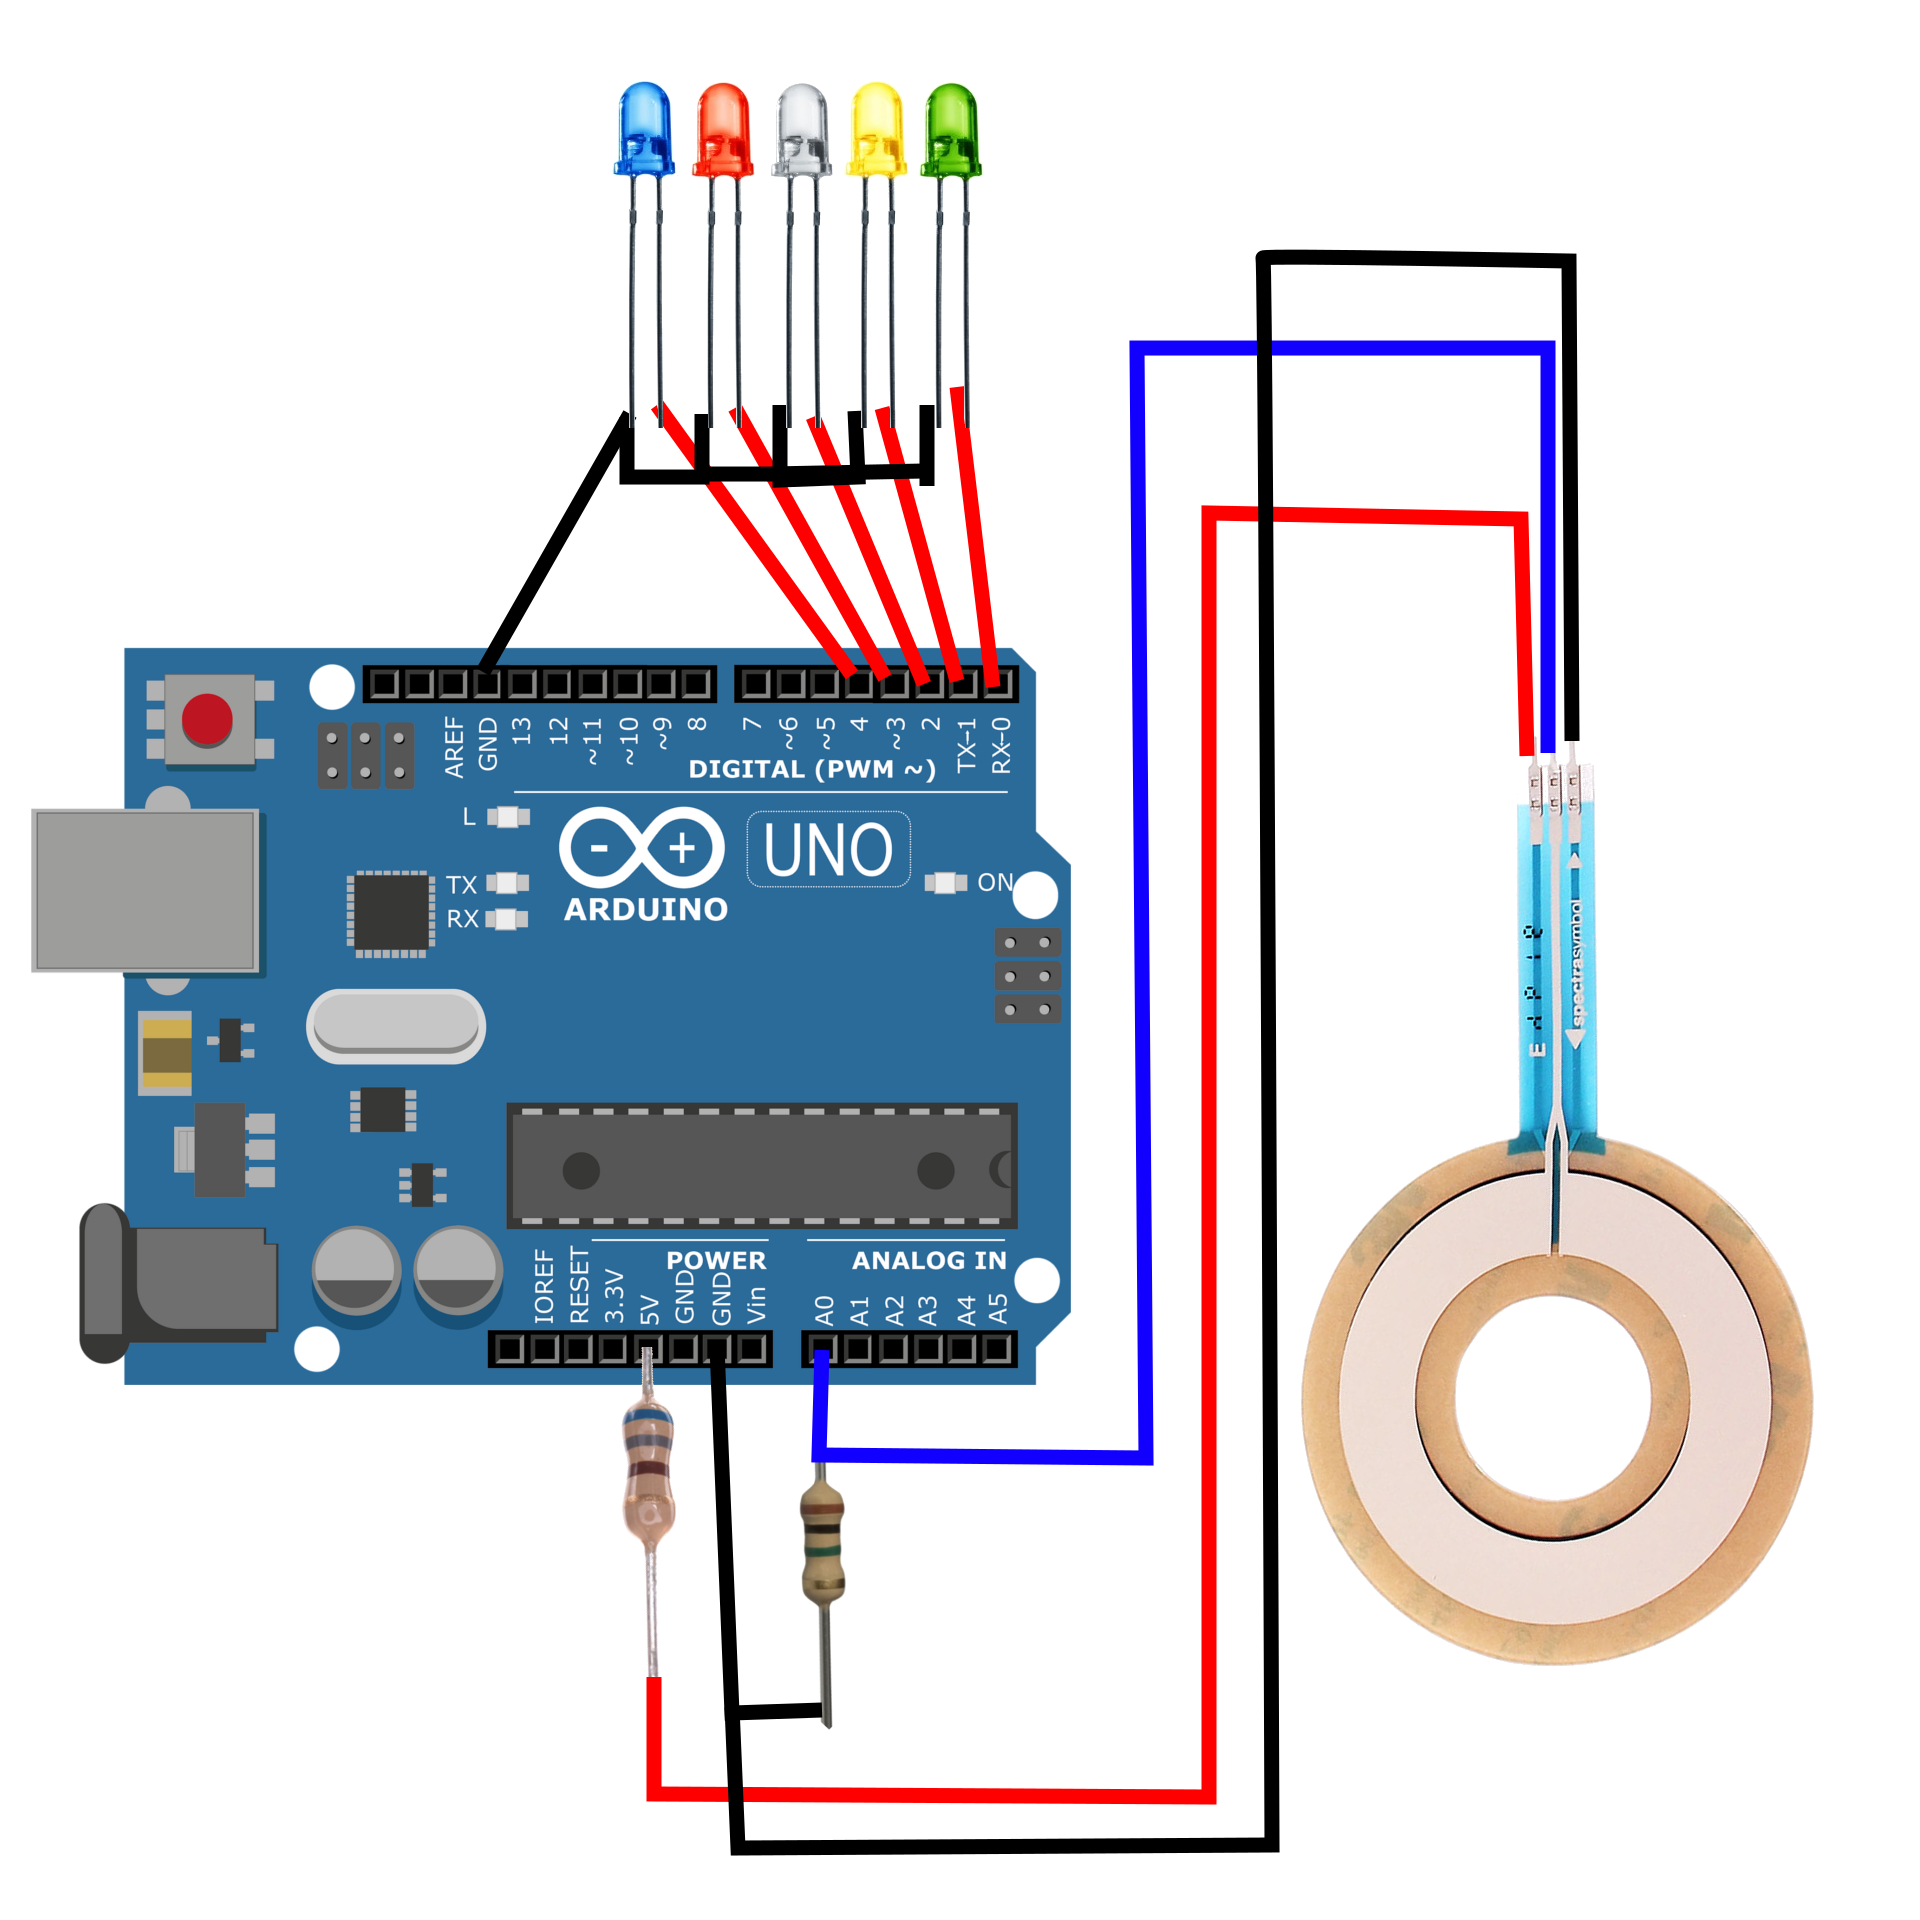
Arduino SoftPot LED Meter (Membrane Potentiometer)
How to use a soft, circular-membrane potentiometer with an Arduino board. Potentiometers function by altering the voltage of a system by mechanically changing the resistance associated with a voltage divider. In a traditional potentiometer (think of turning a volume knob), we are physically changing the voltage of a system. In the case of a soft potentiometer (where the name SoftPot comes from), we are altering the resistance of the voltage divider by physically depressing the potentiometer, thereby changing the resistance at a contact point. The working principle is exactly the same, but in the SoftPot’s case, we are pressing, and for a knob we are rotating.