Audio Processing with The QuadMic 4-Microphone Array on the Raspberry Pi

“As an Amazon Associates Program member, clicking on links may result in Maker Portal receiving a small commission that helps support future projects.”
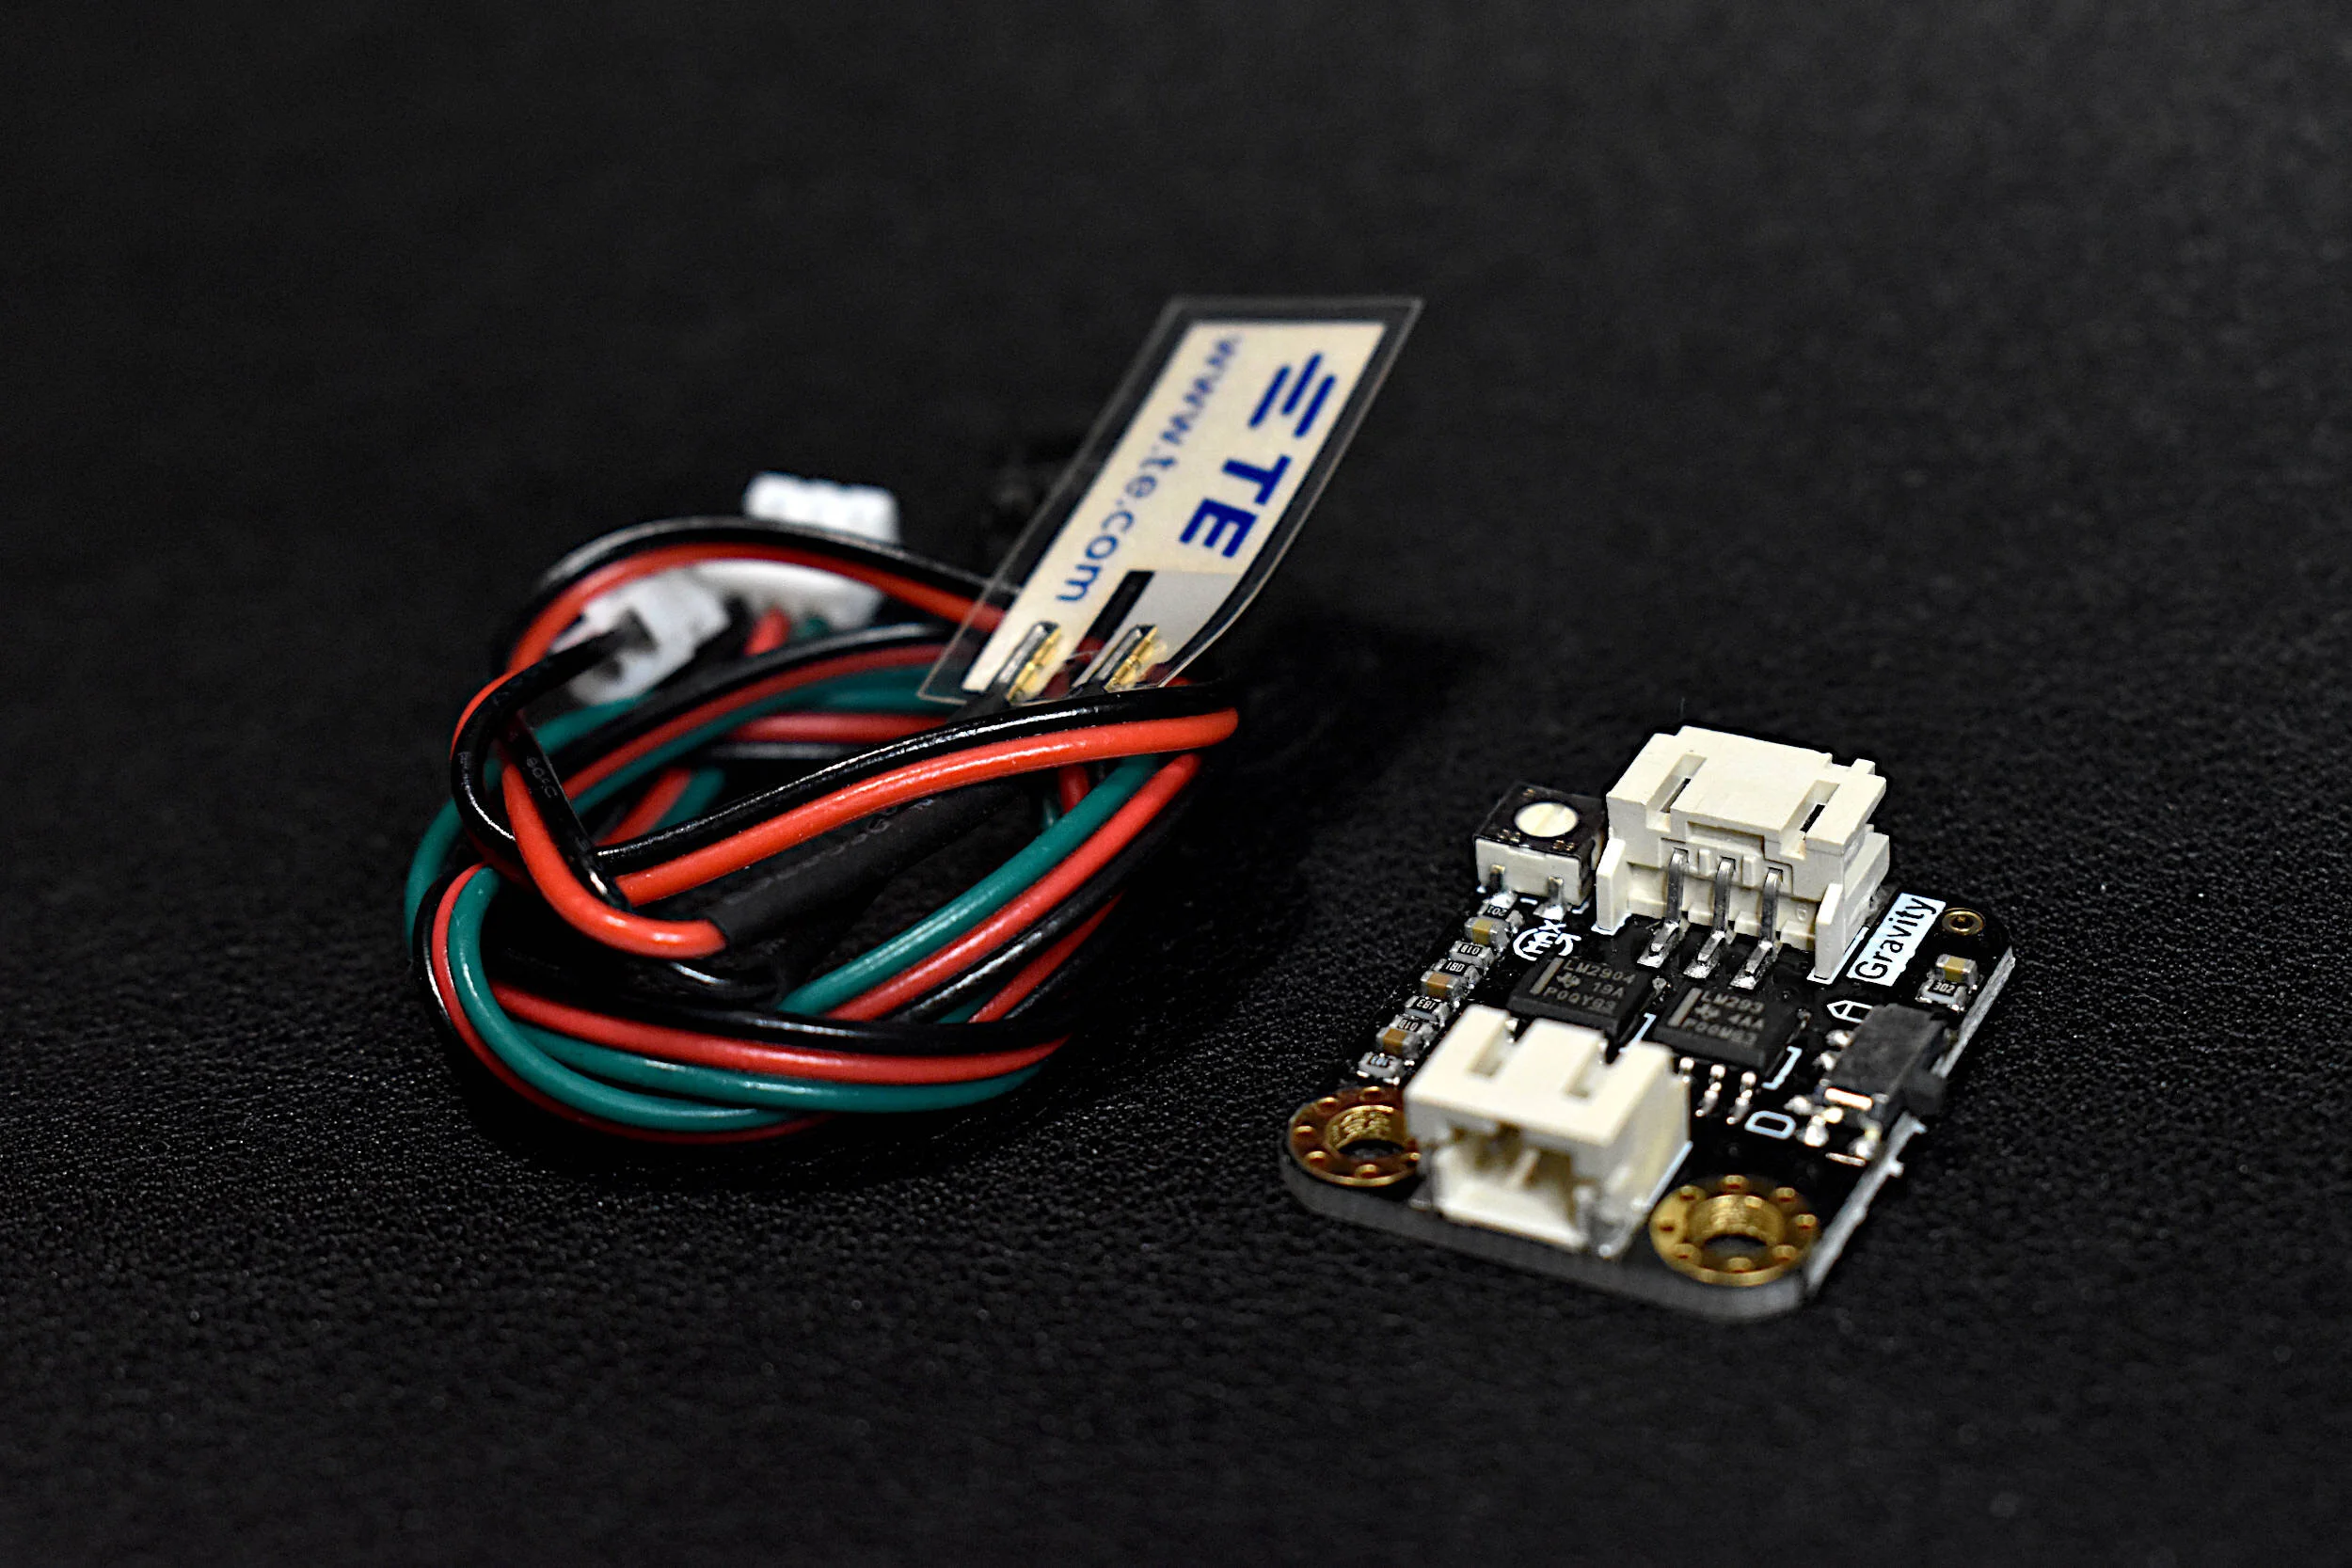
The QuadMic Array is a 4-microphone array based around the AC108 quad-channel analog-to-digital converter (ADC) with Inter-IC Sound (I2S) audio output capable of interfacing with the Raspberry Pi. The QuadMic can be used for applications in voice detection and recognition, acoustic localization, noise control, and other applications in audio and acoustic analysis. The QuadMic will be connected to the header of a Raspberry Pi 4 and used to record simultaneous audio data from all four microphones. Some signal processing routines will be developed as part of an acoustic analysis with the four microphones. Algorithms will be introduced that approximate acoustic source directivity, which can help with understanding and characterizing noise sources, room and spatial geometries, and other aspects of acoustic systems. Python is also used for the analysis. Additionally, visualizations will aid in the understanding of the measurements and subsequent analyses conducts in this tutorial.
The QuadMic and Raspberry Pi computer are sed for the analysis, along with an audio frequency generator developed for smartphones. The Raspberry Pi 4 is used to take advantage of the faster processor (1.5GHz Quad-Core Cortex-A72 (ARM v8) 64-bit SoC - Broadcom BCM2711). The parts used specifically for the tutorial are given below with links:
QuadMic Array - $25 [Our Store]
Raspberry Pi 4 Model B - $48.99 (1GB), $49.99 (2GB), $63.41 (4GB), $88.50 (8GB) [Amazon], $55.00 [2GB from Our Store]
Frequency Generator App - iOS App Store, Google Play Store
The QuadMic occupies the entire Raspberry Pi header, thus, there is no room for other devices to be connected to the RPi. Additionally, it is important to state that the QuadMic must be wired to all 40 pins and aligned correctly. Misaligning the QuadMic with the RPi’s 40-pin header can result in damage of either or both the QuadMic or/and Raspberry Pi.

The QuadMic Array is a 4-microphone array based around the AC108 quad-channel analog-to-digital converter (ADC) with Inter-IC Sound (I2S) audio output capable of interfacing with the Raspberry Pi. The QuadMic can be used for applications in voice detection and recognition, acoustic localization, noise control, and other applications in audio and acoustic analysis. The QuadMic can be connected to the header of a Raspberry Pi computer and used to record simultaneous audio data from all four of its microphones. Some applications of the QuadMic are: characterizing noise sources, room and spatial geometries, and other aspects of acoustic systems.
Included in the QuadMic 4-Microphone Array Package:
1x QuadMic 4-Microphone Array
Features of the QuadMic 4-Microphone Array:
Four SPU0414HR5H MEMS Microphones
100Hz - 10kHZ Flat (4dB) Frequency Response
16kHz Sample Rate for Each Microphone
I2S Audio Protocol
I2C Output Connector
GPIO 12/13 Available via Output Connector
12 Addressable RGB LEDs via SPI
Compatible with Raspberry Pi
Electronic Wiring Diagram can be found here
Read about the AC108 Analog-to-Digital Converter here
NOTE: The QuadMic should be attached to the Raspberry Pi -ONLY- when the RPi is powered off

The QuadMic installation procedure closely follows the one outlined in the Seeed Studio documentation for the “ReSpeaker 4-Mic Array for Raspberry Pi.” And while our tutorial uses the QuadMic instead of the ReSpeaker, both use the AC108 I2S analog-to-digital converter and have nearly identical form factor. Thus, a lot of the use cases are similar, particularly in the library preparation on the Raspberry Pi. Python will exclusively used for the analysis here, whereas the Seeed Studio documentation uses some proprietary software.
First, update and upgrade any Raspberry Pi packages by typing the following into the terminal command line:
pi@raspberrypi:~ $ sudo apt-get update
pi@raspberrypi:~ $ sudo apt-get upgrade
Next, the audio card emulation for the QuadMic needs to be installed by cloning into the Seeed voice card repository for the ReSpeaker:
pi@raspberrypi:~ $ git clone https://github.com/respeaker/seeed-voicecard.git
pi@raspberrypi:~ $ cd seeed-voicecard
pi@raspberrypi:~ $ sudo ./install.sh
The installation will likely 1-2 minutes on the Raspberry Pi 4 (possibly longer on previous models). If any errors arise, make sure to update and upgrade, reboot, and make sure the RPi is connected to the internet - then try again. Finally, reboot the RPi:
pi@raspberrypi:~ $ sudo reboot
Before verifying the QuadMic on the RPi, we need to install the Python pyaudio libraries:
pi@raspberrypi:~ $ sudo apt-get install libportaudio0 libportaudio2 libportaudiocpp0 portaudio19-dev
pi@raspberrypi:~ $ sudo pip3 install pyaudio
Now, the QuadMic can be verified by opening Python and using the ‘pyaudio’ package to list all available audio devices and their properties. The code below uses pyaudio to do this and tells the user whether a QuadMic is detected or not:
##############################################
# QuadMic Device Finder
##############################################
#
import pyaudio
audio = pyaudio.PyAudio() # start pyaudio device
for indx in range(audio.get_device_count()):
    dev = audio.get_device_info_by_index(indx) # get device
    if dev['maxInputChannels']==4 and \
       len([ii for ii in dev['name'].split('-') if ii=='4mic'])>=1:
        print('-'*30)
        print('Found QuadMic!')
        print('Device Index: {}'.format(indx)) # device index
        print('Device Name: {}'.format(dev['name'])) # device name
        print('Device Input Channels: {}'.format(dev['maxInputChannels'])) # channels
Assuming the Seeed voice card library was installed correctly, the above should output the following to the Python shell:

QuadMic Device Output After Seeed Voice Card Installation
The QuadMic device finder routine above will be used to specify the index to be read by the audio streaming function in pyaudio. If the above code snippet doesn’t print out information about a device - then it is likely that one or multiple issues are a result:
The Raspberry Pi needs to be restarted
The Seeed voice card was not properly installed
The QuadMic is improperly wired/aligned to the Raspberry Pi
The QuadMic is damaged
The Raspberry Pi Version and/or operating system is not compatible with the Seeed voice card
Under the assumption that the QuadMic has been found by pyaudio on the Raspberry Pi, the next section will test the four microphones and introduce methods for verifying the functionality of each.
The QuadMic can be tested by taking sample measurements while tapping each microphone. This will allow the user to ensure that each microphone is correlated correctly with the respective measurement and parsing of each data vector. The code below plots all four microphone responses in real time at a sample rate of 16kHz in chunks of 4000 points. This equates to roughly 250ms recordings for all four microphones simultaneously. The code (implemented and tested in Python 3.7 on a Raspberry Pi 4) is given below:
##############################################
# QuadMic Test for all 4-Microphones
# ---- this code plots the time series for all
# ---- four MEMS microphones on the QuadMic
# ---- attached to the Raspberry Pi
#
# -- by Josh Hrisko, Principal Engineer
#       Maker Portal LLC 2021
#
import pyaudio,sys,time
import matplotlib
matplotlib.use('TkAgg')
import numpy as np
import matplotlib.pyplot as plt
#
##############################################
# Finding QuadMic Device
##############################################
#
def indx_getter():
    quadmic_indx = []
    for indx in range(audio.get_device_count()):
        dev = audio.get_device_info_by_index(indx) # get device
        if dev['maxInputChannels']==4 and \
           len([ii for ii in dev['name'].split('-') if ii=='4mic'])>=1:
            print('-'*30)
            print('Found QuadMic!')
            print('Device Index: {}'.format(indx)) # device index
            print('Device Name: {}'.format(dev['name'])) # device name
            print('Device Input Channels: {}'.format(dev['maxInputChannels'])) # channels
            quadmic_indx = int(indx)
            channels = dev['maxInputChannels']
    if quadmic_indx == []:
        print('No QuadMic Found')
        sys.exit() # exit the script if no QuadMic found
    return quadmic_indx,channels # return index, if found
#
##############################################
# pyaudio Streaming Object
##############################################
#
def audio_dev_formatter():
    stream = audio.open(format=pyaudio_format,rate=samp_rate,
                        channels=chans,input_device_index=quadmic_indx,
                        input=True,frames_per_buffer=CHUNK) # audio stream
    stream.stop_stream() # stop streaming to prevent overloa
    return stream
#
##############################################
# Grabbing Data from Buffer
##############################################
#
def data_grabber():
    stream.start_stream() # start data stream
    channel_data = [[]]*chans # data array
    [stream.read(CHUNK,exception_on_overflow=False) for ii in range(0,1)] # clears buffer
    for frame in range(0,int(np.ceil((samp_rate*record_length)/CHUNK))):
        if frame==0:
            print('Recording Started...')
        # grab data frames from buffer
        stream_data = stream.read(CHUNK,exception_on_overflow=False)
        data = np.frombuffer(stream_data,dtype=buffer_format) # grab data from buffer
        for chan in range(chans): # loop through all channels
            channel_data[chan] = np.append(channel_data[chan],
                                        data[chan::chans]) # separate channels
    print('Recording Stopped')
    return channel_data
#
##############################################
# functions for plotting data
##############################################
#
def plotter():
    ##########################################
    # ---- time series for all mics
    plt.style.use('ggplot') # plot formatting
    fig,ax = plt.subplots(figsize=(12,8)) # create figure
    ax.set_ylabel('Amplitude',fontsize=16) # amplitude label
    ax.set_ylim([-2**15,2**15]) # set 16-bit limits
    fig.canvas.draw() # draw initial plot
    ax_bgnd = fig.canvas.copy_from_bbox(ax.bbox) # get background
    lines = [] # line array for updating
    for chan in range(chans): # loop through channels
        chan_line, = ax.plot(data_chunks[chan],
                label='Microphone {0:1d}'.format(chan+1)) # initial channel plot
        lines.append(chan_line) # channel plot array
    ax.legend(loc='upper center',
              bbox_to_anchor=(0.5,-0.05),ncol=chans) # legend for mic labels
    fig.show() # show plot
    return fig,ax,ax_bgnd,lines

def plot_updater():
    ##########################################
    # ---- time series and full-period FFT
    fig.canvas.restore_region(ax_bgnd) # restore background (for speed)
    for chan in range(chans):
        lines[chan].set_ydata(data_chunks[chan]) # set channel data
        ax.draw_artist(lines[chan]) # draw line
    fig.canvas.blit(ax.bbox) # blitting (for speed)
    fig.canvas.flush_events() # required for blitting
    return lines
#
##############################################
# Main Loop
##############################################
#
if __name__=="__main__":
    #########################
    # Audio Formatting
    #########################
    #
    samp_rate      = 16000 # audio sample rate
    CHUNK          = 4000 # frames per buffer reading
    buffer_format  = np.int16 # 16-bit for buffer
    pyaudio_format = pyaudio.paInt16 # bit depth of audio encoding

    audio = pyaudio.PyAudio() # start pyaudio device
    quadmic_indx,chans = indx_getter() # get QuadMic device index and channels

    stream = audio_dev_formatter() # audio stream

    record_length = 0.1 # seconds to record
    data_chunks = data_grabber() # grab the data
    fig,ax,ax_bgnd,lines = plotter() # establish initial plot

    while True:
        data_chunks = data_grabber() # grab the data
        lines = plot_updater() # update plot with new data
The code above should output a visualization similar to the one given below, which registers the taps on each of the four microphones:

One thing to note in the tap test is the peaking of the microphone signal. The microphones peak at 2 raised to the 15th power, both negatively and positively. Anytime the microphone is peaking it can cause damage, and thus, it shouldn’t be done often. Therefore, the tap test should serve as a starting method of ensuring that the channels are being parsed correctly. Going forward, only acoustic inputs will be used to force the microphones into a response.
The QuadMic 4-microphone array was introduced for the Raspberry Pi as a way to record four microphones simultaneously. Using Python, the QuadMic was read and all four microphones were tested and identified. The parsing of the four microphones was done and a real-time plot showed that each microphone corresponded correctly to the hardware label for each MEMS mic. This tutorial was meant as an introduction and getting started routine for setting up and testing the QuadMic for audio processing and acoustic analysis with multiple microphones, using the Raspberry Pi. In the next tutorial in the QuadMic series, a real-world example will be explored where algorithms for determining direction of arrival (DoA) or acoustic localization will be introduced. The sample rate limitations and frequency response of the QuadMic will also be covered in the next tutorial for the QuadMic analyses on the RPi. Use of the onboard RGB LEDs will also be covered, where the direction of arrival can be approximated with one of the 12 LEDs - this is similar to an Amazon Alexa or Echo. The goal of this tutorial series is to introduce the QuadMic as a viable piece of hardware for advanced acoustic analysis on the Raspberry Pi. Examples include: acoustic source directivity, noise reduction, room acoustic characterization, and multi-microphone frequency analysis.

See More in Raspberry Pi and Acoustics: