Posts in Arduino
ATtiny85 Internet of Things Bluetooth Arduino Board

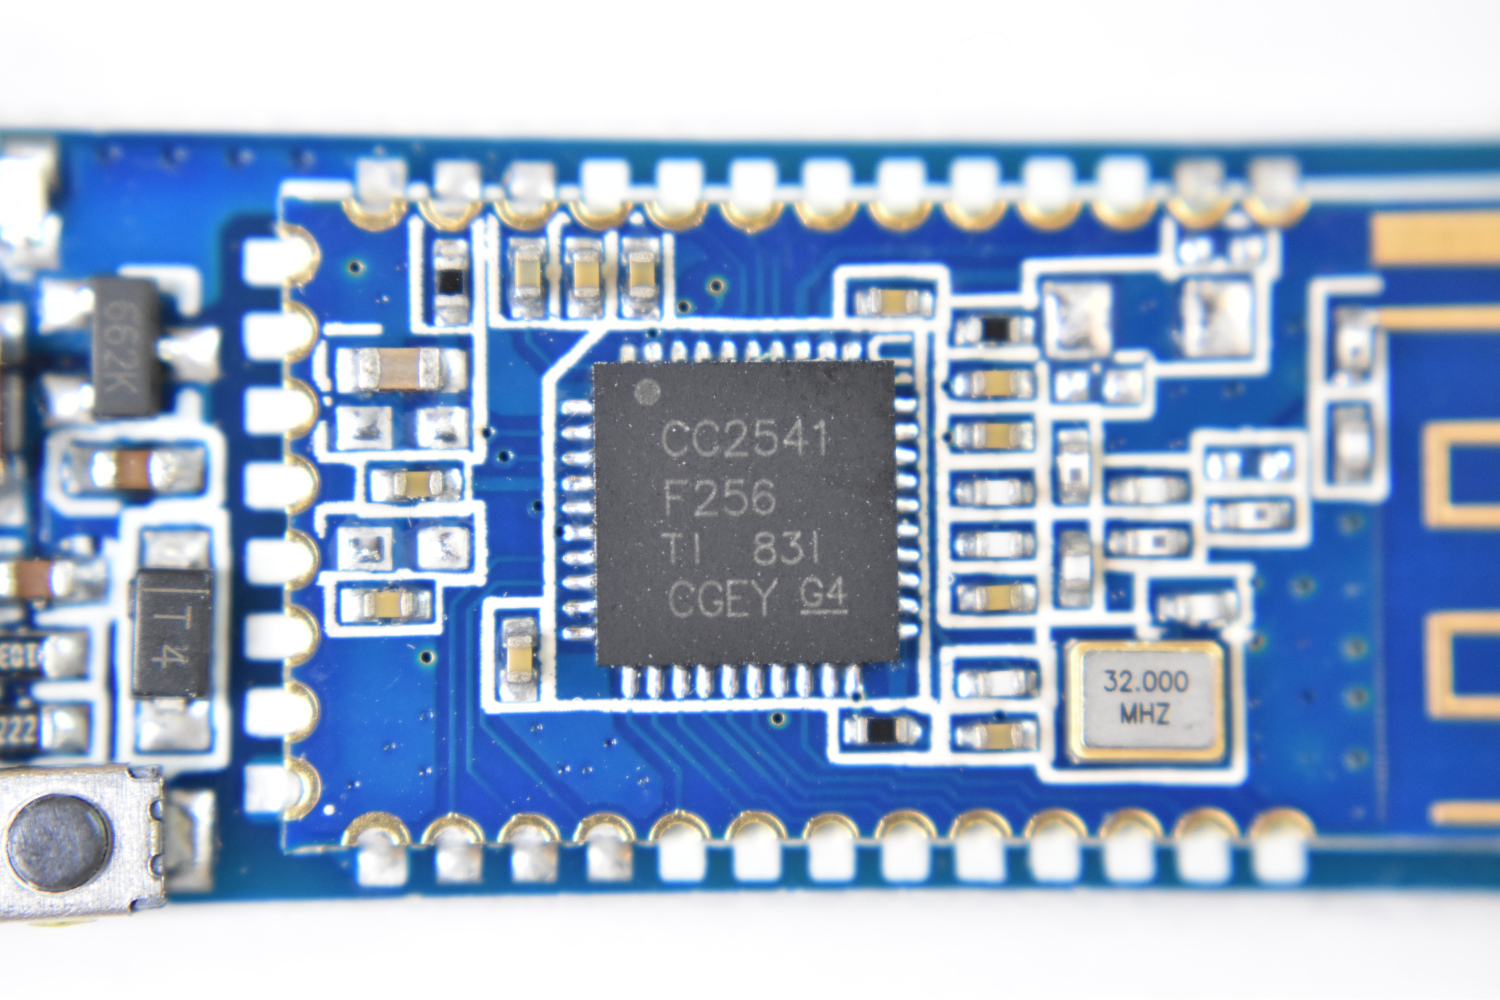
In this tutorial, the ATtiny85 is reintroduced, this time as a Bluetooth-enabled device. First, some of the basics of burning the bootloader to the ATtiny85 and using the Arduino board as an in-system programmer (ISP) are explored. Then, a CC2541 Bluetooth Low Energy (BLE) module is used to communicate with an iOS device using the BLExAR app. Lastly, temperature and humidity data is read by the ATtiny85 and transmitted via Bluetooth to the smartphone.

Read More
Bluetooth Module with Arduino (AT-09, MLT-BT05, HM-10)

In this tutorial, I will dive into the variations of CC2541 BLE board such as the AT-09, MLT-BT05, HM-10, JDY-08, etc. I will use either the specific module name or a blanketed “CC2541-based module” reference to refer to the BLE modules. The general process for interfacing with each module is nearly the same, however, some particularities define how each responds and functions depending on the given firmware. I will also be using the BLExAR app for iOS to communicate with the CC2541 modules.

Read More
Arduino LoRa Network Part I: Radio Basics and Range Tests

LoRa modules, such as the SX1276 used in this tutorial, are widely available and relatively inexpensive, all while being fully compatible with Arduino. LoRa modules are also modular in software and hardware: transmission power is configurable, the modules can be outfitted with antennae, and transmission speed and packet information size are both modifiable. In this tutorial, an Arduino board and SX1276 modules will be used to create a network of long range (LoRa) nodes designed to communicate and transport information. The use of antennae will also help broaden the range of the nodes, and tests in New York City will help quantify the efficiency and cone of functionality for such a node in a complex environment.

Read More
Arduino GPS Tracker

The NEO-6 is a miniature GPS module designed by u-blox to receive updates from up to 22 satellite on 50 different channels that use trilateration to approximate fixed position of a receiver device every second (or less, for some modules). The particular module used in this tutorial, the NEO-6M, is capable of updating its position every second and communicates with an Arduino board using UART serial communication. The NEO-6M uses the National Marine Electronics Association (NMEA) protocol which provides temporal and geolocation information such as Greenwich Mean Time (GMT), latitude, longitude, altitude, and approximate course speed. The NEO-6M and Arduino board will also be paired with an SD module to create a portable logger that acts as a retrievable GPS tracker.

Read More
MPU6050 Arduino High-Frequency Accelerometer and Gyroscope Data Saver

The MPU6050 is a 6-DoF (degree of freedom) accelerometer and gyroscope that is designed for inexpensive, small-scale, and efficient approximation of motion. Accelerometers and gyroscopes are used in smart phones for orientation detection, vibration analysis in vehicles and machines, and even camera stabilization and motion tracking. There are countless applications for accelerometers and gyroscopes, and with devices as accessible as the MPU6050, we can really test the limits of the technology.

Read More
Infrared Thermometry Theory and Applications with Arduino and Python

In this tutorial, I will explore black body radiation, infrared detectors, and the relationship between temperature and emissivity - all with the intention of exploring how infrared (IR) detectors measure temperature from a distance. Arduino will be used, along with an MLX90614 IR thermometer, and a thermocouple for true-temperature approximation of each object. Planck’s discovery of energy quanta and their relationship to thermodynamics is the basis for radiation detectors and infrared temperature sensors. We will use Planck’s law to derive a usable equation that can relate the radiation measured by an infrared sensor to the temperature of a radiative object.

Read More
MATLAB Datalogger with Arduino

In this tutorial, MATLAB is introduced as an interface for data acquisition with an Arduino board. The Arduino, in this particular case, will communicate with a Windows computer via the serial port and send data from an Arduino-compatible sensor, which will subsequently be read by MATLAB through its serial communication library. Serial communication from hardware to MATLAB is very simple and requires only a few lines of code. I will also introduce a real-time analysis and plotting routine to visualize the Arduino data as it arrives in real time. This particular method of data analysis and visualization in real time is incredibly useful for engineers interested in experimentation where microcontrollers and sensors may be used, along with complex data acquisition systems.

Read More
Arduino Heart Rate Monitor Using MAX30102 and Pulse Oximetry

Pulse oximetry monitors the oxygen saturation in blood by measuring the magnitude of reflected red and infrared light [read more about pulse oximetry here and here]. Pulse oximeteters can also approximate heart rate by analyzing the time series response of the reflected red and infrared light . The MAX30102 pulse oximeter is an Arduino-compatible and inexpensive sensor that permits calculation of heart rate using the method described above. In this tutorial, the MAX30102 sensor will be introduced along with several in-depth analyses of the red and infrared reflection data that will be used to calculate parameters such as heart rate and oxygen saturation in blood.

Read More
SAMD21 M0 Mini Arduino Board

In this tutorial, the SAMD21 M0 Mini is introduced, which is a variation of the Arduino Zero (SAMD21 48MHz). The SAMD21 board will be tested specifically in its speed and compatibility with several Arduino libraries. Particularly, the SAMD21 is the most powerful when harnessing its speed, but also in other areas such as analog to digital conversion. The SAMD21 core is a 32-bit microcontroller that will likely replace the traditional ATmega328 (8-bit microcontroller) over time. The SAMD21 core boasts 48MHz clock speeds in contrast to the 20MHz ATmega boards, while also being fully-compatible with many of the capabilities of the Arduino platform.

Read More
WeMos D1 Mini ESP8266 Arduino WiFi Board

The WeMos D1 Mini is an inexpensive ESP8266-based WiFi board that is low-profile but just as powerful as any NodeMCU or ESP8266-based microcontroller. The D1 Mini is incredibly versatile because it is inexpensive, WiFi-enabled, and fully compatible with the Arduino platform. In this tutorial, the ESP8266 library and board manager will be introduced in order to get the D1 Mini acting as an Arduino board. Then, a simple web page will be introduced with the intention of harnessing the WiFi capabilities of the module. The D1 Mini will act as a web server, allowing any WiFi-connected device to interact with the board and control its pins wirelessly.

Read More
Arduino Optical Fingerprint Sensor (AS608)

Optical fingerprint sensors take low-resolution snapshots of the tip of a finger and create arrays of identifiers that are then used to uniquely identify a given fingerprint. The AS608 is capable of storing up to 128 individual fingerprints. This tutorial will introduce the AS608 Arduino-compatible fingerprint sensor and how to validate and reject fingerprints based on the enrolled fingerprint information that will be given to the sensor. The fingerprint algorithm is handled by the AS608 and Arduino, so this tutorial will focus on implementation and putting the pieces together to make a working fingerprint sensor with Arduino.

Read More
Arduino Interrupts with PIR Motion Sensor

The basics of Arduino’s hardware interrupt is explored through the use of a passive infrared (PIR) sensor. The passive infrared sensors used here operate at voltages from 2.7V - 5V and use very little energy when operating in the non-tripped state. The PIR sensor is ultimately tripped by an infrared source, typically human body heat (or another animal with similar radiative emission). When the PIR sensor is tripped it sends a HIGH signal to its OUT pin, which will be read by the Arduino’s interrupt pin (pin 2 or 3 on the Uno board). This process seems trivial, but when done correctly can save massive amounts of energy when dealing with battery-powered systems, as in home automation.

Read More
Smartphone Arduino Weighing Scale with Load Cell and HX711

In this tutorial, I introduce an Arduino-based weighing scale that uses a load cell, analog-to-digital converter, and calibrated mass. I introduce calibration with known masses to create a powerful and accurate weighing system that can be used for highly accurate measurement purpose such as: chemistry, horticulture, cooking, and much more!

Read More
Arduino Weighing Scale with Load Cell and HX711

In this tutorial, I introduce an Arduino-based weighing scale that uses a load cell, analog-to-digital converter, and calibrated mass. I introduce calibration with known masses to create a powerful and accurate weighing system that can be used for highly accurate measurement purpose such as: chemistry, horticulture, cooking, and much more!

Read More
Arduino + VL53L1X Time of Flight Distance Measurement

Time of flight (ToF) is an approximation of the time it takes a traveling wave to come in contact with a surface and reflect back to the source. Time of flight has applications in automotive obstacle detection, resolving geographic surface composition, and computer vision and human gesture recognition. In the application here, the VL53L1X ToF sensor will be used to track the displacement of a ping pong ball falling down a tube. We can predict the acceleration and behavior of a falling ping pong ball by balancing the forces acting on the ball, and ultimately compare the theory to the actual displacement tracked by the time of flight sensor.

Read More
Arduino SD Card Module Data Logger

This tutorial will explore the range of capabilities available to the Arduino SD library by using a real-world example of data logging. The SD library allows users to read/write, list files, create/remove files, and make/delete directories. Additionally, we will develop an algorithm that creates a new file every time the Arduino board is restarted, which will prevent overwriting of existing data records. The resulting data file will be in comma separated format and contain multiple data points, including a time stamp in milliseconds since the program started. Therefore, it is important to record the program start time. For very accurate time monitoring tasks, a real-time clock is recommended, however, for the experiments conducted here, relative time suffices.

Read More
Arduino Uno R3 vs CH340

The CH340 Arduino board contains an ATmega328P-U-TH chip, which differs from the classic ATmega328P-PU in official Arduino Uno Rev3 boards. The CH340 is an inexpensive USB-to-Serial chip (datasheet here) that takes the place of the Rev3 board’s more expensive ATmega16U2. This creates issues when programming the Arduino board with certain operating systems (specifically Windows), however, for most Linux and Mac systems - there appears to be no issue. In this tutorial, I will explore the CH340 Arduino board to see whether there are differences in performance and power under different operating conditions. This will definitively answer whether the CH340 is a worthy alternative to the Rev3 or if it’s just a cheap imposter.

Read More
Controlling LEDs with A Multiplexer and Arduino

A demultiplexer will be used to control 8 LEDs using just 3 digital pins on the Arduino board. This method of demultiplexing frees up pins on the Arduino, but also makes control of multiple LEDs easier by consolidating the power given to each LED. This will allow us to use LEDs without resistors. In general, a demultiplexer uses N boolean outputs to control 2N switches. In our case, the CD4051 multiplexer will be used as a demultiplexer using 3 digital pins and boolean logic to control 8 individual LEDs. Several skills will also be developed, specifically with regard to programming in the Arduino programming language. Pulse-width modulation (or brightening and dimming) of LEDs will be explored, as well as randomization of LED blinks, along with the general selection process for boolean switching with the demultiplexer.

Read More
Loudspeaker Analysis and Experiments: Part II

Part II of the tutorial series on loudspeaker analysis and experiments. The majority of this entry focuses on finding Thiele-Small parameters to fully characterize an electrodynamic loudspeaker in free air.

Read More
Arduino Pitot Tube Wind Speed and Airspeed Indicator - Theory and Experiments

The pitot tube is a device used to approximate the speed of vehicles traveling by air and water. An in-depth article on NASA's website is dedicated to pitot tubes (also called pitot-static tubes, Prandtl tubes), where it cites the primary application as airspeed indicator on aircraft. For more information on design and limitations of the instrument, I recommend perusing that page. For this tutorial, only the basic theory is explored using Bernoulli's equation and a practical application. An inexpensive pitot tube and a digital differential pressure sensor are used to measure pressure, which is converted to a digital signal using an Arduino board.

Read More