Arduino Weighing Scale with Load Cell and HX711
“As an Amazon Associates Program member, clicking on links may result in Maker Portal receiving a small commission that helps support future projects.”
A load cell is an application of strain measurements relating to weight measurement. A load is applied to a strain gauge, which causes the gauge to strain a certain amount and output a voltage proportional to the applied load. This relationship between strain and voltage is used in many applications where weight measurement is important. Load cells are very common because of their linearity, cost effectiveness, and their ease of implementation. In this tutorial, I will introduce an Arduino-compatible load cell that exemplifies all of the aforementioned advantages. I will also introduce calibration with known masses to create a powerful and accurate weighing system that can be used for highly accurate measurement purpose such as: chemistry, horticulture, cooking, and much more!
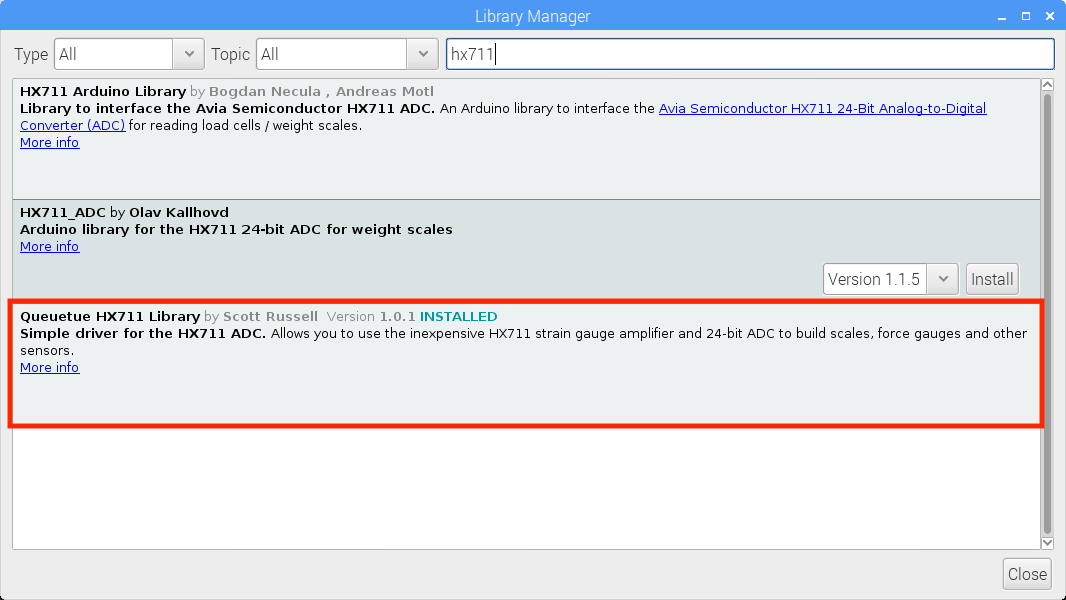
For this tutorial, I will be using a lightweight HX711 load cell library by Queuetue named “<Q2HX711.h>”. The use of this library was found to be the easiest and most stable to implement in terms of performance. To download the library, go to the Library Manager in the Arduino IDE and type HX711. The ‘Queuetue HX711 Library’ will be used in this tutorial, and the program used is based off their example.
The HX711 simple example demonstrates the basic functionality for getting the scale working. Below is the sample code:
#include <Q2HX711.h>

const byte hx711_data_pin = 3;
const byte hx711_clock_pin = 4;

Q2HX711 hx711(hx711_data_pin, hx711_clock_pin);

void setup() {
  Serial.begin(9600);
}

void loop() {
  Serial.println(hx711.read()/100.0);
  delay(500);
}
The HX711 can be powered anywhere from 2.7V - 5.5V. The full data sheet with specifications for the HX711 can be found here. I won’t be doing any alterations of the HX711 library, so the aforementioned statements are the extent to which I will discuss the HX711, apart from wiring.
The main parts used in this experiment are:

The HX711 is a 24-bit analog-to-digital converter that is compatible with Arduino and Raspberry Pi. The HX711 works in conjunction with a strain gauge load cell to approximate the mass of an object in real-time to high precision.
Included in this package:
1kg Load Cell
HX711 ADC
Features of the HX711:
2.7V-5.5V
24-bit resolution ADC
Slim profile
Libraries available for both Raspberry Pi and Arduino

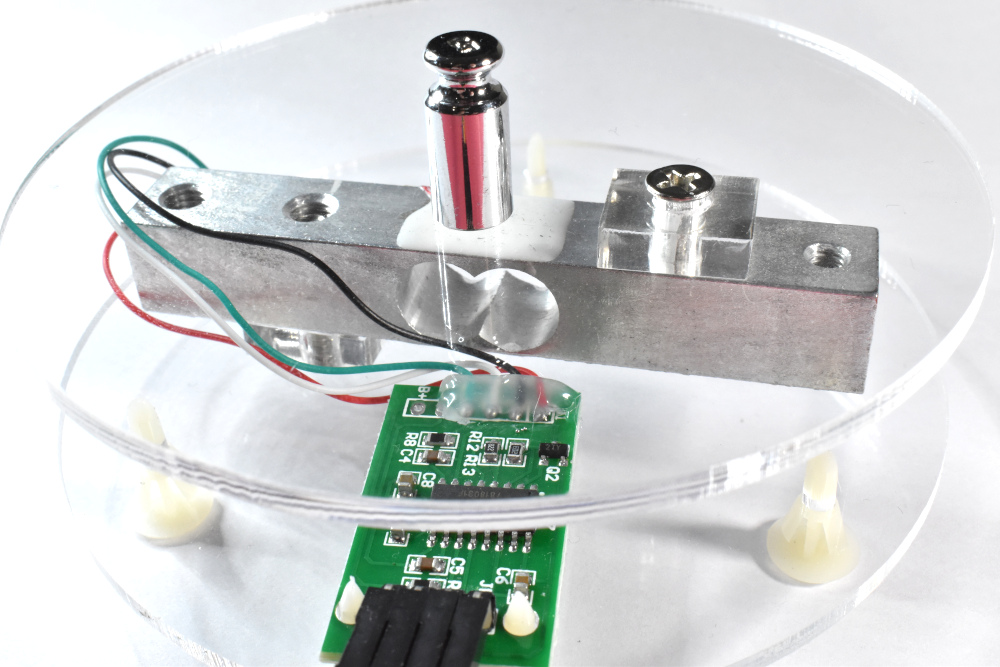
This kit uses known masses to calibrate a load cell using the linear response between strain gauges and weight under gravity. The HX711 is easily integrated with Arduino. Using this calibration kit, makers and engineers can build a low-weight measurement scale, a real-time measurement system for aerodynamic loads, a density measurement system using water, and so much more!
The Load Cell Calibration Kit includes:
1x 1 kg Load Cell
1x HX711 Strain Gauge 24-bit Amplifier
2x 3D Printed supports (one bottom, one top)
1x M5 Hex Screw, 1x M4 Hex Screw (for affixing the supports to the load cell)
3x rubber stoppers to prevent slipping
5x calibrated masses (20g, 10g, 5g, 2g, 1g)
An example video demonstration of the load cell can be found at:
NOTE: Because the supports are 3D printed, they may be slightly different from the ones photographed. They will function and appear exactly the same, with slight variations in minor striations or patterning.
The HX711 is easily wired to the Arduino using any two digital or analog pins. The load cell must also be accurately wired to the HX711 to ensure that the appropriate strain gauge leads are used to approximate the weight given by the load cell. Next, we will explore calibration and test the load cell as a weighing scale.
The load cell is quite sensitive and depending on the changing environment, calibration may be essential. I will outline a method using two calibration points: the zero (tare) value and a calibrated mass value. The calibrated mass method will ensure that each time the load cell is used, it will be calibrated with a known mass, ensuring the best approximation of mass of objects of unknown mass. I recommend calibration before each use, and whenever the environment changes or the load cell is moved.
Using the equation for a line we can begin to understand how calibration will take place and how we will specifically implement calibration with an Arduino board and load cell. The equation for a line is:
which leads to our final definition of the calibration line using two known masses:

The linearity over multiple masses reassures us that the two-point calibration method suffices!
The simplest way to understand the calibration is to use the HX711 ADC reading with no added mass (tare). Then, once the zero value is calibrated, ask Arduino to again read the HX711 ADC value with a known calibration mass. This will create an up-to-date linear calibration slope and intercept, ensuring the most accurate weighing. The code below outlines this process.
#include <Q2HX711.h>

const byte hx711_data_pin = 3;
const byte hx711_clock_pin = 4;

float y1 = 20.0; // calibrated mass to be added
long x1 = 0L;
long x0 = 0L;
float avg_size = 10.0; // amount of averages for each mass measurement

Q2HX711 hx711(hx711_data_pin, hx711_clock_pin); // prep hx711

void setup() {
  Serial.begin(9600); // prepare serial port
  delay(1000); // allow load cell and hx711 to settle
  // tare procedure
  for (int ii=0;ii<int(avg_size);ii++){
    delay(10);
    x0+=hx711.read();
  }
  x0/=long(avg_size);
  Serial.println("Add Calibrated Mass");
  // calibration procedure (mass should be added equal to y1)
  int ii = 1;
  while(true){
    if (hx711.read()<x0+10000){
    } else {
      ii++;
      delay(2000);
      for (int jj=0;jj<int(avg_size);jj++){
        x1+=hx711.read();
      }
      x1/=long(avg_size);
      break;
    }
  }
  Serial.println("Calibration Complete");
}

void loop() {
  // averaging reading
  long reading = 0;
  for (int jj=0;jj<int(avg_size);jj++){
    reading+=hx711.read();
  }
  reading/=long(avg_size);
  // calculating mass based on calibration and linear fit
  float ratio_1 = (float) (reading-x0);
  float ratio_2 = (float) (x1-x0);
  float ratio = ratio_1/ratio_2;
  float mass = y1*ratio;
  Serial.print("Raw: ");
  Serial.print(reading);
  Serial.print(", ");
  Serial.println(mass);
}
A demo of the weighing scale program is also shown below:
Process for Using the Weighing Program Above:
-
1. Restart program with nothing on the load cell platform
2. Open serial port
3. Wait for tare to finish and Arduino to print out: "Add Calibrated Mass"
4. Add calibrated mass equal to the variable "y1" value above (20g in my case)
5. Wait for print out: "Calibration Complete"
6. Real-time mass should be printing out!
This tutorial introduced load cells and strain gauges to approximate mass using the linearity of strain gauges and taking advantage of earth’s gravitation. Using known calibrated masses, we were able to create a routing that calibrates the load cell and approximate mass. This weighing scale routine was implemented in real-time to create a highly accurate weighing scale that is both portable and inexpensive - all using Arduino and Arduino-compatible components. The load cell weighing scale can be used to measure strain in real-time and allow engineers to record and ultimately study changes in mass and weight.
See More in Arduino: