Arduino Optical Fingerprint Sensor (AS608)

“As an Amazon Associates Program member, clicking on links may result in Maker Portal receiving a small commission that helps support future projects.”
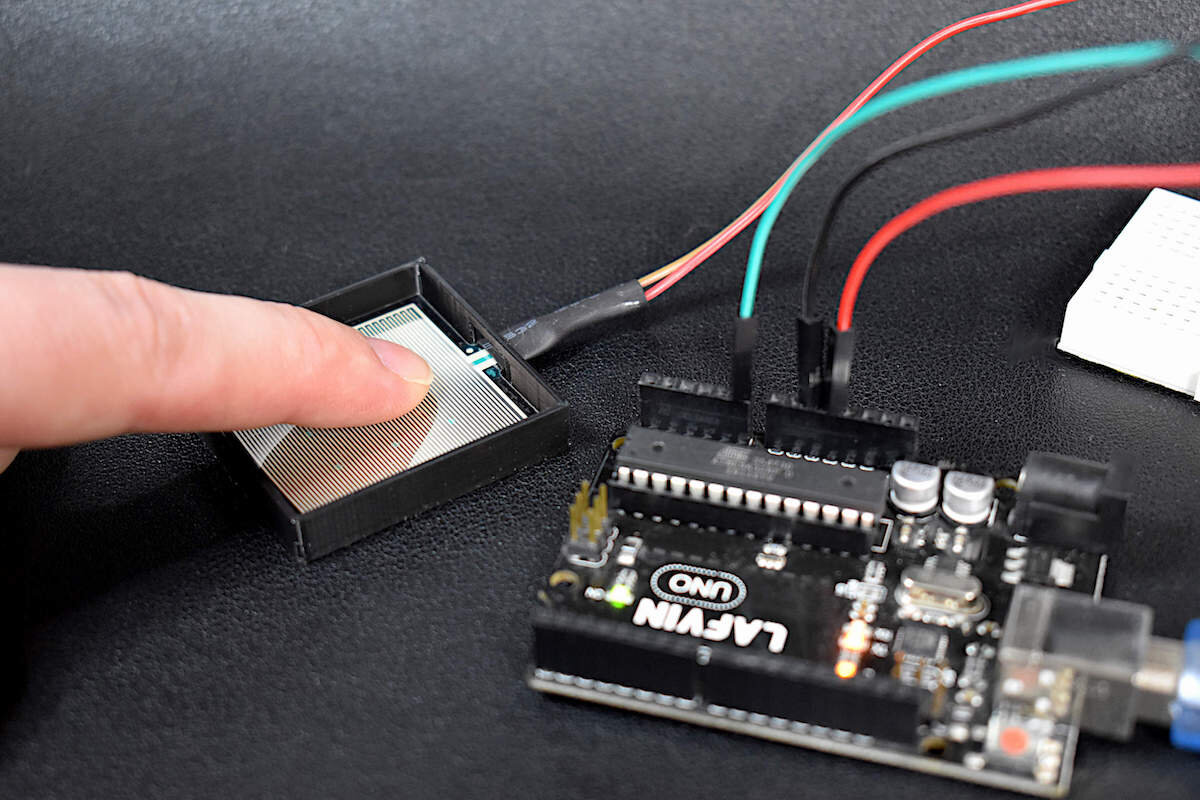
Optical fingerprint sensors take low-resolution snapshots of the tip of a finger and create arrays of identifiers that are then used to uniquely identify a given fingerprint. The AS608 is capable of storing up to 128 individual fingerprints. This tutorial will introduce the AS608 Arduino-compatible fingerprint sensor and how to validate and reject fingerprints based on the enrolled fingerprint information that will be given to the sensor. The fingerprint algorithm is handled by the AS608 and Arduino, so this tutorial will focus on implementation and putting the pieces together to make a working fingerprint sensor with Arduino.

The primary components used in this tutorial are the Arduino board and the appropriate fingerprint module. The full parts list required for replicating the process outlined here is given below:

The optical fingerprint scanner takes images of fingerprints and converts them into unique identifiers. The fingerprint scanner stores up to 128 different fingerprints and is able to store them and scan to find the correct fingerprint match, all of which is done through the scanner and Arduino board.
In the Package:
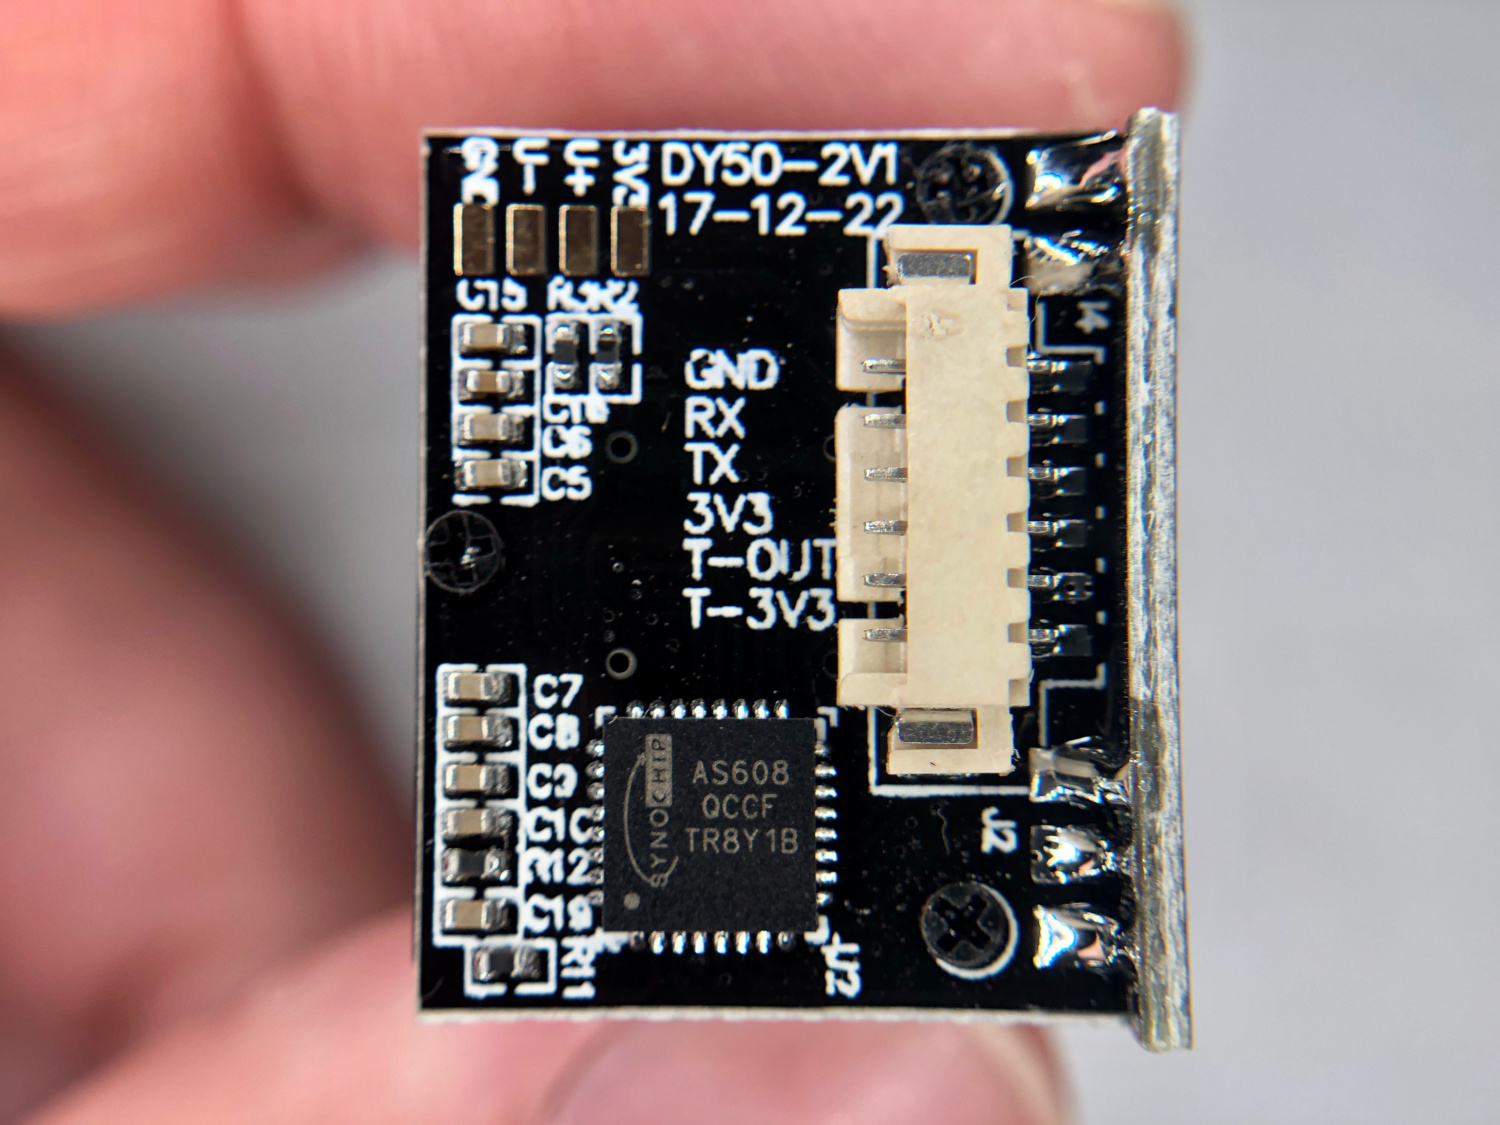
AS608 Fingerprint Module
Connecting Wires
Module Characteristics:
Supply voltage: 3.3V-5V DC
Working Current: <120mA
Fingerprint imaging Time: <1.0 seconds
Image Scan size: 14 * 18 mm
Safety level: 5
False Accept Rate (FAR): <0.001% (security level 3)
False Reject Rate (FRR): <1.0% (security level 3)
Search time: <1.0 seconds (1:500, the mean)
Communication: UART
UART baud rates: (9600 * N) bps where N = 1 ~ 12 (default value N = 6, ie 57600bps)
Wiring the fingerprint module to the Arduino uses the UART, which we will use in software (SoftwareSerial() in Arduino). The wiring diagram (including wiring of the accept and deny LEDs) is shown below:

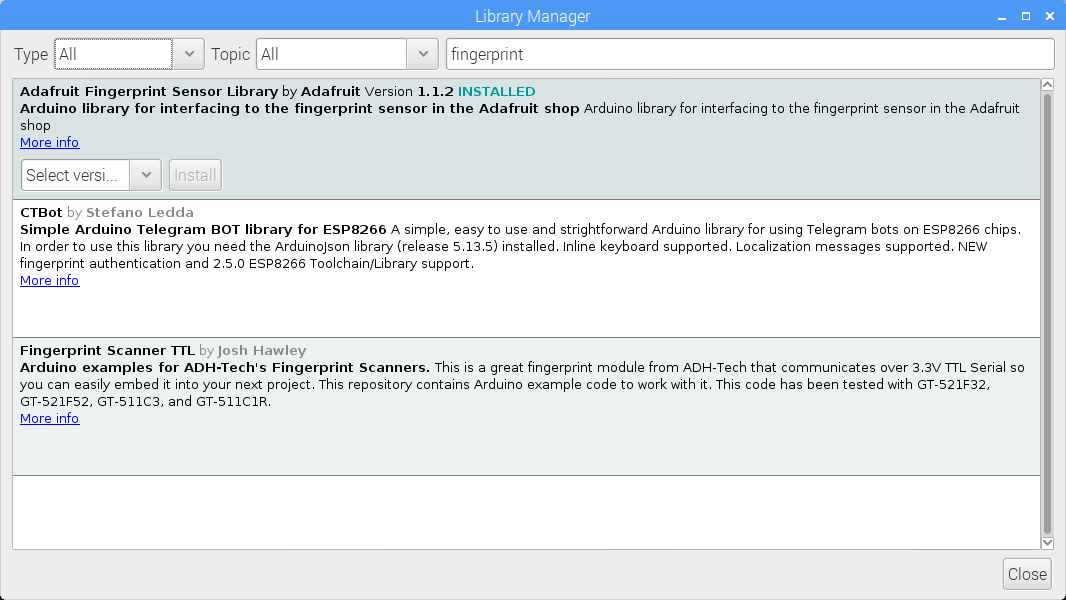
Adafruit has a library that is simple and easy to understand. In order to download the library, open the Library Manager and type in ‘fingerprint;’ the library is shown below as the “Adafruit Fingerprint Sensor Library by Adafruit.”
The Adafruit library has multiple examples, two of which will be the basis for the rest of this tutorial. The two examples are named:
enroll
fingerprint
The enroll example should be uploaded before testing the other algorithms. This process is outlined below.
Before we can test the accept and deny algorithms, we need to first train the fingerprint sensor to recognize the fingerprints that we want to accept. The ‘enroll fingerprint’ code is shown below. The simplest method for understanding the code below is to simply upload it to the Arduino board, then follow the instructions.
#include <Adafruit_Fingerprint.h>

SoftwareSerial mySerial(2, 3); // TX/RX

Adafruit_Fingerprint finger = Adafruit_Fingerprint(&mySerial);

uint8_t id;

void setup()
{
  Serial.begin(9600);
  while (!Serial);  // For Yun/Leo/Micro/Zero/...
  delay(100);
  Serial.println("\n\nAdafruit Fingerprint sensor enrollment");

  // set the data rate for the sensor serial port
  finger.begin(57600);

  if (finger.verifyPassword()) {
    Serial.println("Found fingerprint sensor!");
  } else {
    Serial.println("Did not find fingerprint sensor :(");
    while (1) { delay(1); }
  }
}

uint8_t readnumber(void) {
  uint8_t num = 0;

  while (num == 0) {
    while (! Serial.available());
    num = Serial.parseInt();
  }
  return num;
}

void loop()                     // run over and over again
{
  Serial.println("Ready to enroll a fingerprint!");
  Serial.println("Please type in the ID # (from 1 to 127) you want to save this finger as...");
  id = readnumber();
  if (id == 0) {// ID #0 not allowed, try again!
     return;
  }
  Serial.print("Enrolling ID #");
  Serial.println(id);

  while (!  getFingerprintEnroll() );
}

uint8_t getFingerprintEnroll() {

  int p = -1;
  Serial.print("Waiting for valid finger to enroll as #"); Serial.println(id);
  while (p != FINGERPRINT_OK) {
    p = finger.getImage();
    switch (p) {
    case FINGERPRINT_OK:
      Serial.println("Image taken");
      break;
    case FINGERPRINT_NOFINGER:
      break;
    case FINGERPRINT_PACKETRECIEVEERR:
      Serial.println("Communication error");
      break;
    case FINGERPRINT_IMAGEFAIL:
      Serial.println("Imaging error");
      break;
    default:
      Serial.println("Unknown error");
      break;
    }
  }

  // OK success!

  p = finger.image2Tz(1);
  switch (p) {
    case FINGERPRINT_OK:
      Serial.println("Image converted");
      break;
    case FINGERPRINT_IMAGEMESS:
      Serial.println("Image too messy");
      return p;
    case FINGERPRINT_PACKETRECIEVEERR:
      Serial.println("Communication error");
      return p;
    case FINGERPRINT_FEATUREFAIL:
      Serial.println("Could not find fingerprint features");
      return p;
    case FINGERPRINT_INVALIDIMAGE:
      Serial.println("Could not find fingerprint features");
      return p;
    default:
      Serial.println("Unknown error");
      return p;
  }

  Serial.println("Remove finger");
  delay(2000);
  p = 0;
  while (p != FINGERPRINT_NOFINGER) {
    p = finger.getImage();
  }
  Serial.print("ID "); Serial.println(id);
  p = -1;
  Serial.println("Place same finger again");
  while (p != FINGERPRINT_OK) {
    p = finger.getImage();
    switch (p) {
    case FINGERPRINT_OK:
      Serial.println("Image taken");
      break;
    case FINGERPRINT_NOFINGER:
      break;
    case FINGERPRINT_PACKETRECIEVEERR:
      Serial.println("Communication error");
      break;
    case FINGERPRINT_IMAGEFAIL:
      Serial.println("Imaging error");
      break;
    default:
      Serial.println("Unknown error");
      break;
    }
  }

  // OK success!

  p = finger.image2Tz(2);
  switch (p) {
    case FINGERPRINT_OK:
      Serial.println("Image converted");
      break;
    case FINGERPRINT_IMAGEMESS:
      Serial.println("Image too messy");
      return p;
    case FINGERPRINT_PACKETRECIEVEERR:
      Serial.println("Communication error");
      return p;
    case FINGERPRINT_FEATUREFAIL:
      Serial.println("Could not find fingerprint features");
      return p;
    case FINGERPRINT_INVALIDIMAGE:
      Serial.println("Could not find fingerprint features");
      return p;
    default:
      Serial.println("Unknown error");
      return p;
  }

  // OK converted!
  Serial.print("Creating model for #");  Serial.println(id);

  p = finger.createModel();
  if (p == FINGERPRINT_OK) {
    Serial.println("Prints matched!");
  } else if (p == FINGERPRINT_PACKETRECIEVEERR) {
    Serial.println("Communication error");
    return p;
  } else if (p == FINGERPRINT_ENROLLMISMATCH) {
    Serial.println("Fingerprints did not match");
    return p;
  } else {
    Serial.println("Unknown error");
    return p;
  }

  Serial.print("ID "); Serial.println(id);
  p = finger.storeModel(id);
  if (p == FINGERPRINT_OK) {
    Serial.println("Stored!");
  } else if (p == FINGERPRINT_PACKETRECIEVEERR) {
    Serial.println("Communication error");
    return p;
  } else if (p == FINGERPRINT_BADLOCATION) {
    Serial.println("Could not store in that location");
    return p;
  } else if (p == FINGERPRINT_FLASHERR) {
    Serial.println("Error writing to flash");
    return p;
  } else {
    Serial.println("Unknown error");
    return p;
  }
}
The example code above requires the user to input an integer, which will identify a specific fingerprint.
The user will allow the user to create up to 128 unique fingerprints that can be recalled later. The general process for enrolling a fingerprint is as follows:
Enter integer
Place finger on sensor
Remove finger when instructed
Place finger on sensor again
Wait for the sensor to verify the print and printout “Stored!”
Below is a screenshot of the example output onto the Serial Port using 127 as the fingerprint index.

At this point, the assumption is that one or more fingerprints have been enrolled into the AS608 sensor. Now, we can test if the Arduino and fingerprint module can re-identify those enrolled fingerprints and deny unfamiliar fingerprints. The full code is shown below, which will light up one LED on pin 8 if the fingerprint is recognized, and blink an LED on pin 9 five times if the fingerprint is not recognized.
This algorithm can be used in security scenarios as seen in television and film for door locks etc.
#include <Adafruit_Fingerprint.h>

const int led_pin_accept = 8;
const int led_pin_deny = 9;
volatile int finger_status = -1;

SoftwareSerial mySerial(2, 3); // TX/RX on fingerprint sensor

Adafruit_Fingerprint finger = Adafruit_Fingerprint(&mySerial);

void setup()
{
  Serial.begin(9600);
  pinMode(led_pin_accept,OUTPUT);
  pinMode(led_pin_deny,OUTPUT);
  while (!Serial);  // For Yun/Leo/Micro/Zero/...
  delay(100);
  Serial.println("\n\nAdafruit finger detect test");

  // set the data rate for the sensor serial port
  finger.begin(57600);

  if (finger.verifyPassword()) {
    Serial.println("Found fingerprint sensor!");
  } else {
    Serial.println("Did not find fingerprint sensor :(");
    while (1) { delay(1); }
  }

  finger.getTemplateCount();
  Serial.print("Sensor contains "); Serial.print(finger.templateCount); Serial.println(" templates");
  Serial.println("Waiting for valid finger...");
}

void loop()                     // run over and over again
{
  finger_status = getFingerprintIDez();
  if (finger_status!=-1 and finger_status!=-2){
    digitalWrite(led_pin_accept,HIGH);
    delay(1000);
  } else{
    if (finger_status==-2){
      for (int ii=0;ii<5;ii++){
        digitalWrite(led_pin_deny,HIGH);
        delay(50);
        digitalWrite(led_pin_deny,LOW);
        delay(50);
      }
    }
    digitalWrite(led_pin_accept,LOW);
  }
  delay(50);            //don't ned to run this at full speed.
}

// returns -1 if failed, otherwise returns ID #
int getFingerprintIDez() {
  uint8_t p = finger.getImage();
  if (p!=2){
    Serial.println(p);
  }
  if (p != FINGERPRINT_OK)  return -1;

  p = finger.image2Tz();
  if (p!=2){
    Serial.println(p);
  }
  if (p != FINGERPRINT_OK)  return -1;

  p = finger.fingerFastSearch();
  if (p != FINGERPRINT_OK)  return -2;

  // found a match!
  Serial.print("Found ID #"); Serial.print(finger.fingerID);
  Serial.print(" with confidence of "); Serial.println(finger.confidence);
  return finger.fingerID;
}
In this tutorial, I introduced the basic principles of working with the AS608 fingerprint module with the Arduino platform. Specifically, the Adafruit library was used, which handles a lot of the interaction involved with identifying and enrolling fingerprints. The simplest implementation of the fingerprint sensor was explored, first by enrolling a unique fingerprint, and then verifying the print later. In the video demonstration, the acceptance of recognized fingerprints and the denial of unrecognized fingerprints was illustrated by the different LEDs. The applications in fingerprint identification are numerous and, at the least, fun and interesting. The introduction given here is meant as a stepping stone for getting involved with fingerprint identification with Arduino, and with the inexpensive and easy-to-use hardware and libraries available, the possibilities are endless from here!
See More in Arduino: