Bluetooth Module with Arduino (AT-09, MLT-BT05, HM-10)

“As an Amazon Associates Program member, clicking on links may result in Maker Portal receiving a small commission that helps support future projects.”
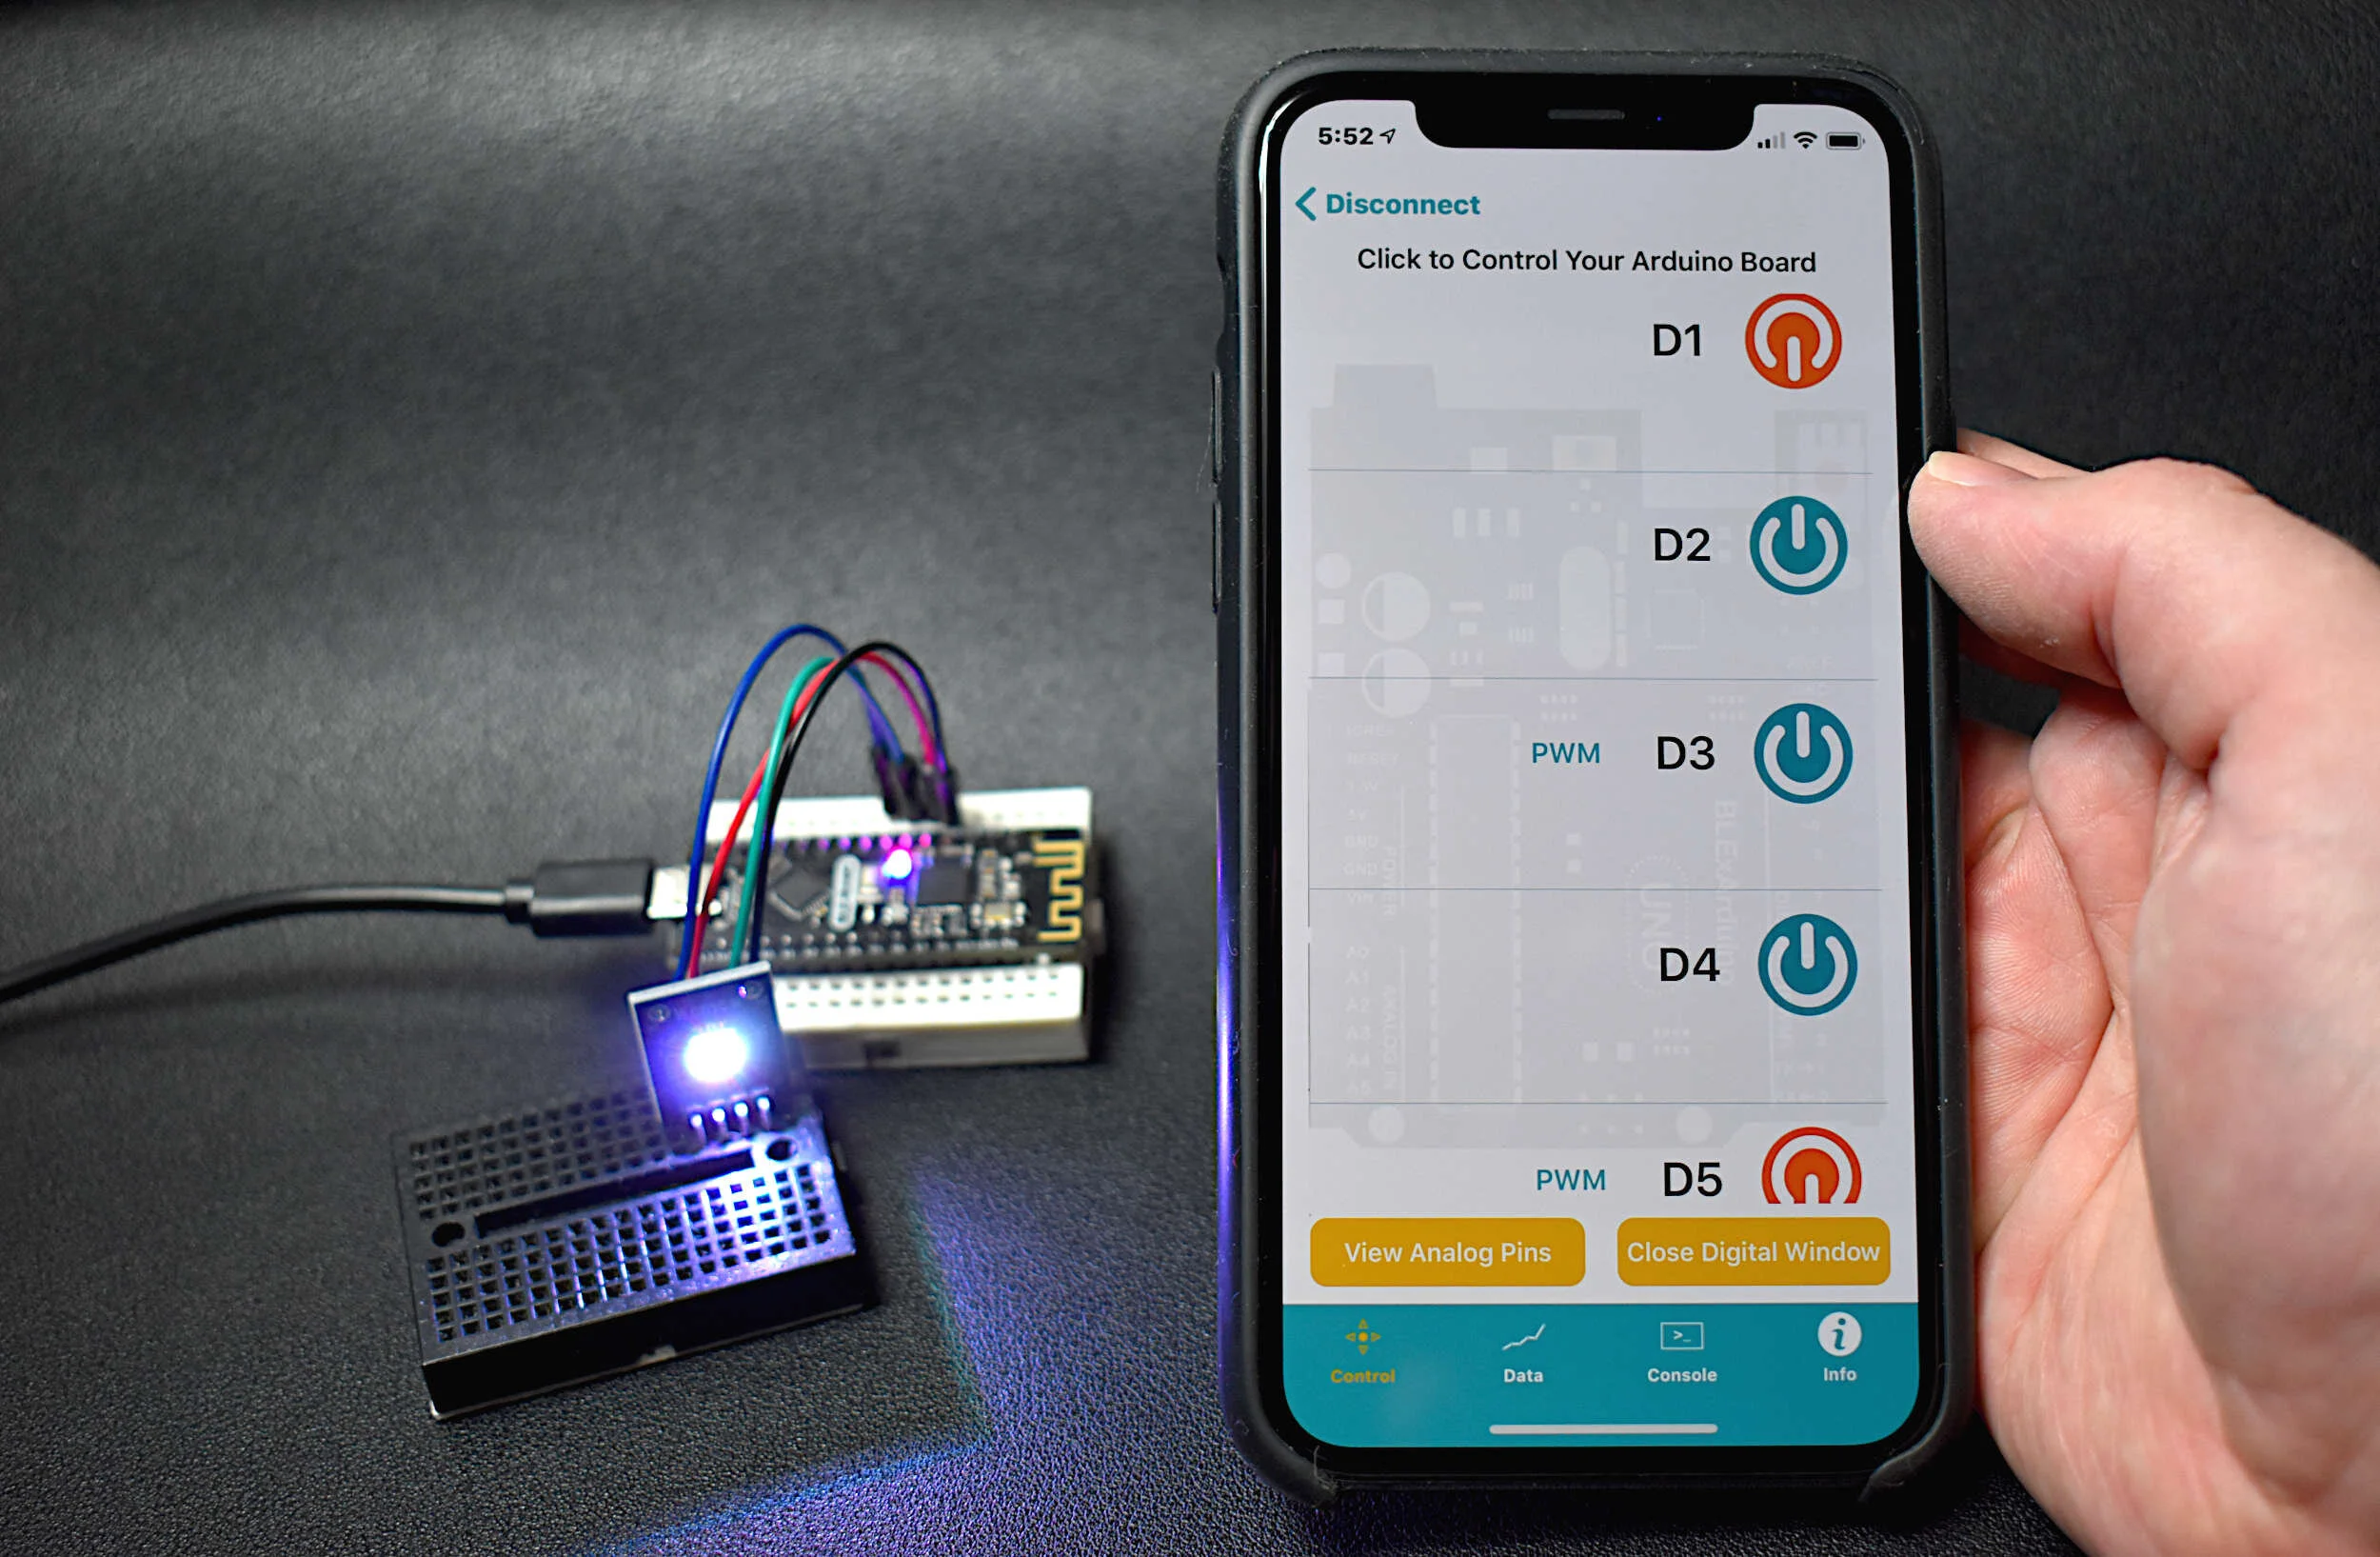
BLExAR - Arduino and iOS Bluetooth App
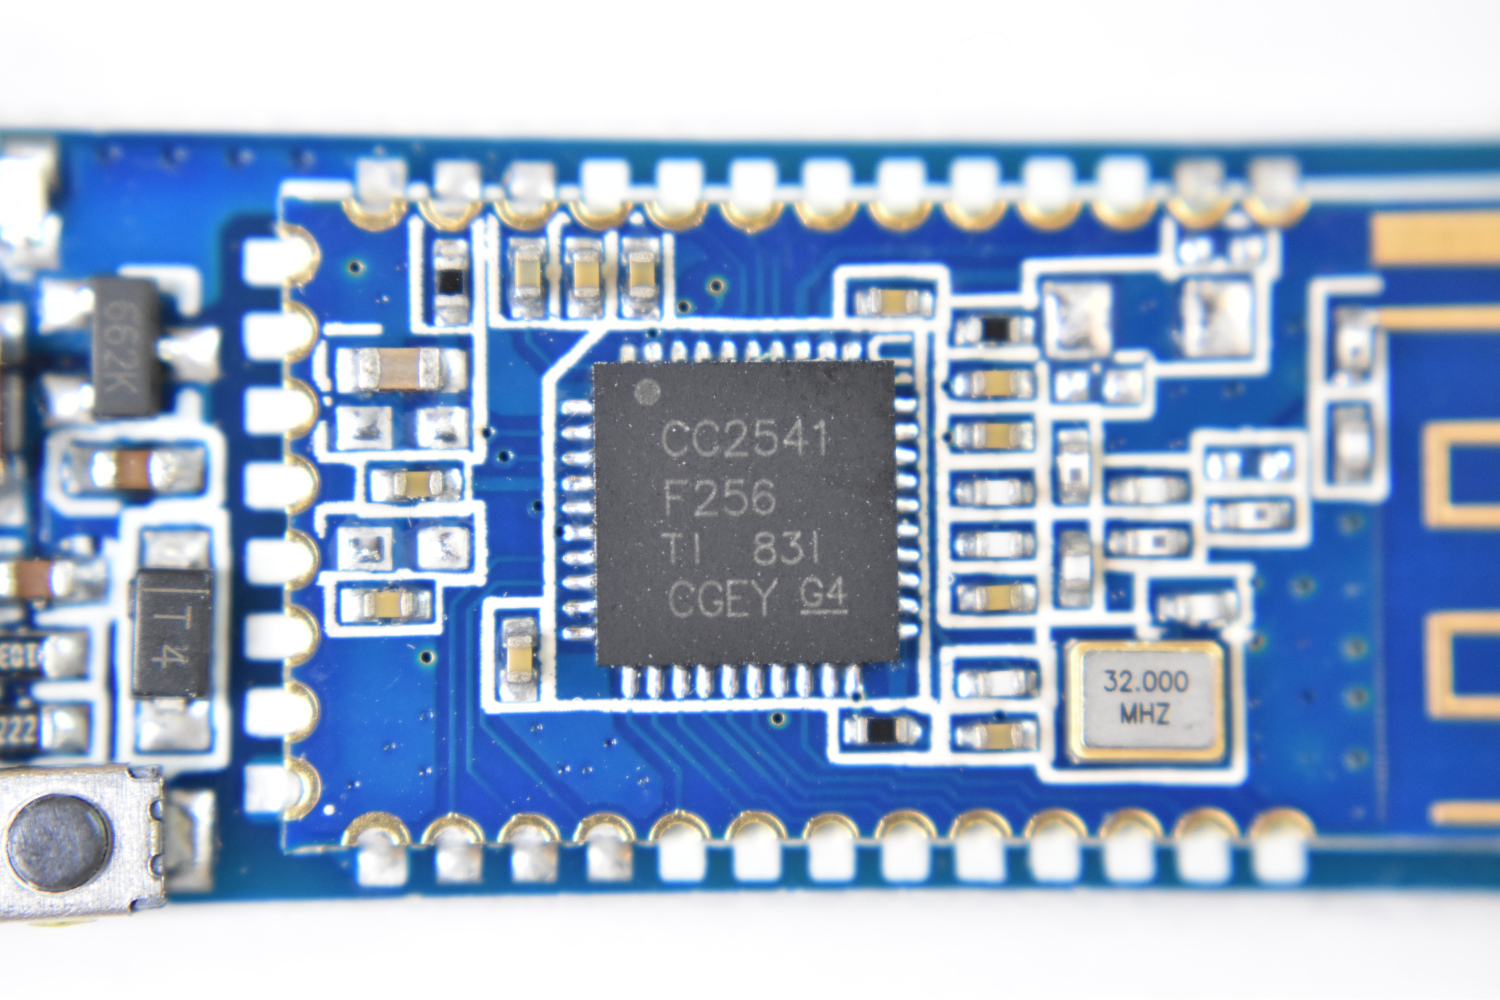
A range of devices use Texas Instruments’ CC2540/CC2541 system-on-chip as a tiny Bluetooth Low Energy (BLE) interface for integrating applications into the Internet of Things (IoT). The CC2541 is compatible with both the Android and iOS platforms, and can be used to talk between a smartphone and Arduino board (see my previous posts on this: here). In this tutorial, I will dive into the variations of CC2541 BLE board such as the AT-09, MLT-BT05, HM-10, JDY-08, etc. I will use either the specific module name or a blanketed “CC2541-based module” reference to refer to the BLE modules. The general process for interfacing with each module is nearly the same, however, some particularities define how each responds and functions depending on the given firmware.
I will be using the BLExAR app for iOS to communicate with the CC2541 modules. Any iOS or Android app that allows communication over BLE can be used to communicate back and forth, so have the app downloaded before continuing.
Only an Arduino board and a CC2541 BLE module will be needed to follow along with this tutorial. Below is a list of parts that can be purchased and where to find them, along with a few peripheral components that will be used.
CC2541 Bluetooth Low Energy Module - $8.00 [Our Store]
Arduino Uno Board - $11.00 [Our Store]
Mini Breadboard - $ 3.00 [Our Store]
Jumper Wires - $5.99 (120 pcs) [Amazon]
3.7V 720 mAh LiPo Battery - $11.97 (5 pcs) [Amazon]
LEDs - $10.99 (600 pcs) [Amazon]
Resistor Kit - $12.99 (1280 pcs) [Amazon]
Raspberry Pi 4 Kit - $99.99 [Amazon]
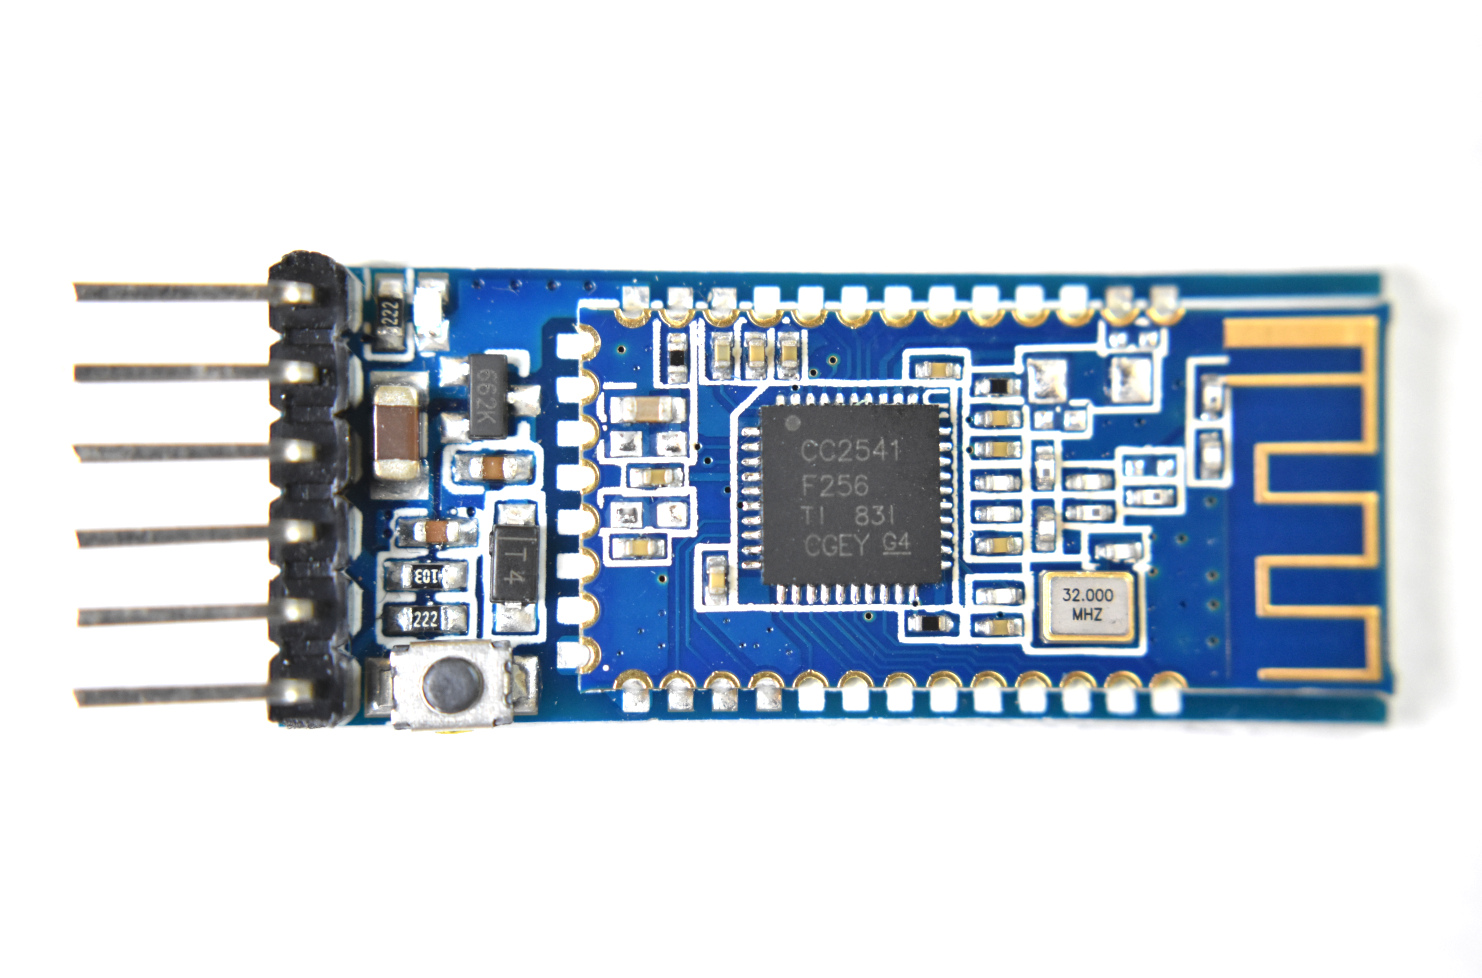
The CC2541 Bluetooth Low Energy (BLE) module is fully compatible with Arduino, Raspberry Pi, and Jetson Nano via serial port communication. The CC2541 works with both Android and iOS smartphones, making it a great choice when getting started with IoT prototyping and development. Multiple CC2541 modules can also be used as iBeacons that permit indoor tracking and localization.
Included in the Bluetooth Low Energy CC2541 Module Package:
1x CC2541 Bluetooth Low Energy Module
Features of the CC2541 Bluetooth Low Energy Module:
Wide Supply-Voltage Range (3.6 V - 5V)
Active-Mode RX Down to: 17.9 mA
Active-Mode TX (0 dBm): 18.2 mA
Power Down Sleep Mode: 60uA
Serial Communication (Arduino/Raspberry Pi Compatible)
Full datasheet can be found at Texas Instrument’s website: http://www.ti.com/lit/ds/symlink/cc2541.pdf
Examples can be found on our blog:
The CC2541 module can communicate with an Arduino board adhering to the following wiring diagram:
Next, we will explore the functions available to a given CC2541 BLE module to change settings such as device name, sleep state, and device characteristic ID.
Several datasheets exist for the various modules based on the CC2541 Bluetooth chip. A few of them are listed below with links:
Each of the datasheets outlines the electrical characteristics and firmware breakdown for each module. Every CC254x module that is mentioned above uses the ‘AT-Command’ protocol to interface with and alter different parameters specific to each module. For example, we can change the name that is displayed on a smartphone during a BLE scan by sending the following command to the CC254x module:
“AT+NAMEBLExAR”
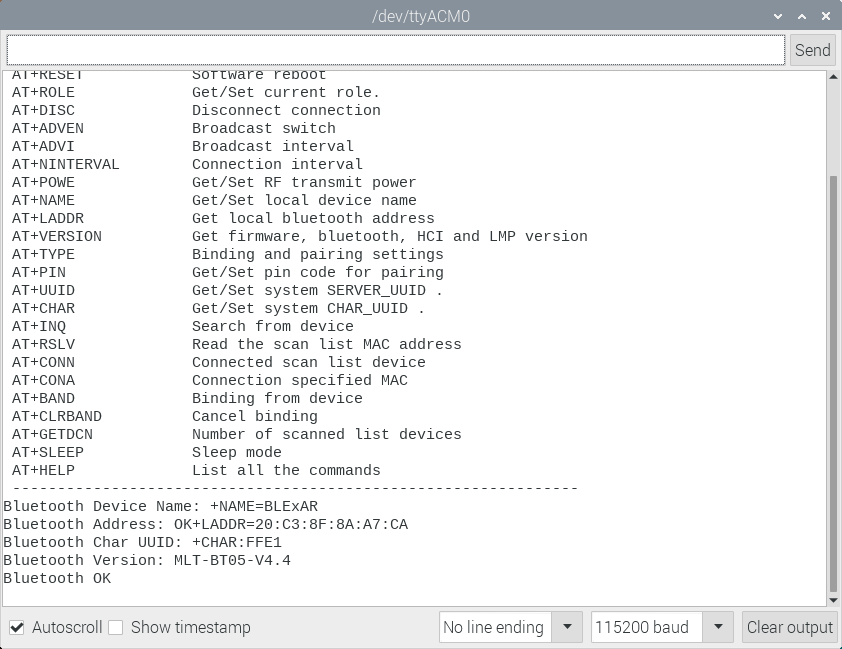
To view all of the possible commands, the command “AT+HELP” should be used, which prints out the following list of possible commands and settings:
The code to replicate this particular printout, with the AT-09 or MLT-BT05, is given below.
// help menu printout for MLT-BT05
#include <SoftwareSerial.h>

SoftwareSerial ble_device(3,4);

String str_ii = "";
int ii_0 = 0;

void setup() {
  Serial.begin(115200);
  delay(1000);
  ble_device.begin(9600);
  delay(1000);

  // First, get all available functions from CC2541 firmware
  ble_help();
}

void loop() {
}

void ble_help(){
  ble_device.println("AT+HELP"); // list all AT+ commands
  while (true){ // loop to print all AT+ commands
    char in_char = ble_device.read();
    if (int(in_char)==-1 or int(in_char)==42){continue;}
    str_ii+=in_char;
    if (in_char=='\n'){
      if (str_ii==String('\r')+String('\n')){
        if (ii_0 == 0){
          ii_0 = 1;
          continue;
        }
        break; // break after more than 1 empty carriage return and newline
      }
      Serial.print(str_ii);
      str_ii = "";
    }
  }
}
NOTE: If an HM-10 module is being used, a slightly different protocol may be needed. For example, the help would be printed out as "AT+HELP?" instead of "AT+HELP" - For the module used on this site, the code above suffices.
The help menu printout is very helpful because it tells us which commands do what. If we wanted to know the Bluetooth address of our module such that we can search directly for our unique device, we can tell the BLE module to print out the device address using:
“AT+LADDR”
And we should see a printout similar to:
“LADDR=16:D7:3C:9B:A3:CA”
This is the 24-bit (six hex digits) address of the BLE module. In the next section, I outline the various methods for communicating with the CC254x to read and configure various parameters of the Bluetooth low energy modules.
There are a few changes that can be made with respect to the CC254x modules used here. We can change the name of the module, for example, I choose to name mine after the app being used via the AT command: “AT+NAMEBLExAR” - which was mentioned above. We can also get the Bluetooth address using the command mentioned above, “AT+LADDR” - and we can configure a range of other commands using similar protocols.
The code below carries out the following sequence of commands:
Print all AT+ Commands
Rename BLE module to ‘BLExAR’
Print the BLE address
Print the BLE UUID used for communication
Print the firmware version of the device
Reset the Bluetooth module to enact any changes
It is important that the BLE module is NOT connected yet. The AT+ commands can only be carried out if there is no connection yet.
// Arduino code to read and change CC254x parameters
#include <SoftwareSerial.h>

SoftwareSerial ble_device(3,4);

String str_ii = "";
int ii_0 = 0;

void setup() {
  Serial.begin(115200);
  ble_device.begin(9600);
  delay(100);

  ble_help(); // uncomment to print commands
  delay(100);

  // Enter AT+ commands of interest here (BLE Address, UUIDs, Power settings)
  ble_cmd("AT+NAMEBLExAR","Device Name: "); // printout device name
  ble_cmd("AT+LADDR","Address: "); // printout BLE address
  ble_cmd("AT+CHAR","Char UUID: "); // printout character UUID
  ble_cmd("AT+VERSION","Version: "); // module version
  ble_cmd("AT+RESET",""); // reset BLE module
}

void loop() {

}

String ble_cmd(String cmd_str,String desc_str){
  str_ii = "";
  unsigned long t1 = millis();
  ble_device.println(cmd_str);
  while (true){
    char in_char = ble_device.read();
    if (int(in_char)==-1 or int(in_char)==42){
      if ((millis()-t1)>2000){ // 2 second timeout
        return "Err";
      }
      continue;
    }
    if (in_char=='\n'){
      Serial.print("Bluetooth "+desc_str);
      Serial.println(str_ii.substring(0,str_ii.length()));
      return str_ii;
    }
    str_ii+=in_char;
  }
}

void ble_help(){
  ble_device.println("AT+HELP"); // list all AT+ commands
  while (true){ // loop to print all AT+ commands
    char in_char = ble_device.read();
    if (int(in_char)==-1 or int(in_char)==42){continue;}
    str_ii+=in_char;
    if (in_char=='\n'){
      if (str_ii==String('\r')+String('\n')){
        if (ii_0 == 0){
          ii_0 = 1;
          continue;
        }
        break; // break after more than 1 empty carriage return and newline
      }
      Serial.print(str_ii);
      str_ii = "";
    }
  }
}
An example printout from the code above is shown below as well:
In the next section, the BLExAR app will be used to connect to the CC254x module to send messages back and forth from smartphone to Arduino board.
The framework for communication between the Arduino board and smartphone is based on the methods shown above, particularly with the CC254x and the BLExAR smartphone app.
The following code should be uploaded to the Arduino board:
// Arduino code to send messages from smartphone to Arduino
#include <SoftwareSerial.h>

SoftwareSerial ble_device(3,4);

String str_ii = "";
int ii_0 = 0;

void setup() {
  ble_device.begin(9600);
  delay(100);

  // Enter AT+ commands of interest here (BLE Address, UUIDs, Power settings)
  ble_cmd("AT+NAMEBLExAR","Device Name: "); // printout device name
  ble_cmd("AT+LADDR","Address: "); // printout BLE address
  ble_cmd("AT+CHAR","Char UUID: "); // printout character UUID
  ble_cmd("AT+VERSION","Version: "); // module version
  ble_cmd("AT+RESET","Reset: "); // reset module
  str_ii = "";
  delay(500);
}

void loop() {
  while (ble_device.available()){
    char in_char = ble_device.read();
    if (int(in_char)!=-1 and int(in_char)!=42){
      str_ii+=in_char;
    }
    if (in_char=='\n'){
      delay(20);
      String msg = "Msg: ";
      msg+=str_ii;
      ble_device.print(msg);
      str_ii = "";
    }
  }
}

String ble_cmd(String cmd_str,String desc_str){
  str_ii = "";
  unsigned long t1 = millis();
  ble_device.println(cmd_str);
  while (true){
    if ((millis()-t1)>2000){ // 2 sec timeout
      return "Err";
    }
    char in_char = ble_device.read();
    if (int(in_char)==-1 or int(in_char)==42){
      continue;
    }
    if (in_char=='\n'){
      return str_ii;
    }
    str_ii+=in_char;
  }
}
Once the code is uploaded, the BLExAR app should be downloaded and opened. The menu will look similar to the one shown below:

BLExAR App screen showing available BLE devices - Select BLExAR and wait for the connection
Once the smartphone and CC254x module are connected over Bluetooth, the main menu of the app should appear. Select the “Console” tab at the bottom of the app and click the area titled “Send Message.” Enter a message and click “return” to send the message. The result should be the same message you sent with a “Msg: “ in front of it.
Now we have a connected stream between smartphone and Arduino board!
If I were to send “hello!” from the message board, we would get the following in the console window:

Message from Smartphone to CC254x, and the Returned Verification from Arduino -> CC254x -> Smartphone
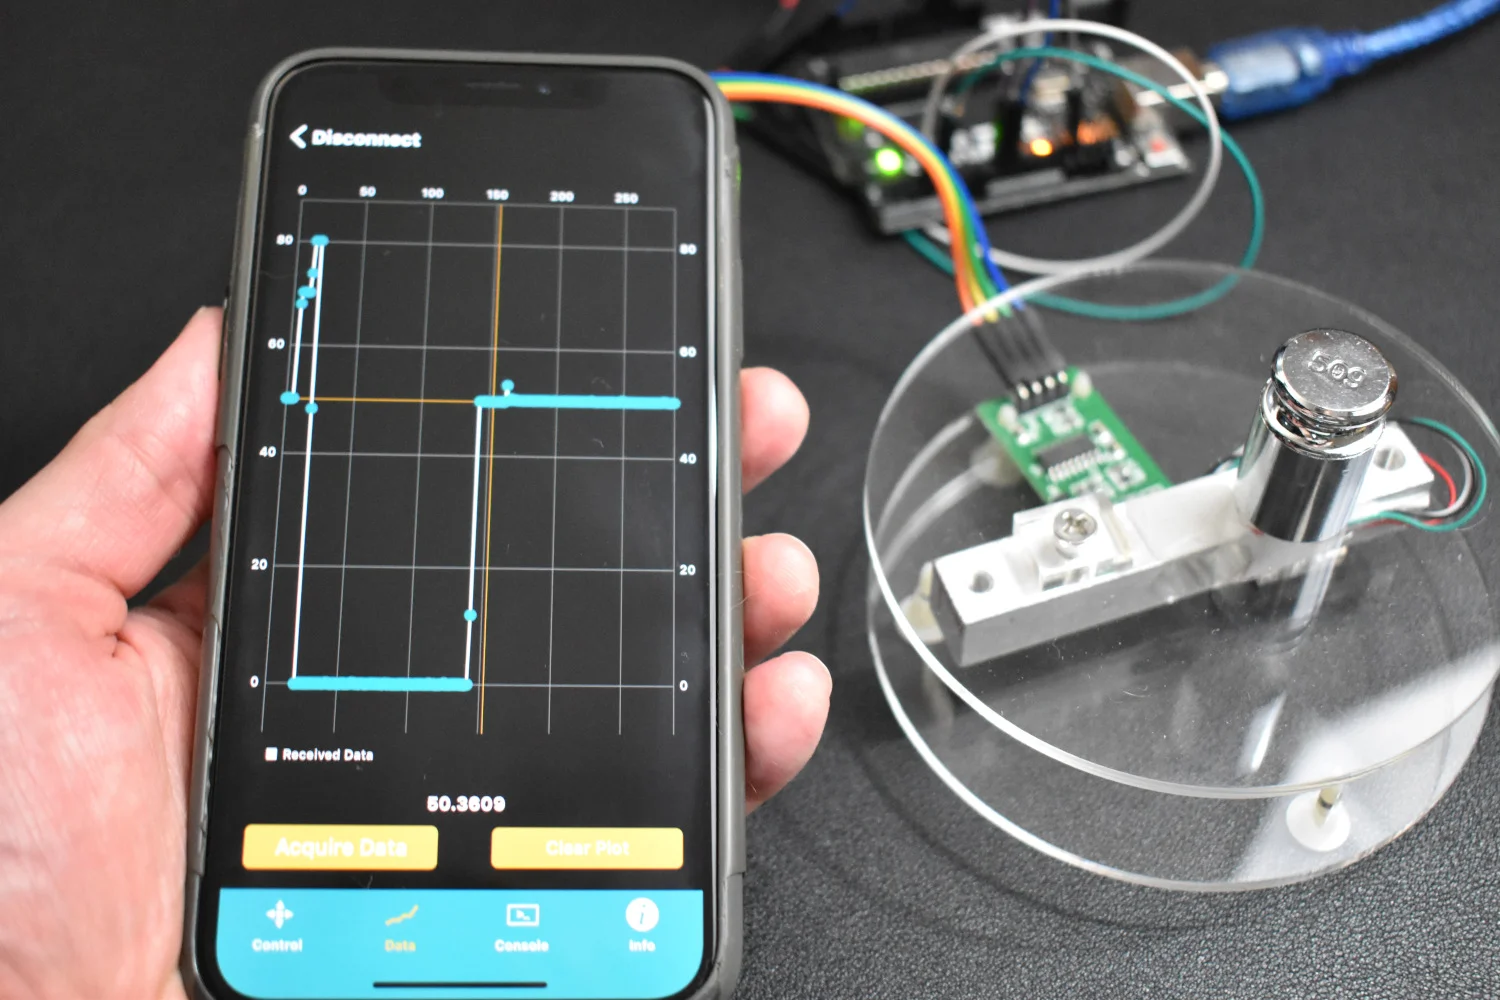
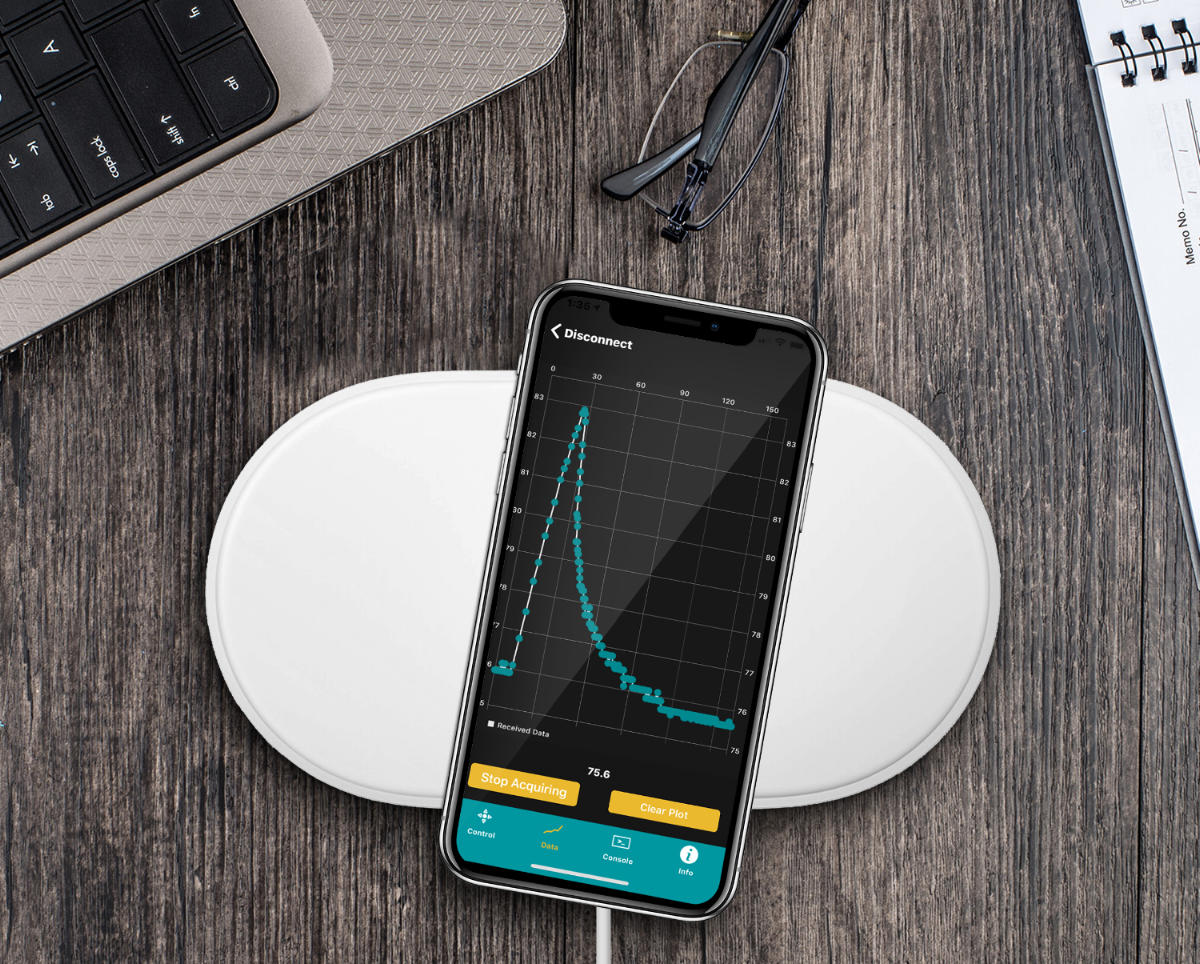
This tutorial acts as an introduction to Bluetooth Low Energy as an interface between Arduino and a smartphone. The CC254x modules are widely used and inexpensive, which makes them great for applications in wireless communication on the maker level with Arduino. In this tutorial, I explained how to use Arduino to communicate and learn about the CC254x chip and work with the firmware on an MLT-BT05 module. The MLT-BT05 was controlled first using AT+ commands and then using the SoftwareSerial() library on Arduino. We can alter properties of the BLE module such as its name, characteristic ID, and sleep state; while also being able to read its firmware version, name, and Bluetooth address - all of which can help the user personalize and understand a given module that much more. Lastly, the BLExAR app was used to communicate between the Arduino board and a smartphone, where advanced applications can begin to form using the basics outlined in this tutorial. In other BLExAR tutorials, applications in control, data acquisition, and communication have been investigated (click here to explore BLExAR projects). In upcoming tutorials, other projects will be explored using the BLExAR app and CC254x modules.
See More in BLExAR and Bluetooth: