4-Pin RGB LED Control Using iOS BLExAR App, HM-10 Bluetooth Module, and Arduino
In this tutorial, I will demonstrate how to use the BLExAR App to control an RGB LED using three PWM pins on an Arduino Uno board via Bluetooth communication. An RGB LED is a single casing with three cathode (or anode) pins and one anode (or cathode) pin. This results in a 4-pin LED. In this tutorial, I will be using an RGB LED with three anodes and one common cathode. This means that we can change the color of the LED to over 16.7 million different variations (assuming each anode produces a different luminosity for each voltage change of the Arduino PWM pin). This tutorial will help demonstrate the power of the BLExAR app, and the flexibility of an Arduino board under iOS Bluetooth control. In my case, I will be using an iPhone with the BLExAR app, but an iPad would suffice as well.
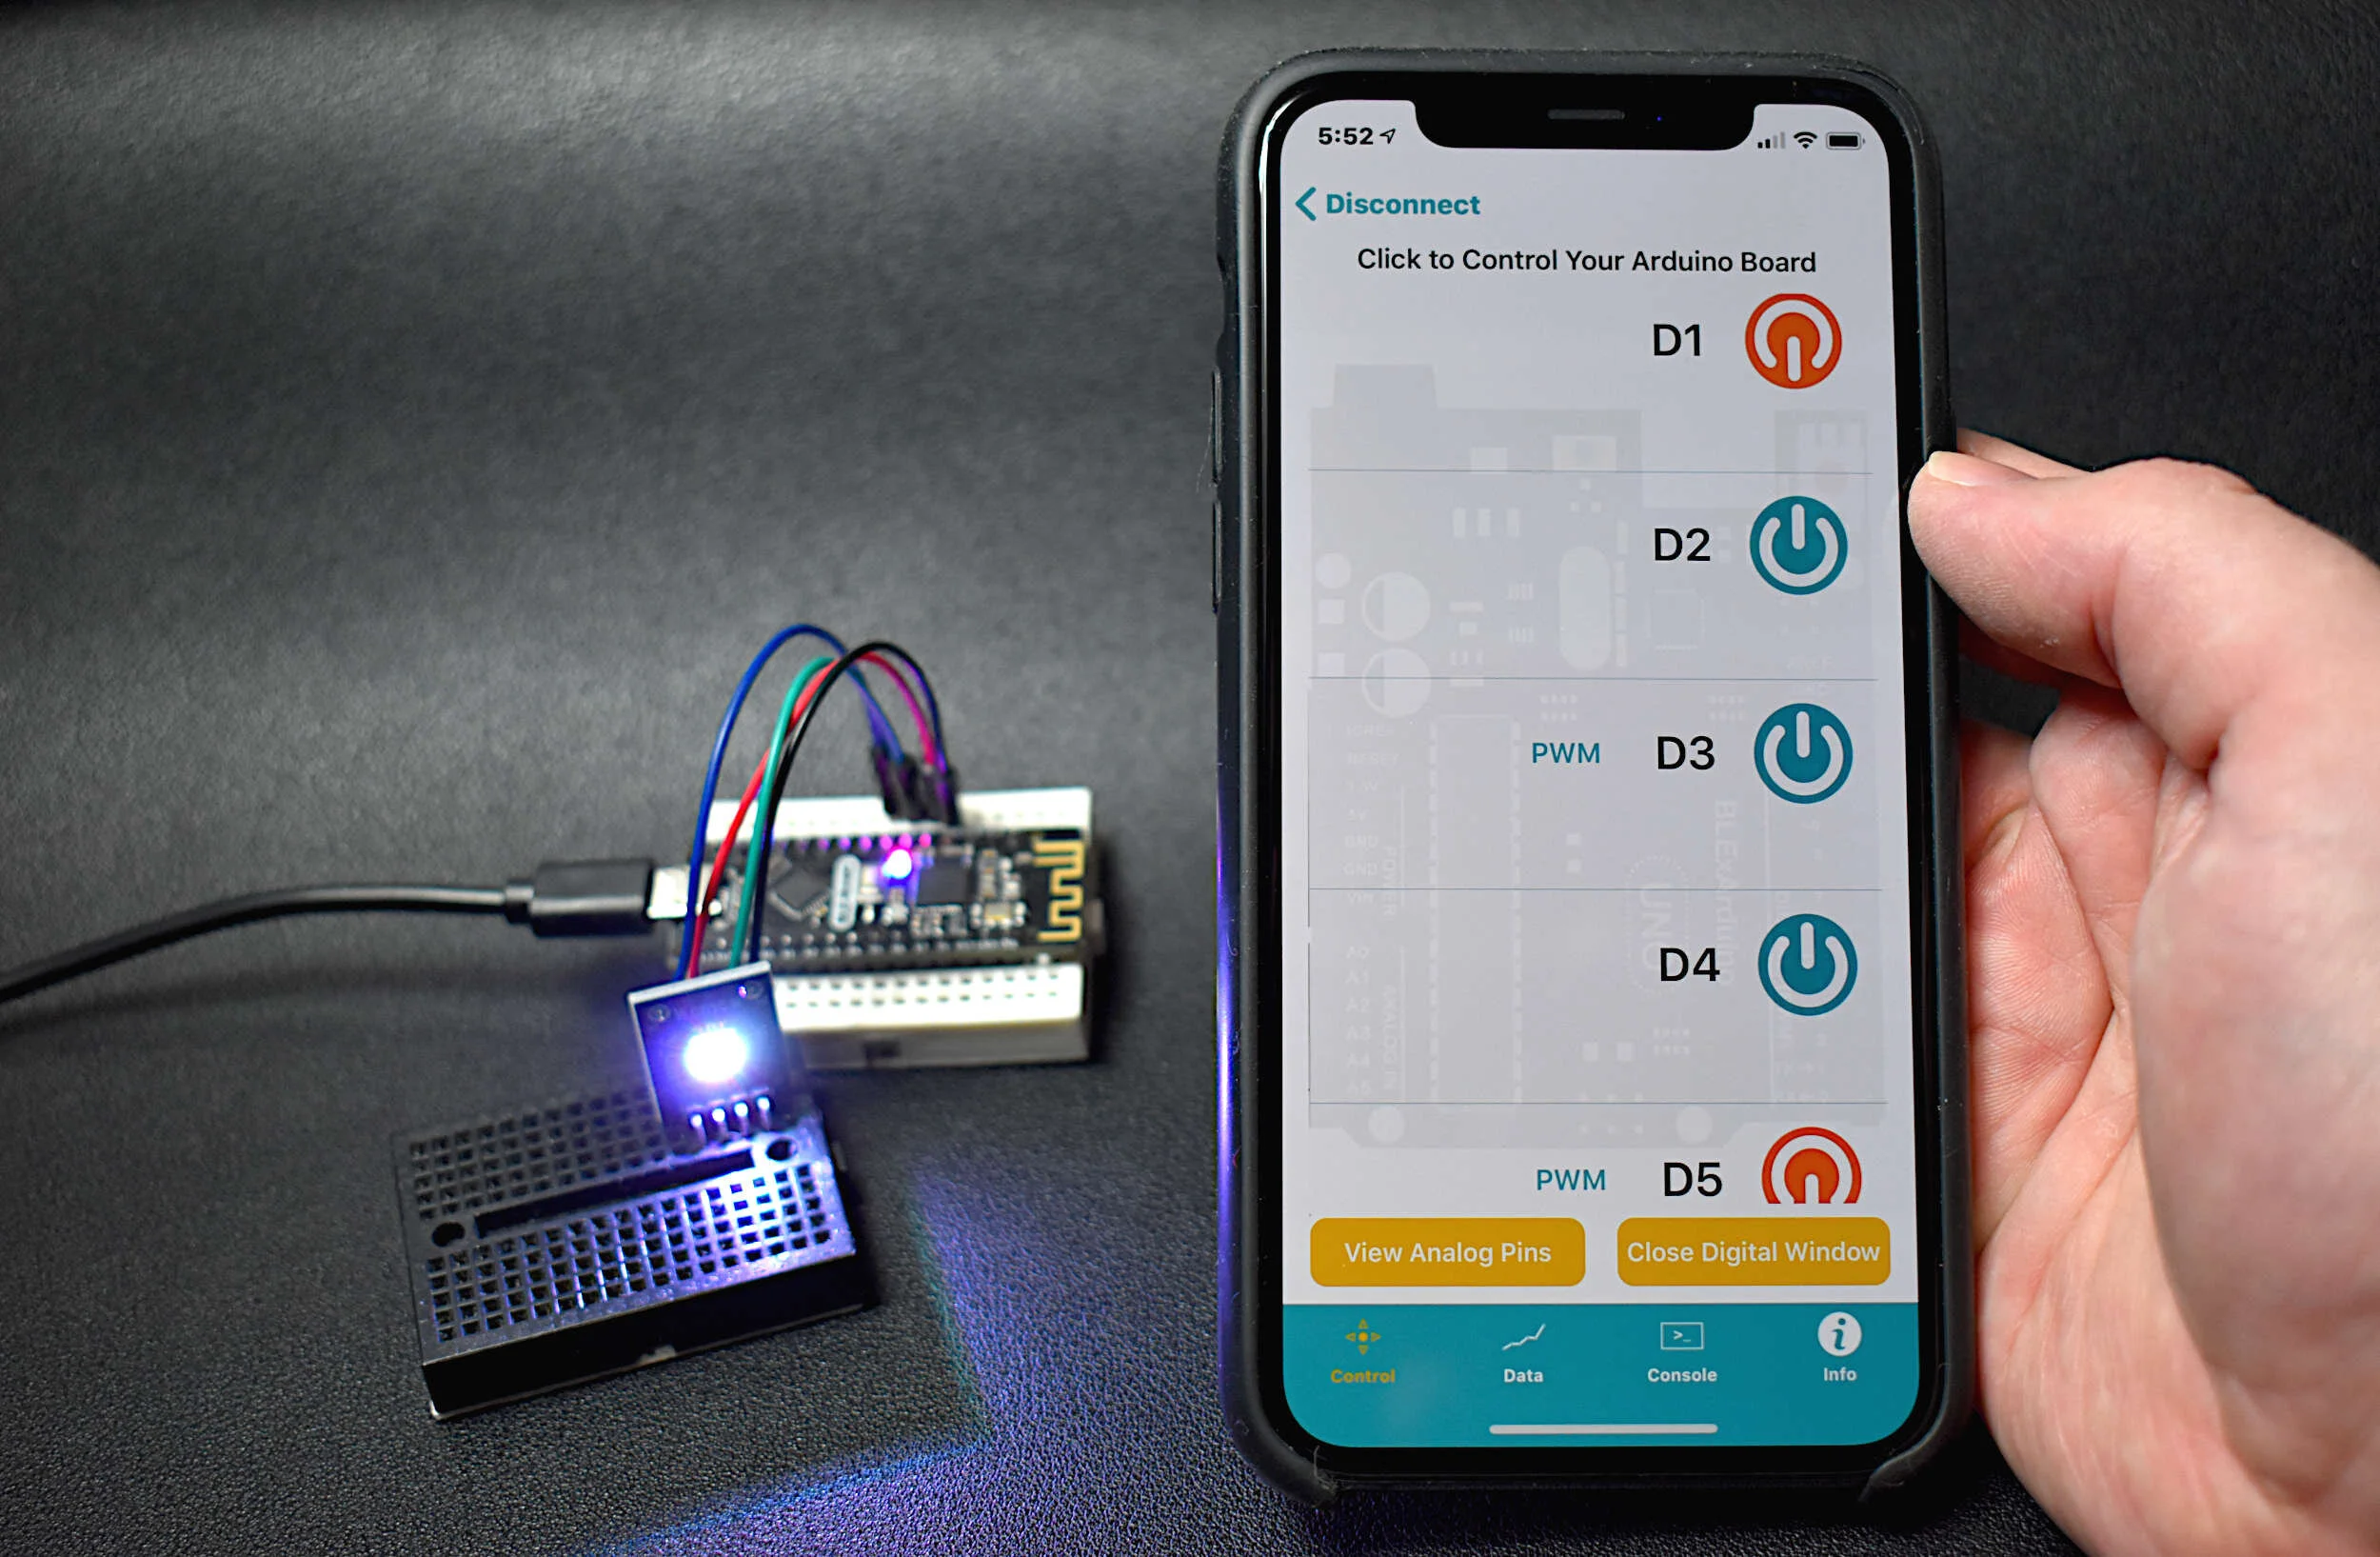
BLExAR iOS Bluetooth App - Control your Arduino board using Bluetooth Low Energy
Parts List for Tutorial
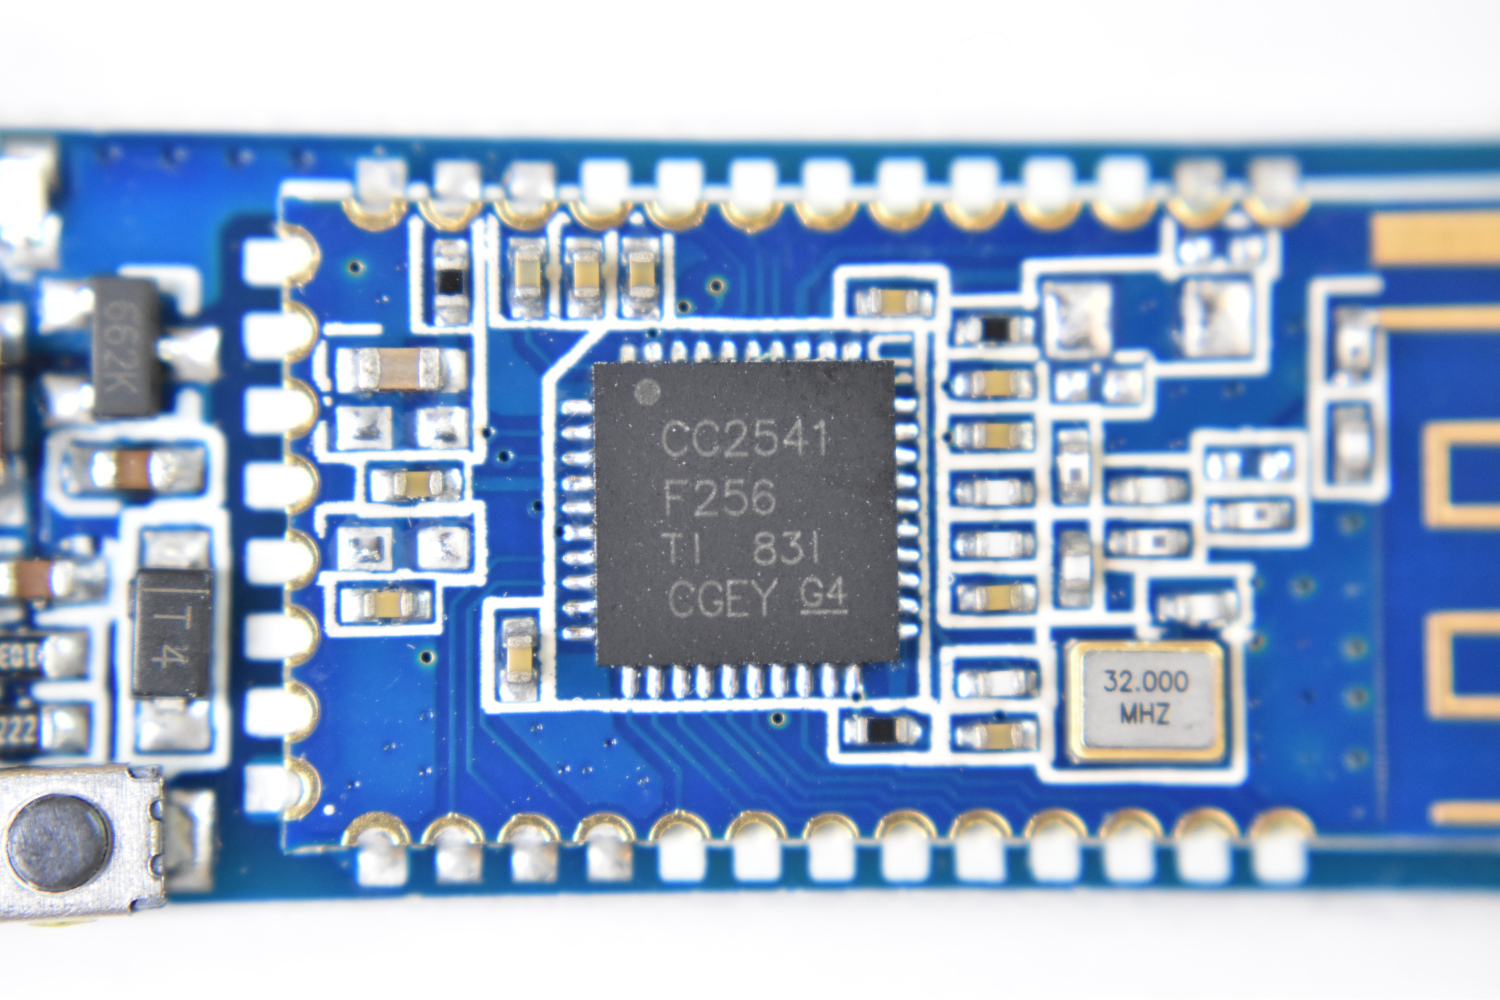
An RGB LED, as stated earlier, has four pins instead of two. The 4-pin RGB LED can be seen against a standard LED in Figure 1. The RGB LED is the first component used in this tutorial, along with an Arduino Uno board, a CC2541 Bluetooth module (HM-10 or AT-09), and a few resistors. The BLExAR app has pulse width modulation (PWM) capabilities, which will allow us to alter the emitted light color and brightness based on intervals from 0-255 for each color. Since we are using an RGB LED, we have red, blue, and green hues which allow us to create a 24-bit color light emitting diode (assuming each color responds to the PWM resolution of the Arduino). In order to use this PWM method, we must ensure that we are using the correct LED - a cathode-common RGB LED. This means that the longest leg of the LED must be the common (ground) pin. This will allow us to vary the voltage (via PWM) of each RGB color using the Arduino board and BLExAR app.
The full part list is shown below, purchasable from Amazon:

Figure 1: RGB LED (right) vs. Regular LED (left)
It is imperative that the RGB LED has a common CATHODE (long leg) and three ANODES (short legs). Otherwise, the PWM method we are using will not work.

This bundle includes the necessary components to follow along with the RGB LED fade tutorial using the BLExAR app. The user will wire, program, and demonstrate how to change the color of a tri-color LED with the BLExAR app using both PWM control and on-off switches on the app. The PWM control of the RGB LED lets users select from a range of colors using a combination brightness of the three colors available on the LED.
This kit comes with the following components:
1x Maker Portal Arduino Uno Board
1x Black USB 2.0 Cable (1m)
1x CC2541 Bluetooth Module
1x RGB LED (with 3 anode legs, 1 cathode leg)
1x Mini Breadboard
8x Male-to-Male Jumper Wires
*iOS device NOT included!
NOTE: Our batch of RGB LED modules have reversed labels for green and red, meaning, the label R is for green, and G is for red. This was noticed after receiving and testing the modules from our manufacturer.
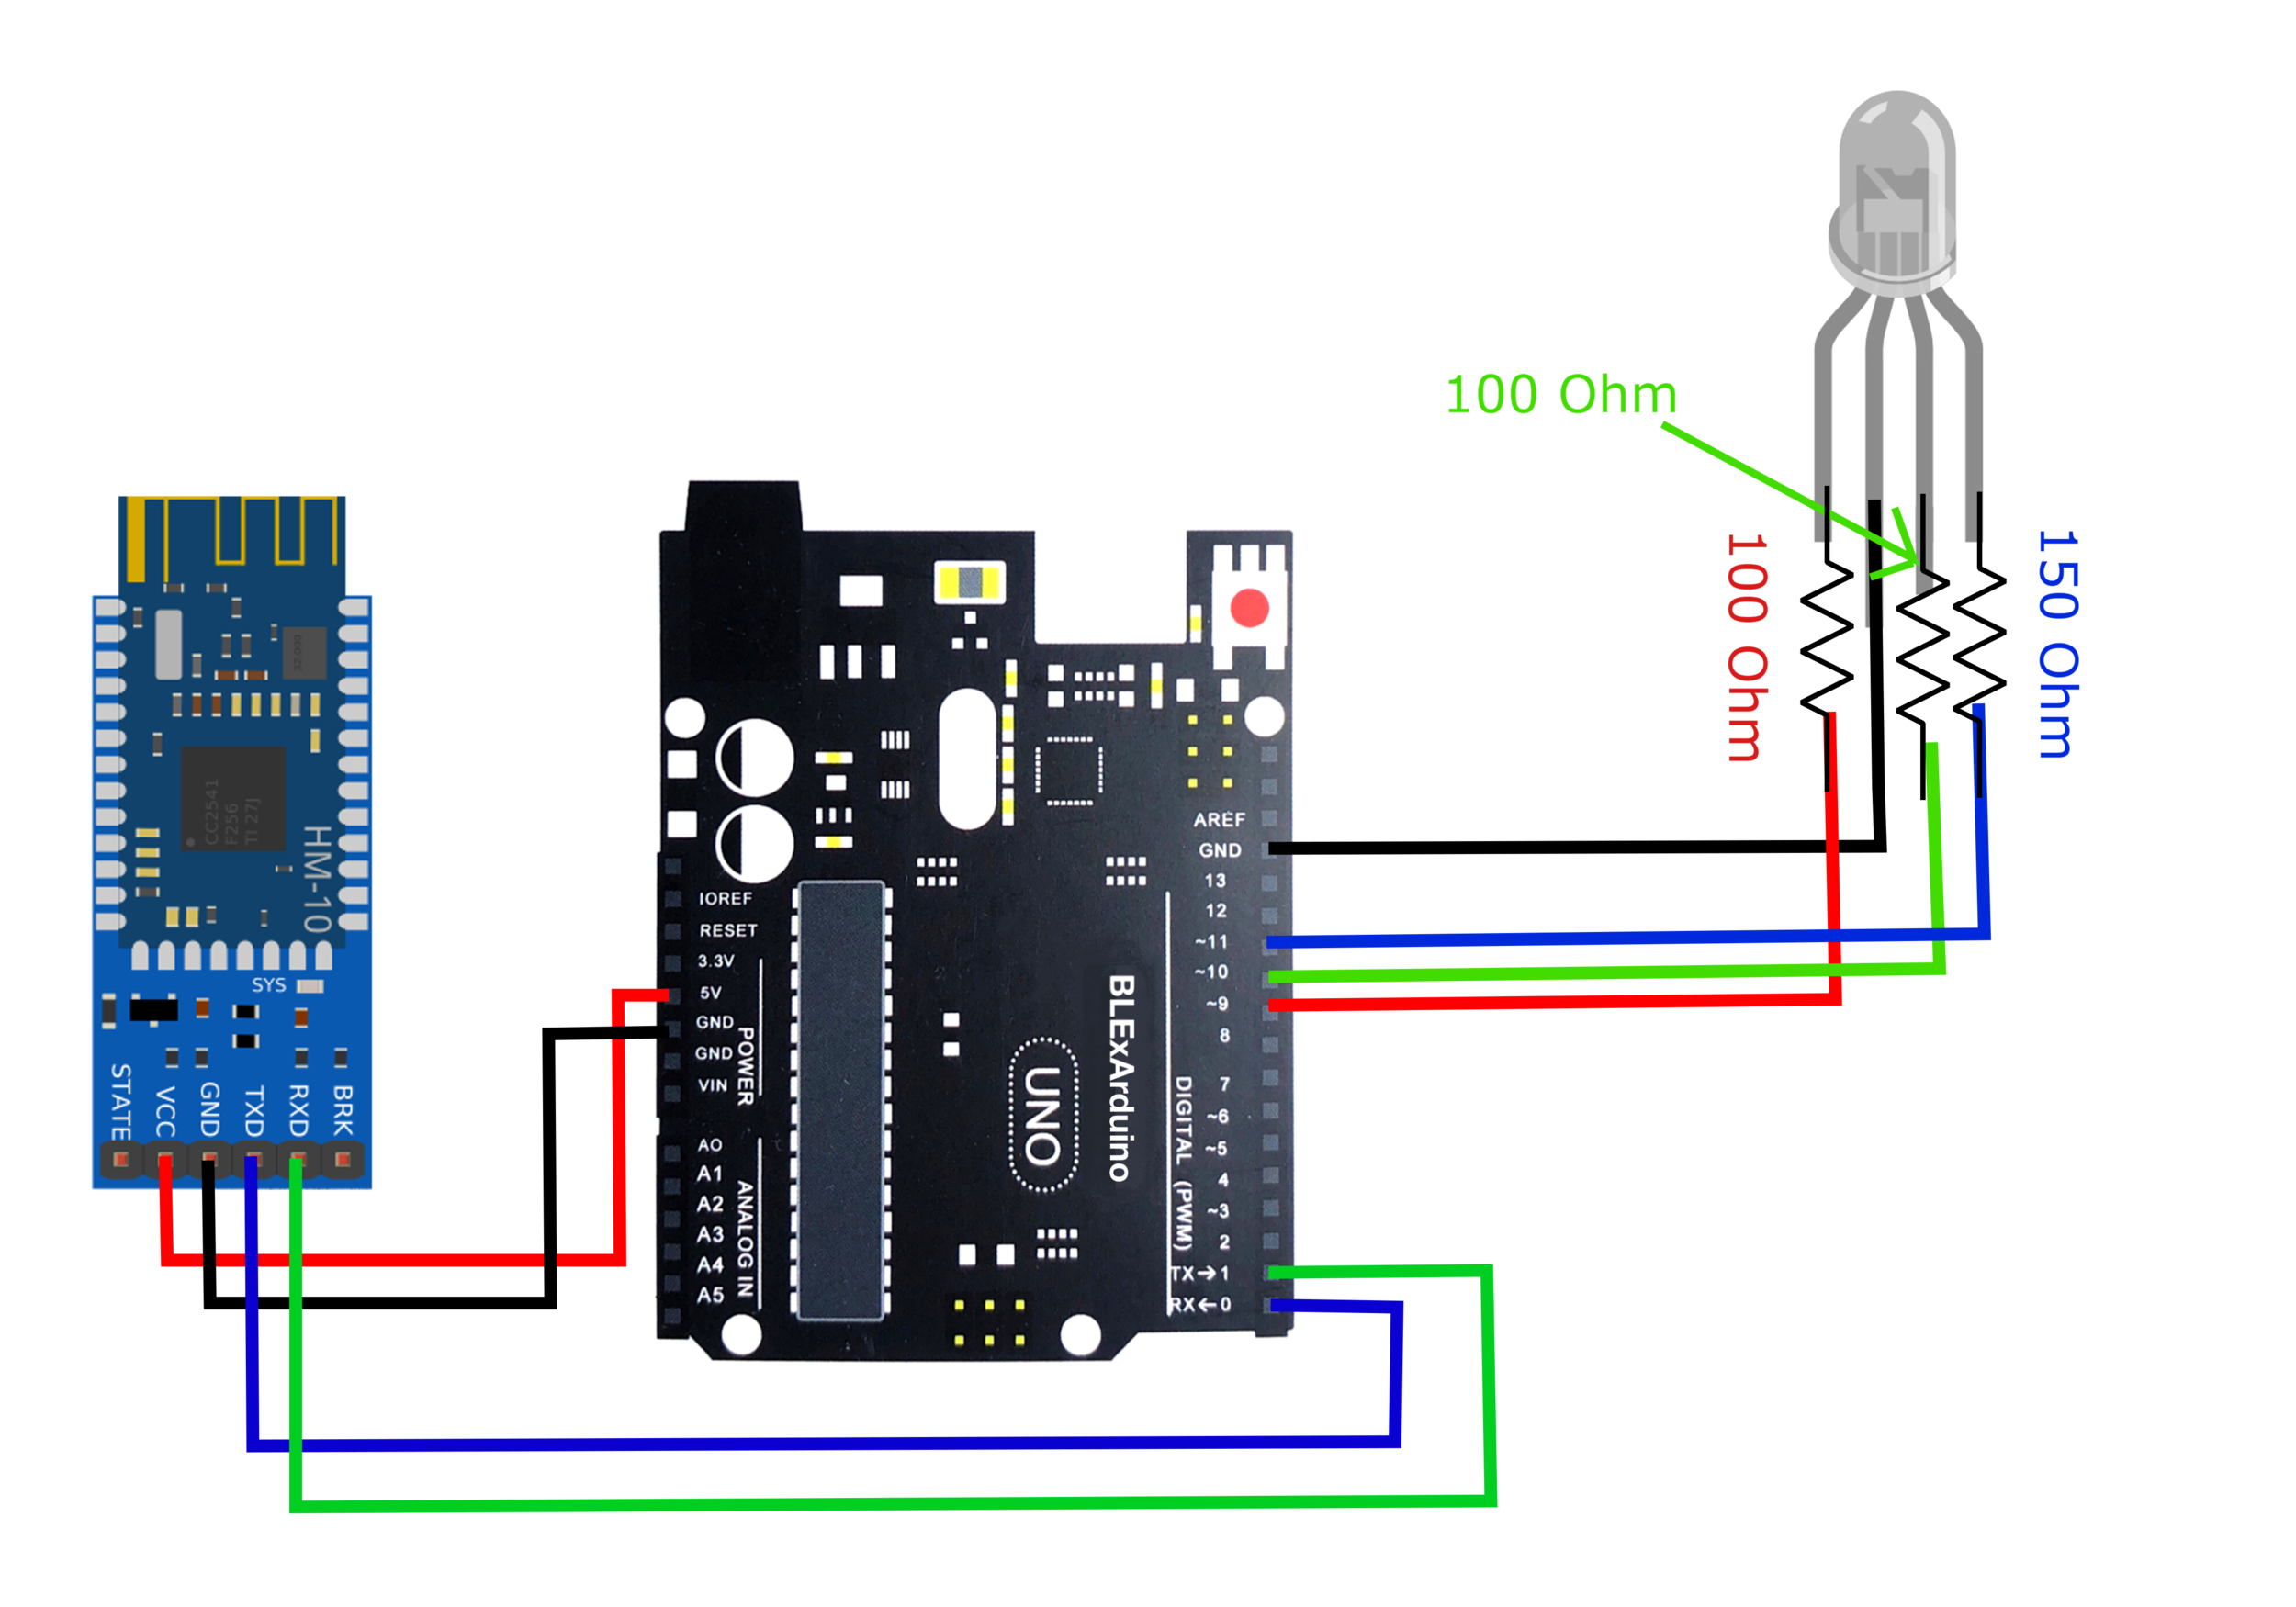
Wiring for Bluetooth Communication and PWM Control
As stated above, we need to use PWM to vary the brightness of each color pin of the LED. Therefore, we must choose PWM-enabled pins on the Arduino board. On the Uno, pins 3,5,6,9,10 and 11 are PWM controllable. To make things simple, I chose pins 9,10,11, but any of the PWM enabled pins are usable and controllable via the BLExAR app.
The wiring diagram below outlines the process for wiring the RGB LED and a CC2541 (HM-10, AT-09, JDY-08, etc.) Bluetooth module to the Arduino Uno board.
Arduino Code
The code required for control of an Arduino board needs specific identifiers that tell the board when to start and end a specific command. The code also interprets the signals sent by the BLExAR app to determine whether to control an analog or digital signal. Furthermore, the control code also deciphers whether to control a pin as PWM or just a standard on or off. All of the commands and interpretations are handled by the app (on the iOS side) and the code below (Arduino side).
#include <SoftwareSerial.h>

String strglob= "";
String pin_num_char = "";
int pin_num = 255;
bool analog_bool = false;
bool digital_bool = false;

SoftwareSerial ble_device(0,1);

// the setup routine runs once when you press reset:
void setup() {
  //Serial.begin(9600);
  delay(100);
  ble_device.begin(9600);
}

void loop() {

  while (ble_device.available()){
    char ble_char = ble_device.read();
    if (ble_char == '\n'){
      //Serial.println(strglob);
      if (analog_bool){
        pinMode(pin_num,OUTPUT);
        analogWrite(pin_num,strglob.toFloat());
        analog_bool = false;
        pin_num = 255;
      } else if (digital_bool){
        pinMode(pin_num,OUTPUT);
        if (strglob == "1"){
          digitalWrite(pin_num,HIGH);
        } else if (strglob == "0"){
          digitalWrite(pin_num,LOW);
          pinMode(pin_num,INPUT);
        }
        digital_bool = false;
        pin_num = 255;
      }
      pin_num = 255;
      strglob = "";
    } else {
      if (analog_bool == false and digital_bool == false) {
        if (ble_char == 'D'){
          digital_bool = true;
        } else if (ble_char == 'A'){
          analog_bool = true;
        } else {
        }
      } else{
        if (pin_num == 255){
          if (ble_char != 'e'){
            pin_num_char += ble_char;
          } else if (ble_char == 'e'){
            pin_num = (String(pin_num_char).toInt());
            pin_num_char = "";
          }
        } else {
          strglob += ble_char;
        }
      }
    }
  }
  strglob = "";
  delay(20);
}
Demonstration and PWM Control
The video below demonstrates control of an Arduino Uno board using an iPhone X. The brightness and color of an RGB LED are changed using simple on-off switches as well as PWM sliders that range from 0-255 (8-bit).
The next video below shows the varying brightness of the RGB LED for each color.
Conclusion and Continuation

In this tutorial, I introduced the idea of RGB LEDs and how to control them using an iOS device and the BLExAR app. RGB LEDs are 4-pin LEDs that can produce over 16.7 million different colors by varying the voltage sent to each of its three individual color pins (red, green, blue). The BLExAR app allows the iOS user to send a series of commands to a Bluetooth-enabled Arduino board that allows the user to control its pins via digital on and off values and even pulse width modulation (PWM) values.
The PWM methods afforded by the BLExAR app demonstrate the effects of fading an LED and how, through changing the effective voltage sent to an LED, we can create a 24-bit color LED. This type of 24-bit color combination is the basis for most liquid crystal displays (LCD) that are used in modern displays like computer screens, TVs, and smartphones.
From this point, the BLExAR app can be used to control other PWM components such as fans, heaters, or pumps. The BLExAR app was created specifically as an integrated tool that allows users to control their Arduino board at a low cost, with minimal coding or experience needed. The possibilities from here, using both digital control and PWM are endless!

See More in BLExAR and Arduino: