iPhone Datalogger with Arduino Using The iOS Bluetooth App BLExAR

In this tutorial, the BLExAR app will be used in conjunction with a CC2541 Bluetooth module and an Arduino (ATmega328) board to create a simple data acquisition system. A DHT-22 sensor will provide temperature and humidity data to the Arduino which will be recorded by an iOS device via the BLExAR app. BLExAR allows users to visualize and save data in real-time. The wiring, programming, and general functionality needed to create a Bluetooth data acquisition system with an iPhone or iPad is demonstrated here to simplify the app. This experiment is a real-world example of an Arduino application showing temperature data acquisition from a real sensor. This tutorial will allow users to solve their own engineering problems using the modern Arduino platform and wireless communication through the BLExAr app, which will ultimately expand the reach and compatibility of technology in the classical sciences through exploration and experimentation.
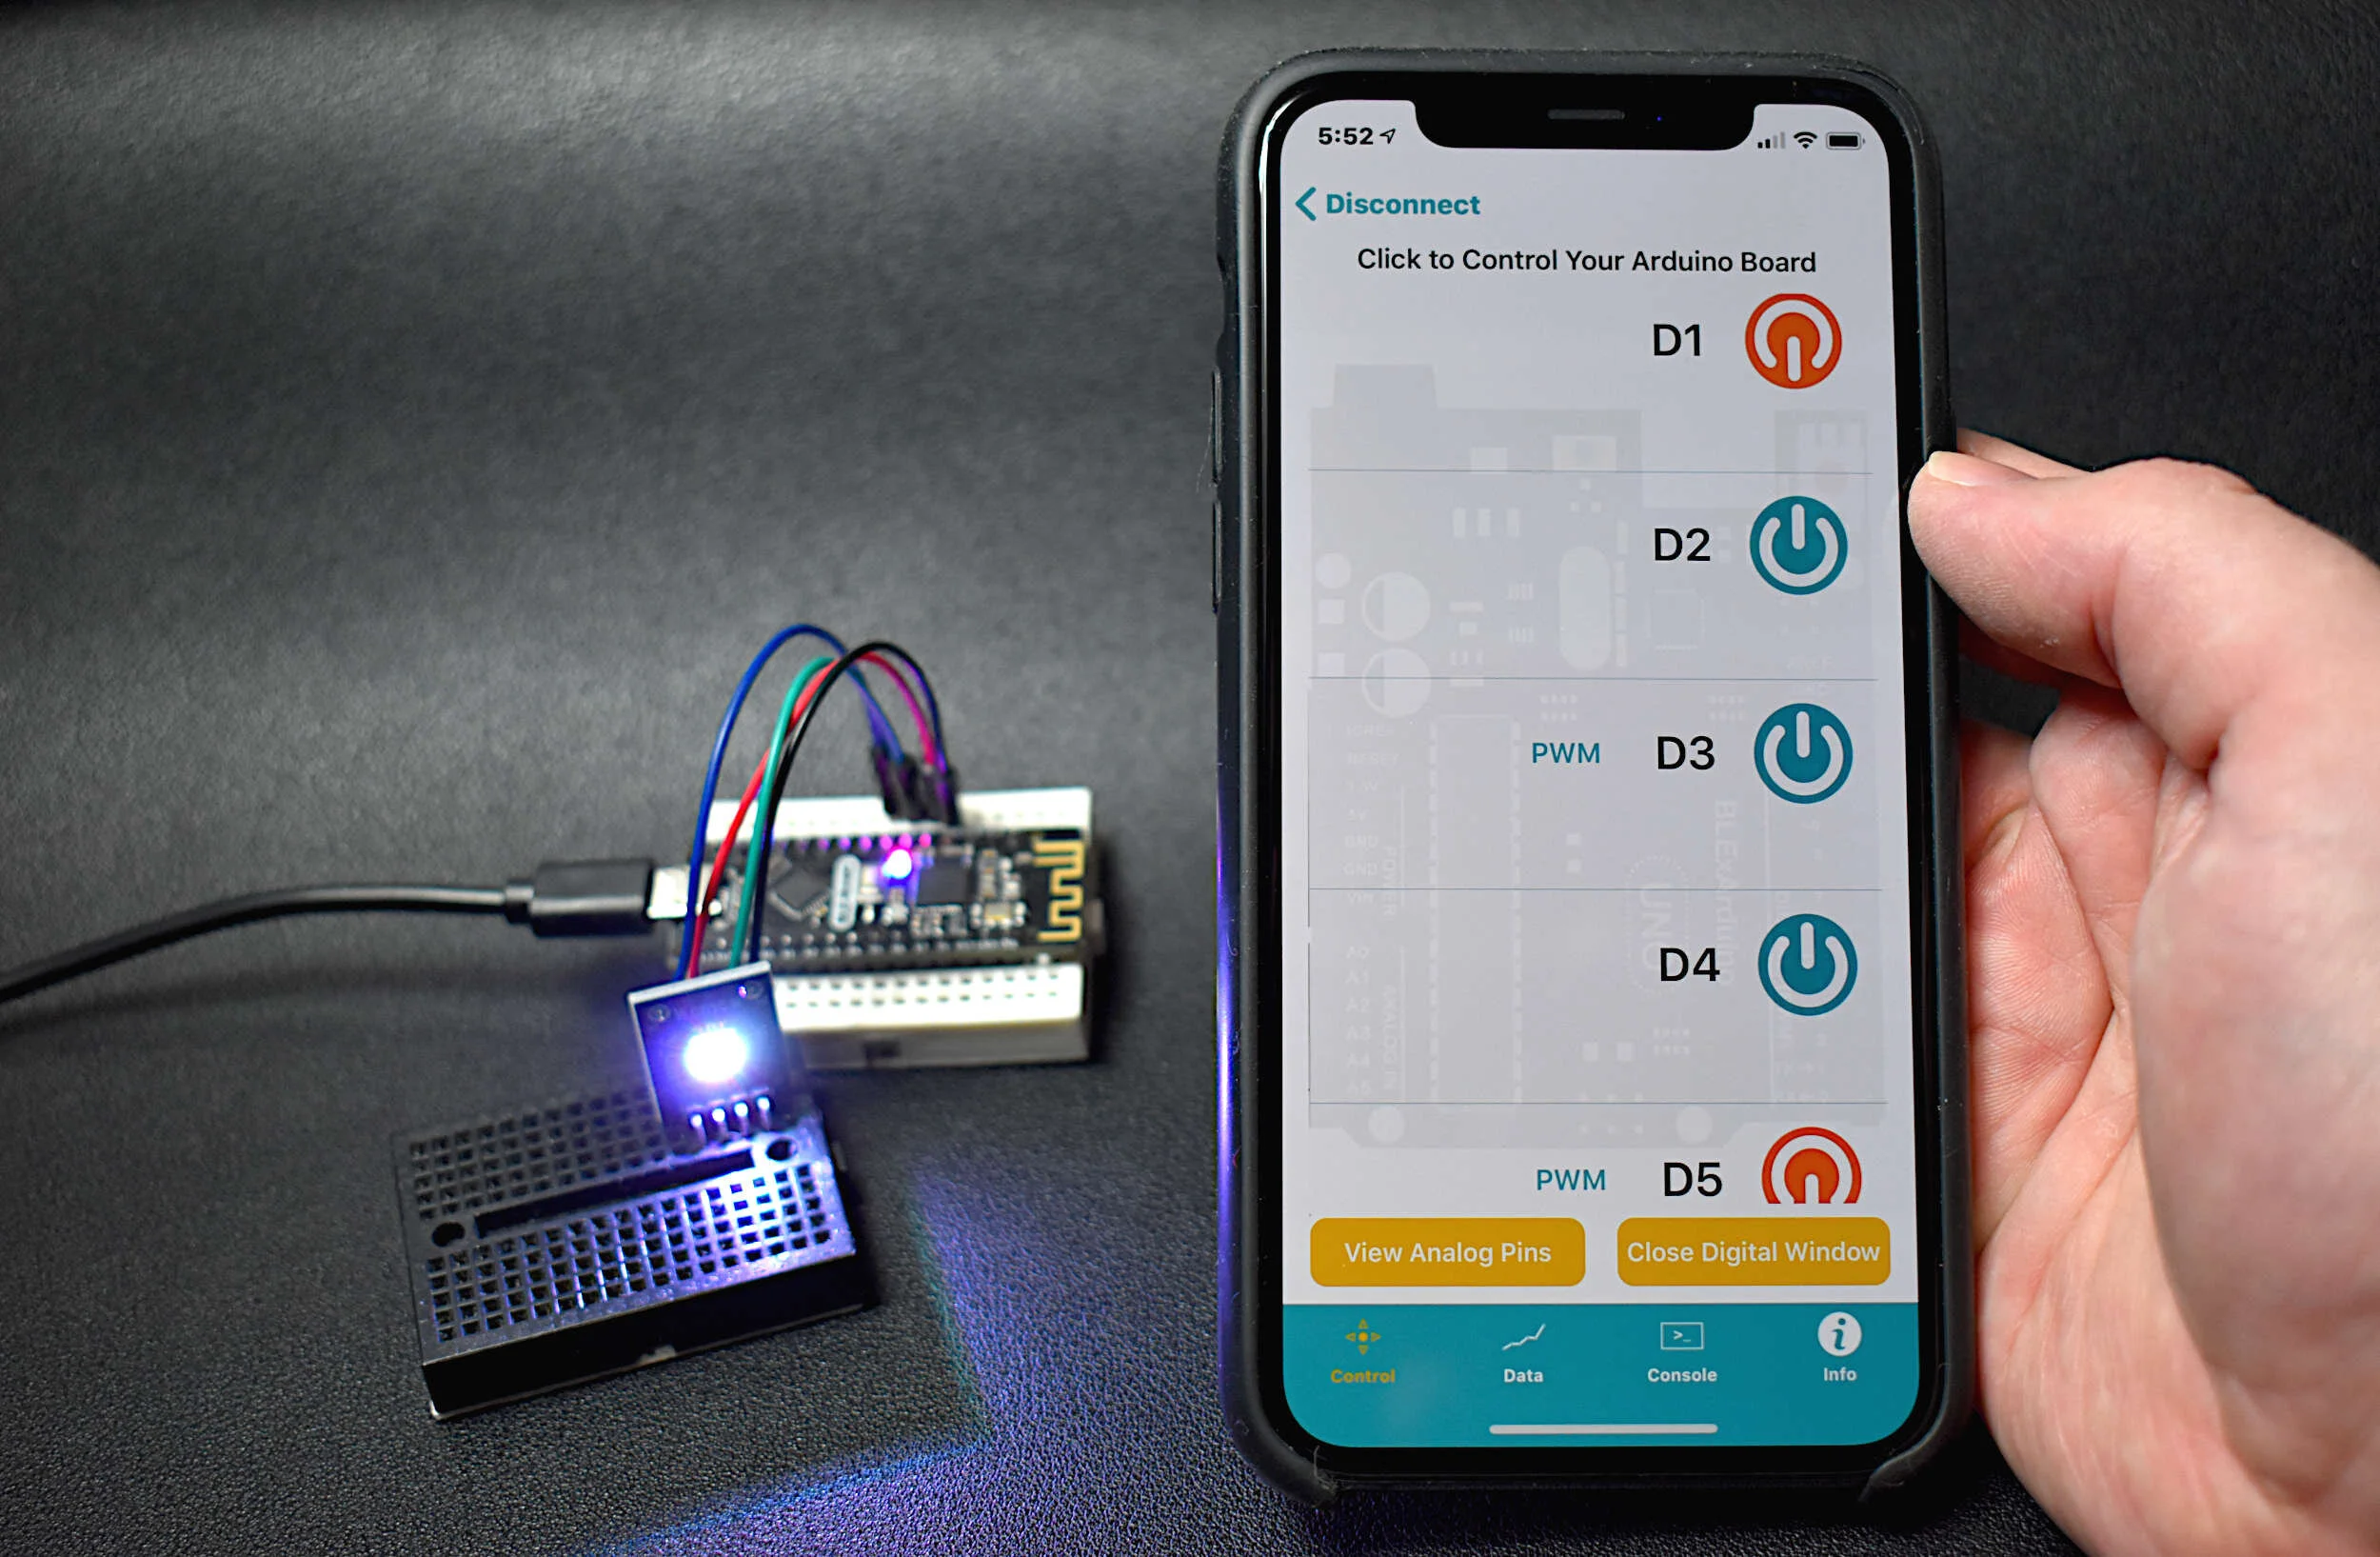
Figure 1: BLExAR app for iOS and Arduino Bluetooth interaction
Parts List and Wiring for Tutorial
The DHT-22 temperature sensor will function as the data component for this tutorial, along with a CC2541 BLE module and an Arduino board. Below is a list of components used in this tutorial (along with an iOS device, of course). A resistor is also needed as a pullup to function correctly with the DHT-22 sensor. I additionally include a breadboard so that the DHT sensor doesn’t need to be soldered (unless a breakout version is purchased, then no breadboard is needed). The wiring is fairly straight forward for this tutorial, and the software is handled by libraries that read the signal from the data pin.

Figure 2: DHT22 Temperature Sensor and HM-10 Bluetooth Module for

This is the DHT22 temperature sensor bundle that will provide temperature and humidity data to an Arduino which will be recorded by an iOS device via the BLExAR app. BLExAR allows users to visualize and save data in real-time.
Included in the BLExAR DHT22 Temperature Sensor Bundle:
1x Arduino Uno (w/USB Cable)
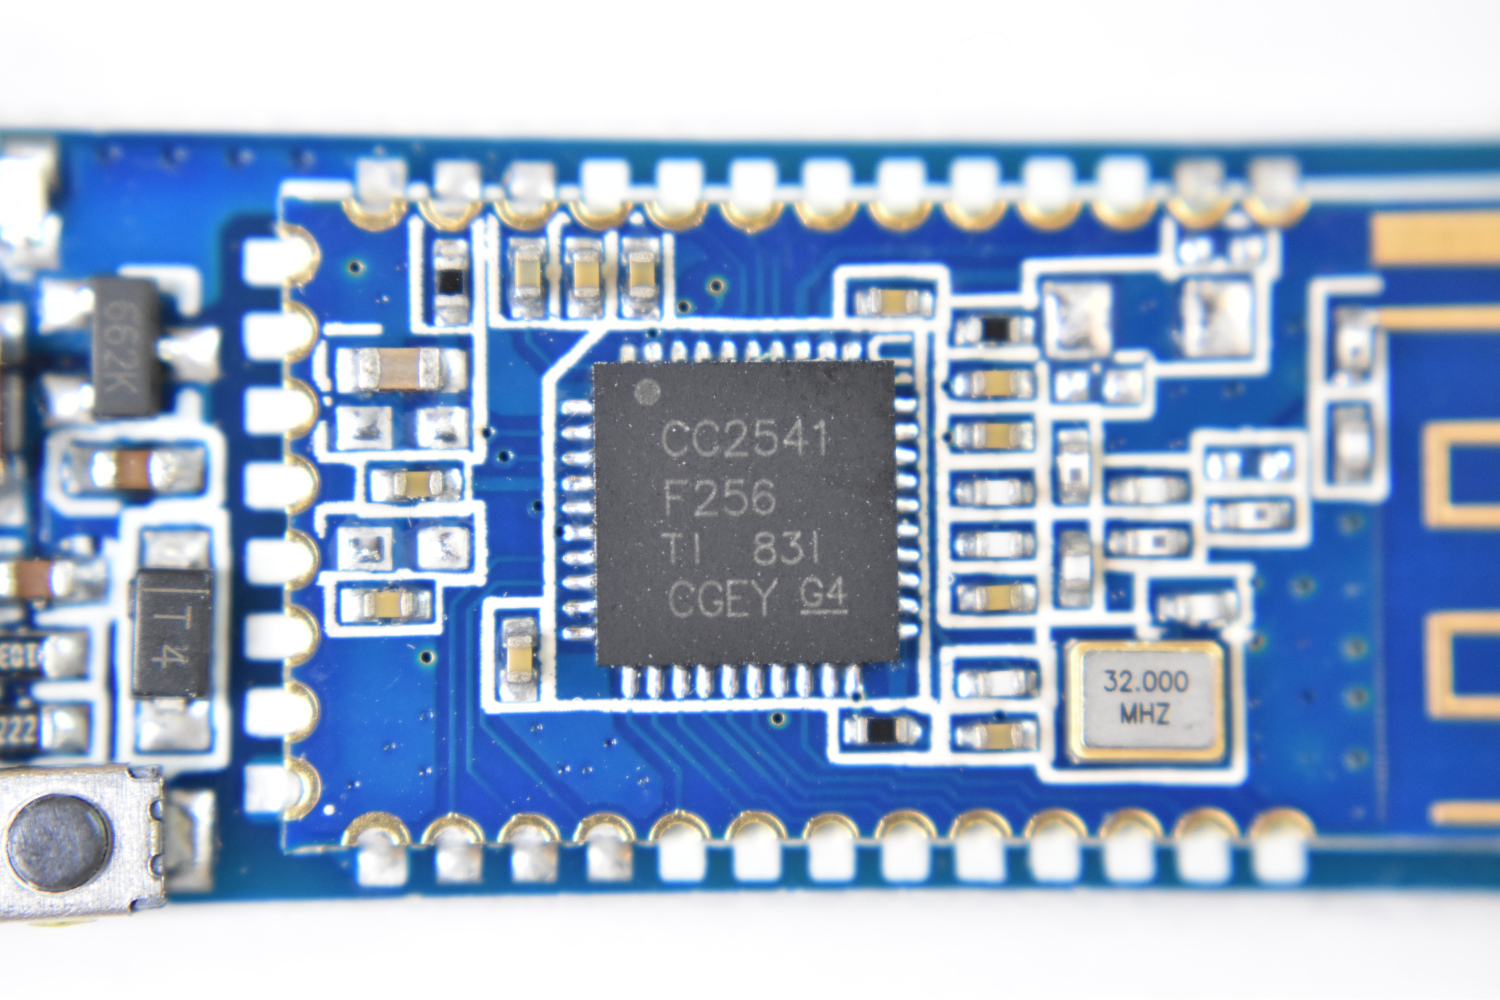
1x CC2541 Bluetooth Module
1x DHT22 Temperature Sensor
1x Mini breadboard (Colors may vary)
10x Jumper Wires
Features of the DHT22 Temperature Sensor:
3.3-6V Supply Voltage
DHT22 Operating Ranges:
Relative Humidity: 0-100 %
Temperature -40 °C to 80 °C
Sample Rate ~ 2 seconds
Sensitivity:
Relative Humidity: ± 0.1 %
Temperature: ± 0.1 °C
Accuracy (Drift and calibration errors):
Relative Humidity: ± 2-5 %
Temperature: ±0.5 °C
Specifications for Arduino Uno Rev3 Board:
ATmega328P chip with Arduino Bootloader
14 digital pins, 6 analog pins
10-bit analog-to-digital converter (ADC)
5V-12V Supply Tolerance
3.3V and 5.0V output pins
16 MHz clock
5 PWM pins, I2C support, SPI support , UART support
ATmega16U2 USB TTL, compatible with Linux, Windows, and Mac
Black Stylish Finish
Fully Integrated with Arduino IDE software
Features of the CC254x Bluetooth Module:
Active-Mode RX Down to: 17.9 mA
Active-Mode TX (0 dBm): 18.2 mA
Power Down Sleep Mode: 60uA
Wide Supply-Voltage Range (3.6 V - 5V)
Serial Communication
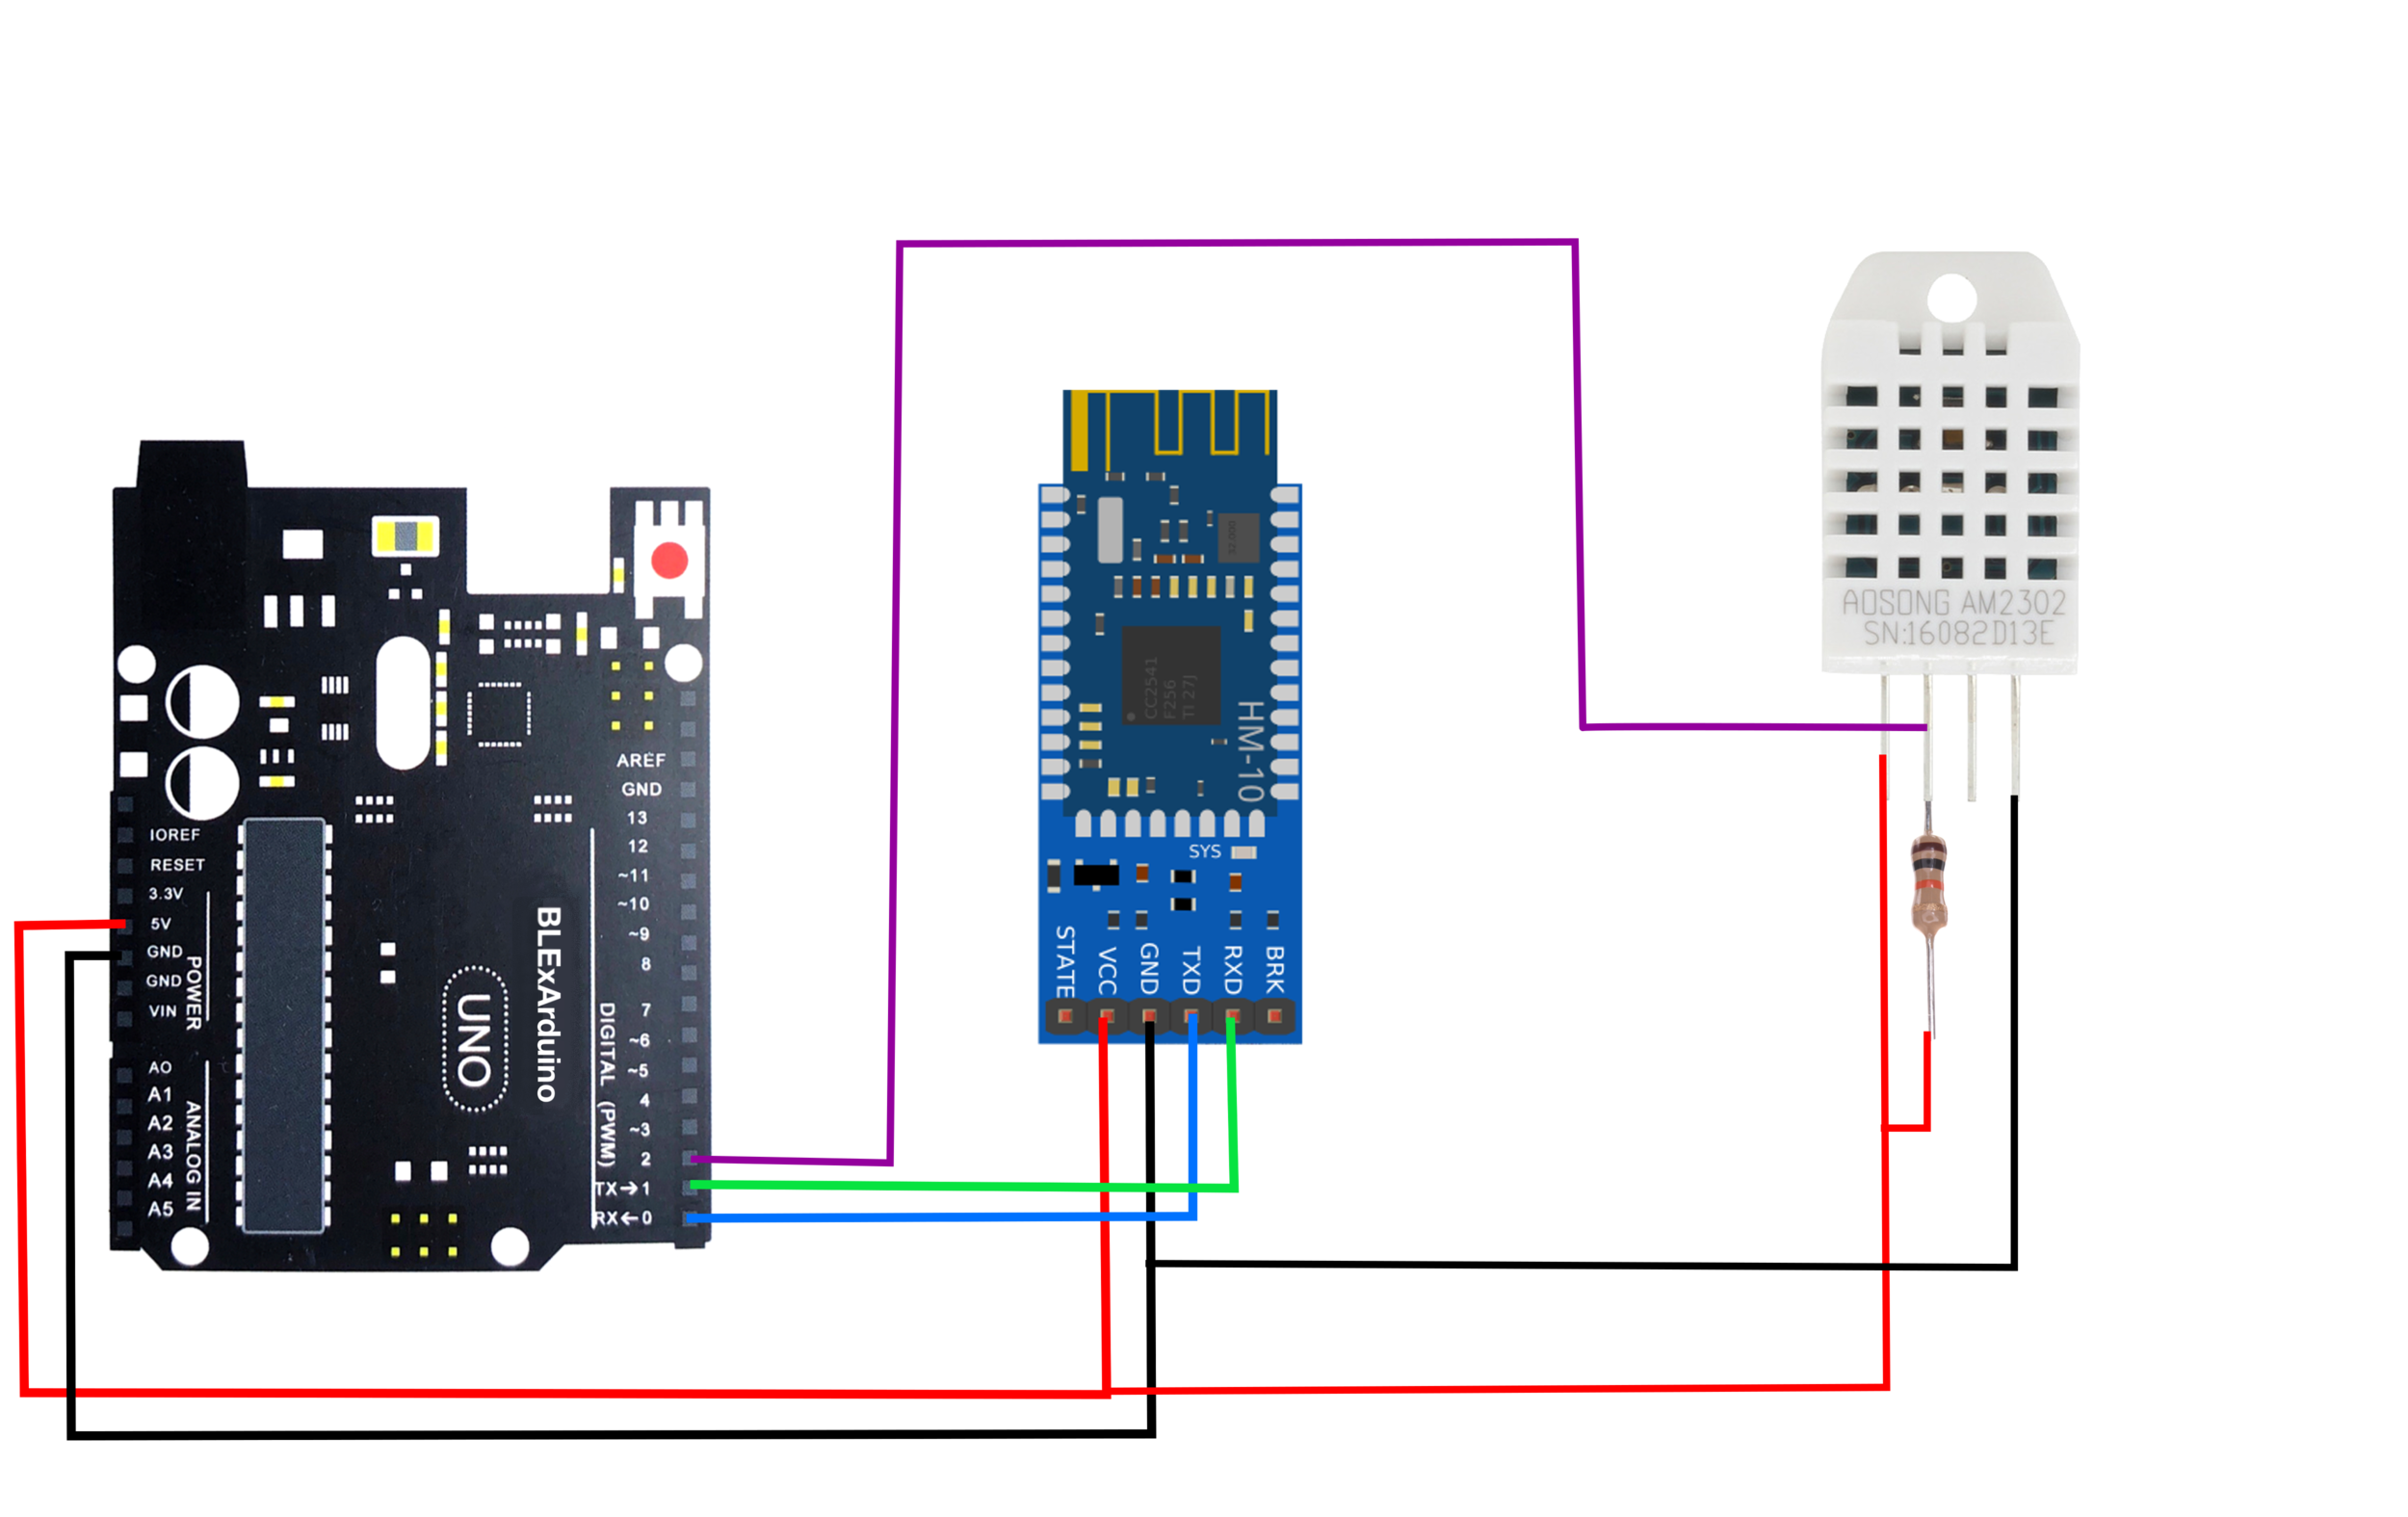
Figure 3: Wiring diagram for Arduino Bluetooth communication between an iOS BLExAR device and the Arduino DHT-22 temperature sensor. Notice the 10k resistor acting as a pull-up resistor. This configuration will allow the Arduino to send a temperature (or humidity) data point roughly every 2 seconds.
Arduino Code
I will be using Adafruit’s DHT Sensor Library to handle and control the temperature and humidity data from the DHT sensor. Before uploading the sketch to an Arduino board, be sure to first download the library from the library manager in the Arduino IDE (shown below).

DHT Sensor Library from Adafruit
The Unified Sensor Library from Adafruit must also be downloaded to ensure that the DHT library functions correctly.
Below is the final DHT-22 data send code from Arduino -> BLExAR. BLExAR knows how to decode the data (sent as UTF-8) and log it into the data acquisition window along with a timestamp. This means that users can access the data and timestamp after data acquisition has completed.
#include "DHT.h"
#include <SoftwareSerial.h>

#define DHTPIN 2     // what digital pin we're connected to

//#define DHTTYPE DHT11   // DHT 11
#define DHTTYPE DHT22   // DHT 22  (AM2302), AM2321
//#define DHTTYPE DHT21   // DHT 21 (AM2301)

DHT dht(DHTPIN, DHTTYPE);
SoftwareSerial ble_device(0,1); // HM-10 TX/RX pins

void setup() {
  dht.begin(); // prepare DHT sensor
  ble_device.begin(9600); // prepare BLE module
}

void loop() {
  delay(2000); // delay in-between readings
  //float f = dht.readHumidity(); // uncomment to send humidity
  float f = dht.readTemperature(true); // send temperature data
  char f_str[6]; // prepare character array to send
  dtostrf(f,2,1,f_str); // format data into char array
  ble_device.write(f_str); // send to BLExAR
}
BLExAR App and Data Window
Once the BLExAR app is downloaded and opened, a window will appear that shows multiple peripherals (assuming Bluetooth is enabled on the iOS device). The scan window should look something like the image in Figure 4.

Figure 4: BLExAR Bluetooth scan with discoverable devices. In this particular case, a BLExAR device has been discovered and needs to be selected in order to connect and continue with the tutorial.

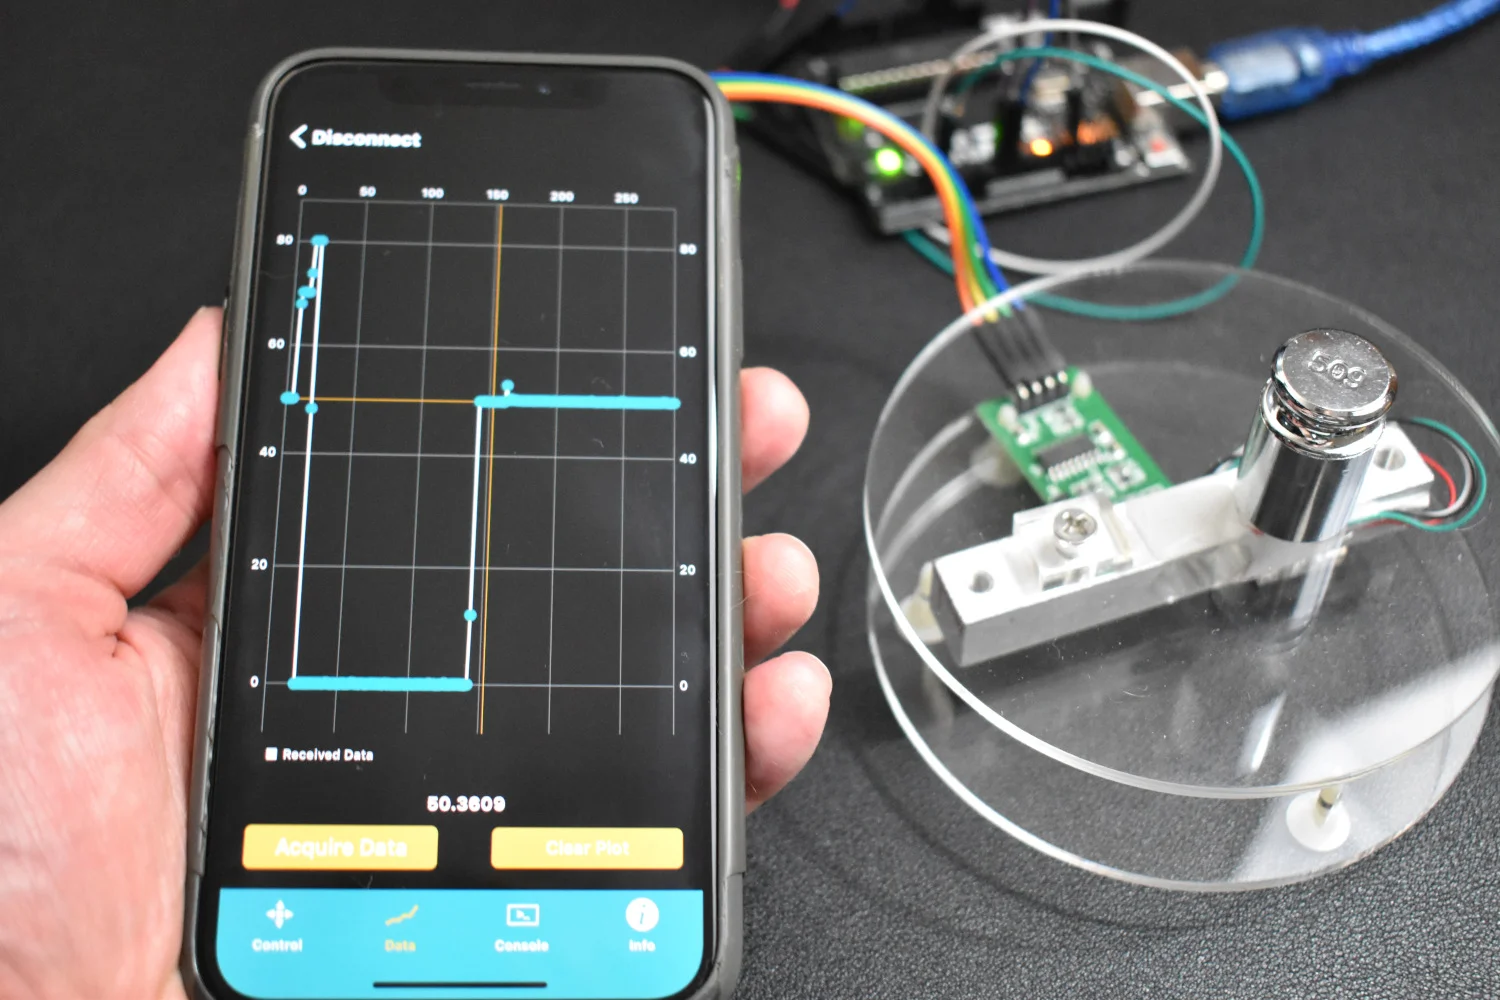
Figure 5: BLExAR app showing the data window and demonstrating the visualization of real-time data as it is logged into the iOS device via Bluetooth communication. This is a real temperature readout from the DHT22 temperature sensor and the BLExAR app.
Once the BLExAR device is selected and the iOS device has connected with the peripheral, the tab bar window will appear with an image of an Arduino Uno board. For this tutorial, we will select the “Data” tab on the bottom of the screen. Data should already be arriving in real-time once the Data window is selected. You should start seeing a plot similar to that in Figure 5.
From here, there are multiple options. The user can elect to “Start Acquisition” which will collect data as it comes in. Then, when the user wants to stop acquiring the data, select “Stop Acquiring” and a window will appear with instructions to email the data to an email address. This allows the user to access the data with a timestamp in a .csv format from an email address of their choosing.
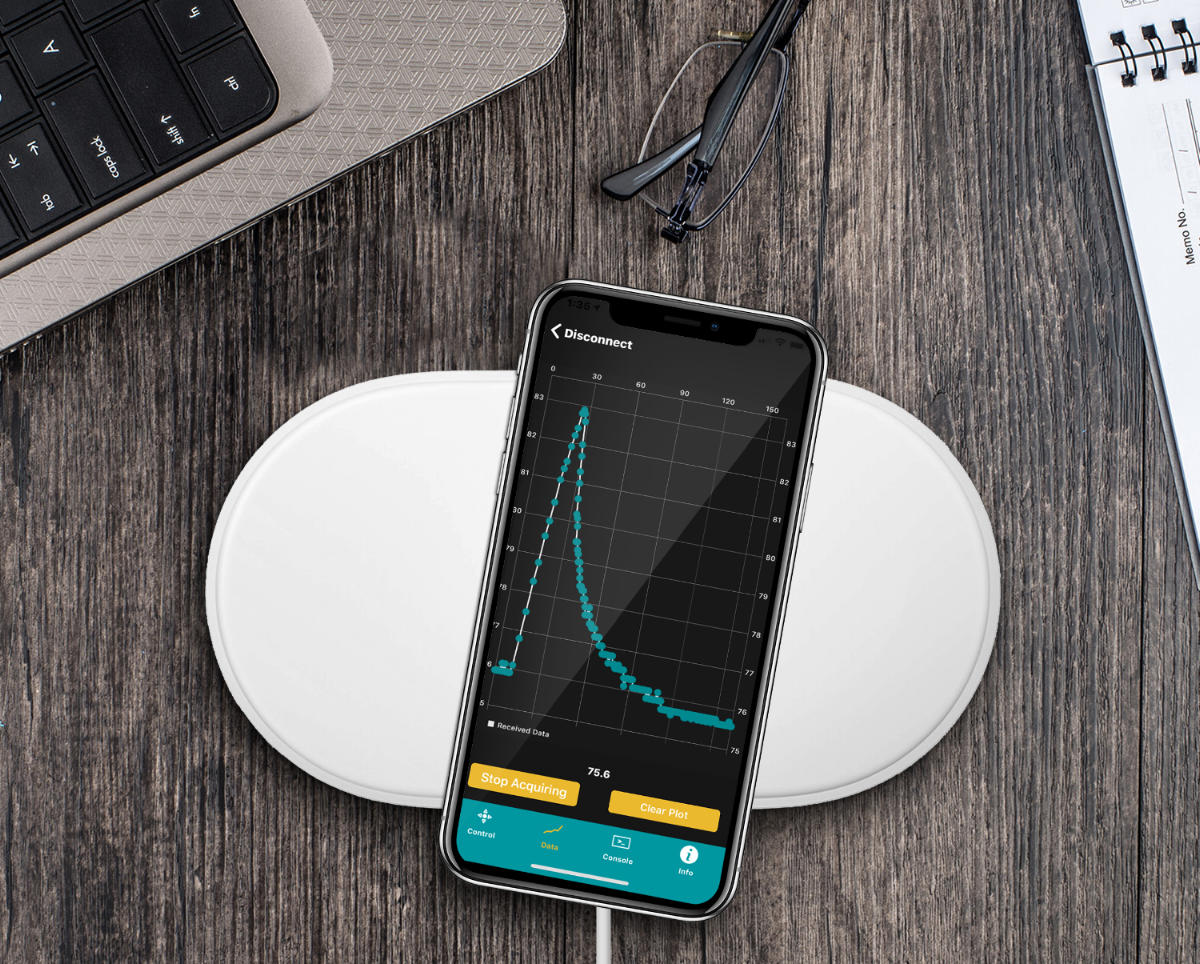
I went through the process of heating a DHT-22 temperature sensor and then letting it cool via forced convection, which can be seen in the plot below:
It’s easy to see the heating and cooling of the sensor, as well as the timestamp with accurate (up to about 1 microseconds) readouts of the time at which the data was received.
Conclusion
In this tutorial, I demonstrated the power of the BLExAR app once again by using its data window to acquire data from an Arduino Uno board measuring temperature from a DHT-22 sensor. The BLExAR app has the ability to communicate via Bluetooth with an Arduino ATmega328 board and CC2541 BLE module. The app permits users to acquire and visualize data in real-time, with the ability to save a data period as a .csv file for future processing. This features further proves the versatility of the BLExAR app and its integration with iOS devices to further the young engineer’s education into building and experimenting in the physical world.

See More in BLExAR and Arduino: