Bluetooth-Enabled e-Paper Display with Arduino

“As an Amazon Associates Program member, clicking on links may result in Maker Portal receiving a small commission that helps support future projects.”
Electronic paper, also known as e-Paper, is a common technology used in e-Reader devices such as the Amazon Kindle, Barnes and Noble Nook, and Sony Reader. Many e-Readers use electrophoretic technology, which functions by moving charged particles (ink) by imposing an electric field that sends ink dots to to the front or back of the e-Paper, creating shapes that humans perceive as text or images [learn more about the technology behind e-Paper: here and here]. Unlike LCDs, OLED, and other display technologies, e-Paper is highly advantageous for low power, low refresh rate applications due to its ability to retain imagery after being powered off. Application areas for e-Paper range from electronic signage to smart watches, and of course e-Readers. In this tutorial, a 1.54 inch e-Paper module is wired to a BLE-Nano Arduino board to communicates via SPI and display text in real time over Bluetooth. The e-Paper module here can be powered via 3.3V or 5.0V, requires very low power when refreshing (2mA-8mA), and can be completely powered off while retaining its text. An Android smartphone and the BLExAR app will be used to print text on the e-Paper display in real time, demonstrating the capabilities of electronic paper technology.
The main component of this tutorial is the 1.54 inch e-Paper display, which can be found in our store. We are using a specialized library designed by Waveshare with custom examples developed by our team to display text on this particular e-Paper display. Thus, we cannot guarantee that any of the examples provided here will work with other displays. Fortunately, any ATmega328P-based Arduino board can be used with the library (Uno, Nano, BLE-Nano, etc.). We’re also using a Raspberry Pi 4 Computer to interface with the Arduino board. The full list of parts to follow along with the tutorial is given below:
BLE-Nano Arduino Board - $15.00 [Our Store] (alternate: MakerBLE Board)
1.54 inch E-Paper Display - $20.00 [Our Store]
Mini Breadboard - $3.00 [Our Store]
Android Smartphone - $699.99 [Amazon] (Any recent model)
BLExAR App - $1.99 [Google Play]
Raspberry Pi 4 Computer - $69.99 (4GB) [Amazon], $119.99 (8GB Kit) [Amazon]
The wiring between the BLE-Nano (and any ATmega328P chip) and 1.54 inch e-Paper display is given below:

e-Paper Wiring to Arduino Board
This wiring will work with any ATmega328P-based Arduino boards (Arduino Uno, Nano, BLE-Nano, etc.)
A wiring diagram directly between the e-Paper and BLE-Nano is given for additional reference:

For the example in this tutorial, we chose to use 3.3V as the supply voltage, however, 5V will suffice as well. The user may also find it useful for power consumption to wire the e-Paper power pin (VCC) to a digital pin on the Arduino and control the power from there. This would be useful for situations of very low power consumption, where the user does not need to update the display often. For the rest of the tutorial, 3.3V will be used to power the e-Paper display, which consumes about 3mA during idle periods.
The e-Paper library used here is based on the series of display libraries developed by Waveshare on GitHub. Users may find it helpful to check there for e-Paper displays outside of the 1.54 inch display used in this example. For reference, we are building upon the Waveshare 1.54 inch e-Paper display entitled epd1in54_V2. To follow along with this tutorial, click on the GitHub card below and get started with our library and examples:

The simplest way to test your e-Paper display is to run the example script entitled:
simple_text_display.ino
The code is also given below for reference:
/***************************************************************************
* Arduino e-Paper Text Display on Arduino
*  -- looping through integers to show real-time updating
*
*
*  by Josh Hrisko | Maker Portal LLC (c) 2021
*
*
***************************************************************************/

#include <SPI.h>
#include "1_54in_epaper.h"
#include <stdlib.h>

Epd epd; // initiate e-paper display [epd]
unsigned char image[1024]; // memory for display
Paint paint(image, 0, 0); // setup for text display

#define COLORED     0 // background color handler (dark)
#define UNCOLORED   1 // background color handler (light)

int iter_val = 0; // storage variable for serial data

int initial_space = 10; // initial white/dark space at the top of the display
int row_line = 3; // counting rows to avoid overlap
int row_height = 24; // row height (based on text size)

void setup() {
  Serial.begin(9600); // start serial handling for text input

  epd.LDirInit(); // initialize epaper
  epd.Clear(); // clear old text/imagery
  epd.DisplayPartBaseWhiteImage(); // lay a base white layer down first

}

void loop() {
  String str_to_print = "Val: "; // string prepend
  str_to_print+=String(iter_val); // add integer value

  header_print(); // print header text

  paint.Clear(UNCOLORED); // clear background
  paint.DrawStringAt(0, 4, str_to_print.c_str(), &Font20, COLORED); // light background
  epd.SetFrameMemory(paint.GetImage(), 0, initial_space+(3*row_height), paint.GetWidth(), paint.GetHeight());
  epd.DisplayPartFrame(); // display new text
  iter_val+=1; // increase integer value
}

void header_print(){
  paint.SetWidth(200); // set display width
  paint.SetHeight(24); // set initial vertical space

  paint.Clear(COLORED); // darkr background
  paint.DrawStringAt(0, 4, "1.54in e-Paper!", &Font20, UNCOLORED); // light text
  epd.SetFrameMemory(paint.GetImage(), 0, initial_space+(0*row_height), paint.GetWidth(), paint.GetHeight());

  paint.Clear(UNCOLORED); // light background
  paint.DrawStringAt(0, 4, "Simple Demo", &Font20, COLORED); // dark text
  epd.SetFrameMemory(paint.GetImage(), 0, initial_space+(1*row_height), paint.GetWidth(), paint.GetHeight());

  paint.Clear(COLORED); // dark background
  paint.DrawStringAt(0, 4, "Maker Portal", &Font20, UNCOLORED); // light text
  epd.SetFrameMemory(paint.GetImage(), 0, initial_space+(2*row_height), paint.GetWidth(), paint.GetHeight());
}
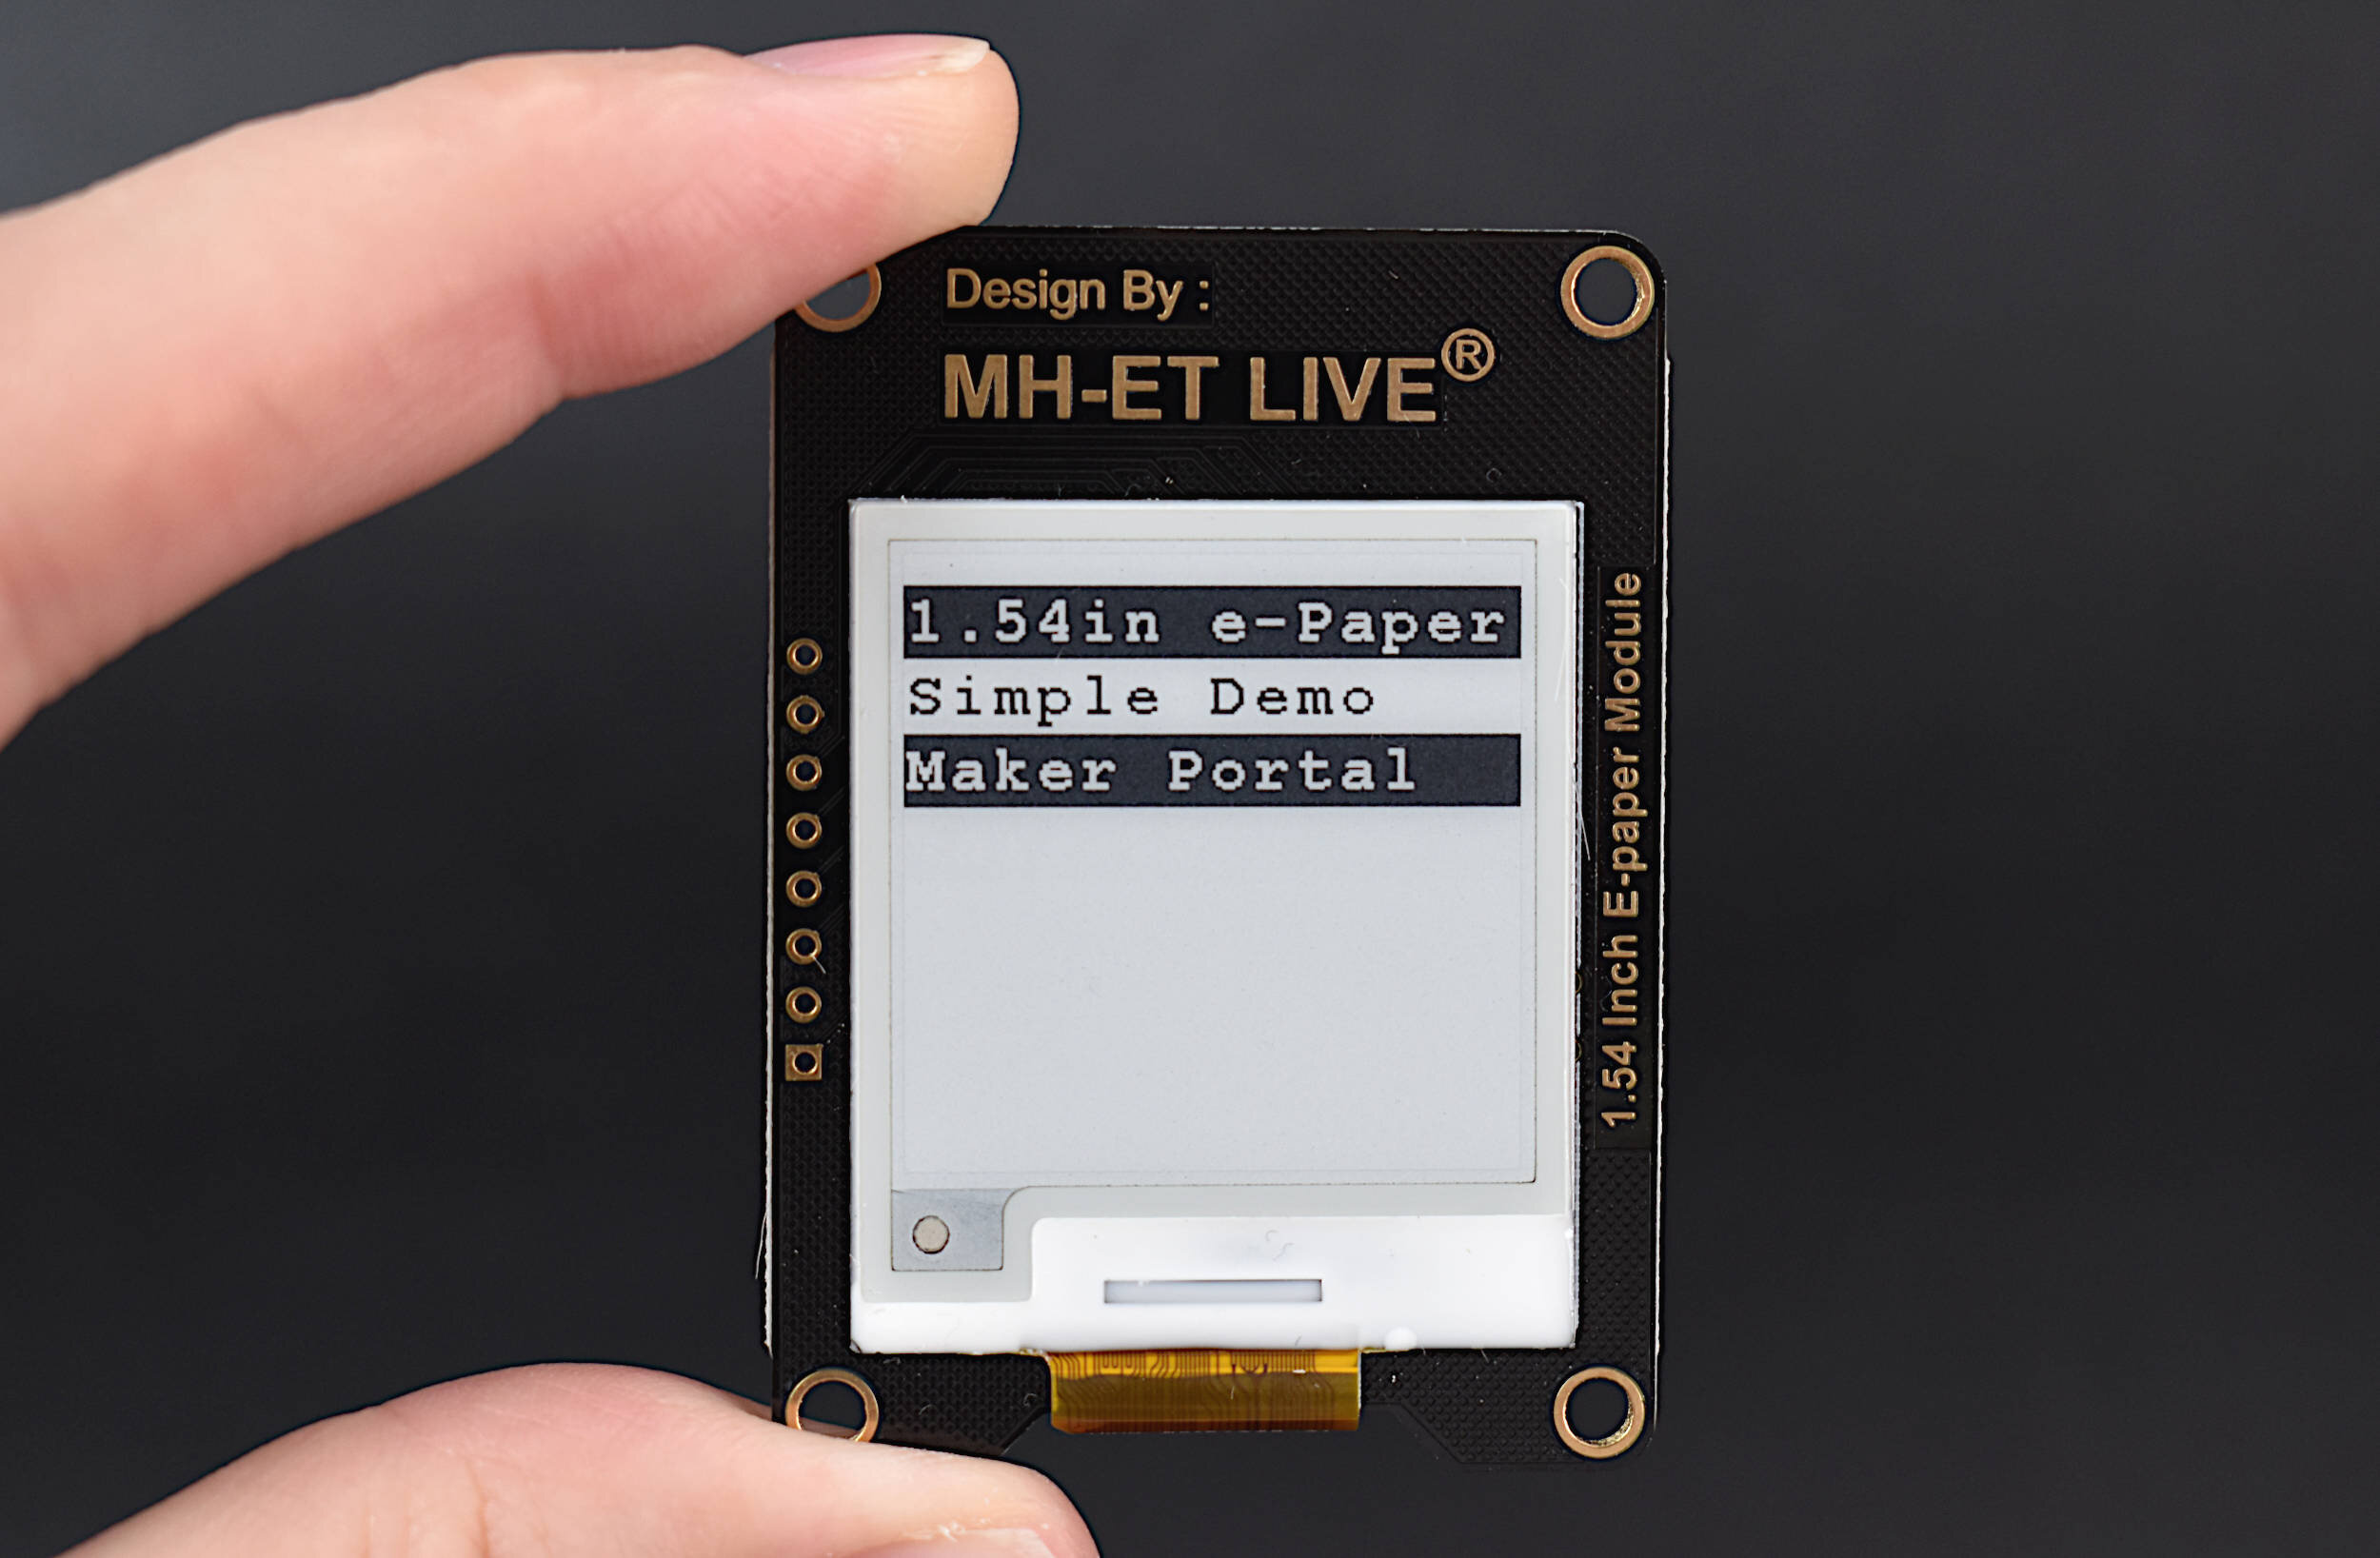
This simple example will print out integer values starting with 0 and marching forward until the count overflows. We are also printing a header, defined by three different texts: “1.54in e-Paper,” “Simple Demo,” and “Maker Portal.”
The basic setup for the e-Paper library is as follows:
Epd epd; // initiate e-paper display [epd]
unsigned char image[1024]; // memory for display
Paint paint(image, 0, 0); // setup for text display
First, we instantiate the e-paper display (EPD) also known as the electrophoretic display. Then we assign a print function called ‘paint’ that uses the pre-allocated variable called ‘image.’ Next, we want to initialize, clear, and refresh the display using the following:
epd.LDirInit(); // initialize epaper
epd.Clear(); // clear old text/imagery
epd.DisplayPartBaseWhiteImage(); // lay a base white layer down first
Finally, we are able to set the text to display using the following representations:
paint.Clear(UNCOLORED); // clear background
paint.DrawStringAt(0, 4, str_to_print.c_str(), &Font20, COLORED); // light background
epd.SetFrameMemory(paint.GetImage(), 0, initial_space+(3*row_height), paint.GetWidth(), paint.GetHeight());
epd.DisplayPartFrame(); // display new text
This series of commands prints values to the e-Paper display, particularly in the light background and dark foreground format. The function ‘DrawStringAt()’ defines the relative location, fontsize, and color (Black [colored] vs white [uncolored]). Next, the ‘SetFrameMemory()’ designates the location of the text within the entire e-Paper display, which is why we are using offset values based on the header and row height. There are many customizations that are possible with these variables and we are only showing a very brief example. In the next section we will explore a bit more on customizing the text display. The simple example given above should output text similar to that shown in the image below:

We can expect the simple example to iterate continually. This type of example can be extrapolated to increment as a clock or counter of a similar fashion. One example may be with an electronic label in a department store, or counter for counting customers in a store, or something similar with long-term operation and low refresh rate applications. In the next section, we will introduce Bluetooth capabilities and near real-time updating using an Android smartphone and the BLExAR app.
The following example requires the BLE-Nano board and BLExAR app (both the iOS and Android versions suffice). Thus, if the user does not have both of these - the following demonstration may not translate.
The Bluetooth demo for the BLE-Nano and 1.54 inch e-Paper display can be found at the GitHub page under the following example file:
simple_text_display.ino
The code is also given below for reference:
- BLExAR App -
/***************************************************************************
* Arduino e-Paper Text Display on Arduino
*  -- with BLE-Nano board for smartphone integration
*
*
*  by Josh Hrisko | Maker Portal LLC (c) 2021
*
*
***************************************************************************/

#include <SPI.h>
#include "1_54in_epaper.h"
#include <stdlib.h>

Epd epd; // initiate e-paper display [epd]
unsigned char image[1024]; // memory for display
Paint paint(image, 0, 0); // setup for text display

#define COLORED     0 // background color handler (dark)
#define UNCOLORED   1 // background color handler (light)

String tot_val = ""; // storage variable for serial data

String header_txt[3] = {"1.54in e-Paper","Simple Demo","Maker Portal"}; // header text

int initial_space = 10; // initial white/dark space at the top of the display
const int init_row_lines = sizeof(header_txt)/sizeof(String); // counting rows to avoid header overlap
int row_line = 0; // for iterating
int row_height = 24; // row height (based on text size)

const int max_lines = 8; // max lines that can print at font-20 (for this demo)
String line_array[max_lines-init_row_lines]; // More lines than this and the display will overflow

void setup() {
  Serial.begin(9600); // start serial handling for Bluetooth handling

  clear_func(); // clear display and set header
}

void loop() {
  char val = Serial.read(); // read character from BLE device (iPhone)
  if (int(val)!=-1){ // make sure it's a valid integer pin
    tot_val+=val; // if the input is over 1 character, this handles that
    if (val=='\n'){ // wait for newline
      int str_len = strlen(tot_val.c_str()); // get length of string
      tot_val[str_len-1] = '\0'; // blank out the newline character from BLExAR

      if (row_line<(max_lines-init_row_lines)){
        line_array[row_line] = tot_val; // append to string array
        header_print(); // print header text
        update_txt(row_line);
      } else {
        for (int qq=0;qq<(max_lines-init_row_lines);qq++){
          line_array[qq] = String(" "); // reset array too
        }
        clear_func(); // clear display upon overload
        row_line = 0; // reset iterator
        line_array[row_line] = tot_val; // append to string array
        header_print(); // print header
        update_txt(row_line); // update with last received text
      }
      tot_val = ""; // clear serial input variable
      row_line+=1; // iterate to ensure new text prints to new line
    }
  }
}

void header_print(){
  paint.SetWidth(200); // set display width
  paint.SetHeight(24); // set initial vertical space
  // loop through header text and print values
  for (int jj=0;jj<init_row_lines;jj++){
    paint.Clear(jj%2); // background
    paint.DrawStringAt(0, 4, header_txt[jj].c_str(), &Font20, int(!bool(jj%2))); // text
    epd.SetFrameMemory(paint.GetImage(), 0, initial_space+(jj*row_height), paint.GetWidth(), paint.GetHeight());
  }
}

void clear_func(){
  epd.LDirInit(); // initialize epaper
  epd.Clear(); // clear old text/imagery

  epd.DisplayPartBaseWhiteImage(); // lay a base white layer down first

  header_print(); // print header text
  epd.DisplayPartFrame(); // display header text
}

void update_txt(int row_ii){
  for (int ii=0;ii<=row_ii;ii++){
    paint.Clear(int(!bool(ii%2))); // clear background
    // below: draw at opposite to background (light vs dark)
    paint.DrawStringAt(0, 4, line_array[ii].c_str(), &Font20, ii%2);
    epd.SetFrameMemory(paint.GetImage(), 0, initial_space+((ii+init_row_lines)*row_height), paint.GetWidth(), paint.GetHeight());
  }
  epd.DisplayPartFrame(); // display new text
}
Out of the box - the code above should print out the same three headers as the simple demo given in the previous section. Next, the BLE-Nano waits for the BLExAR app to send text and will print out the text as soon as it receives a newline character. The GIF below shows the user sending the text and the e-Paper updating accordingly:

e-Paper + Android Bluetooth Display
Android text printed out on the 1.54in e-Paper display
Each time the text is sent to the Arduino board it sends the new text onto a new line. Thus, with the current setting, the display will refresh after 6 lines of new text, where the sixth line refreshes the display and prints to the first line. The refresh rate of the partial update in the Bluetooth case is roughly 1-2 seconds. Once the display gets the sixth line, it will take roughly 5-6 seconds to refresh the entire display and update with the new text. This is of course one downside to e-Paper display, but a well-established limitation.
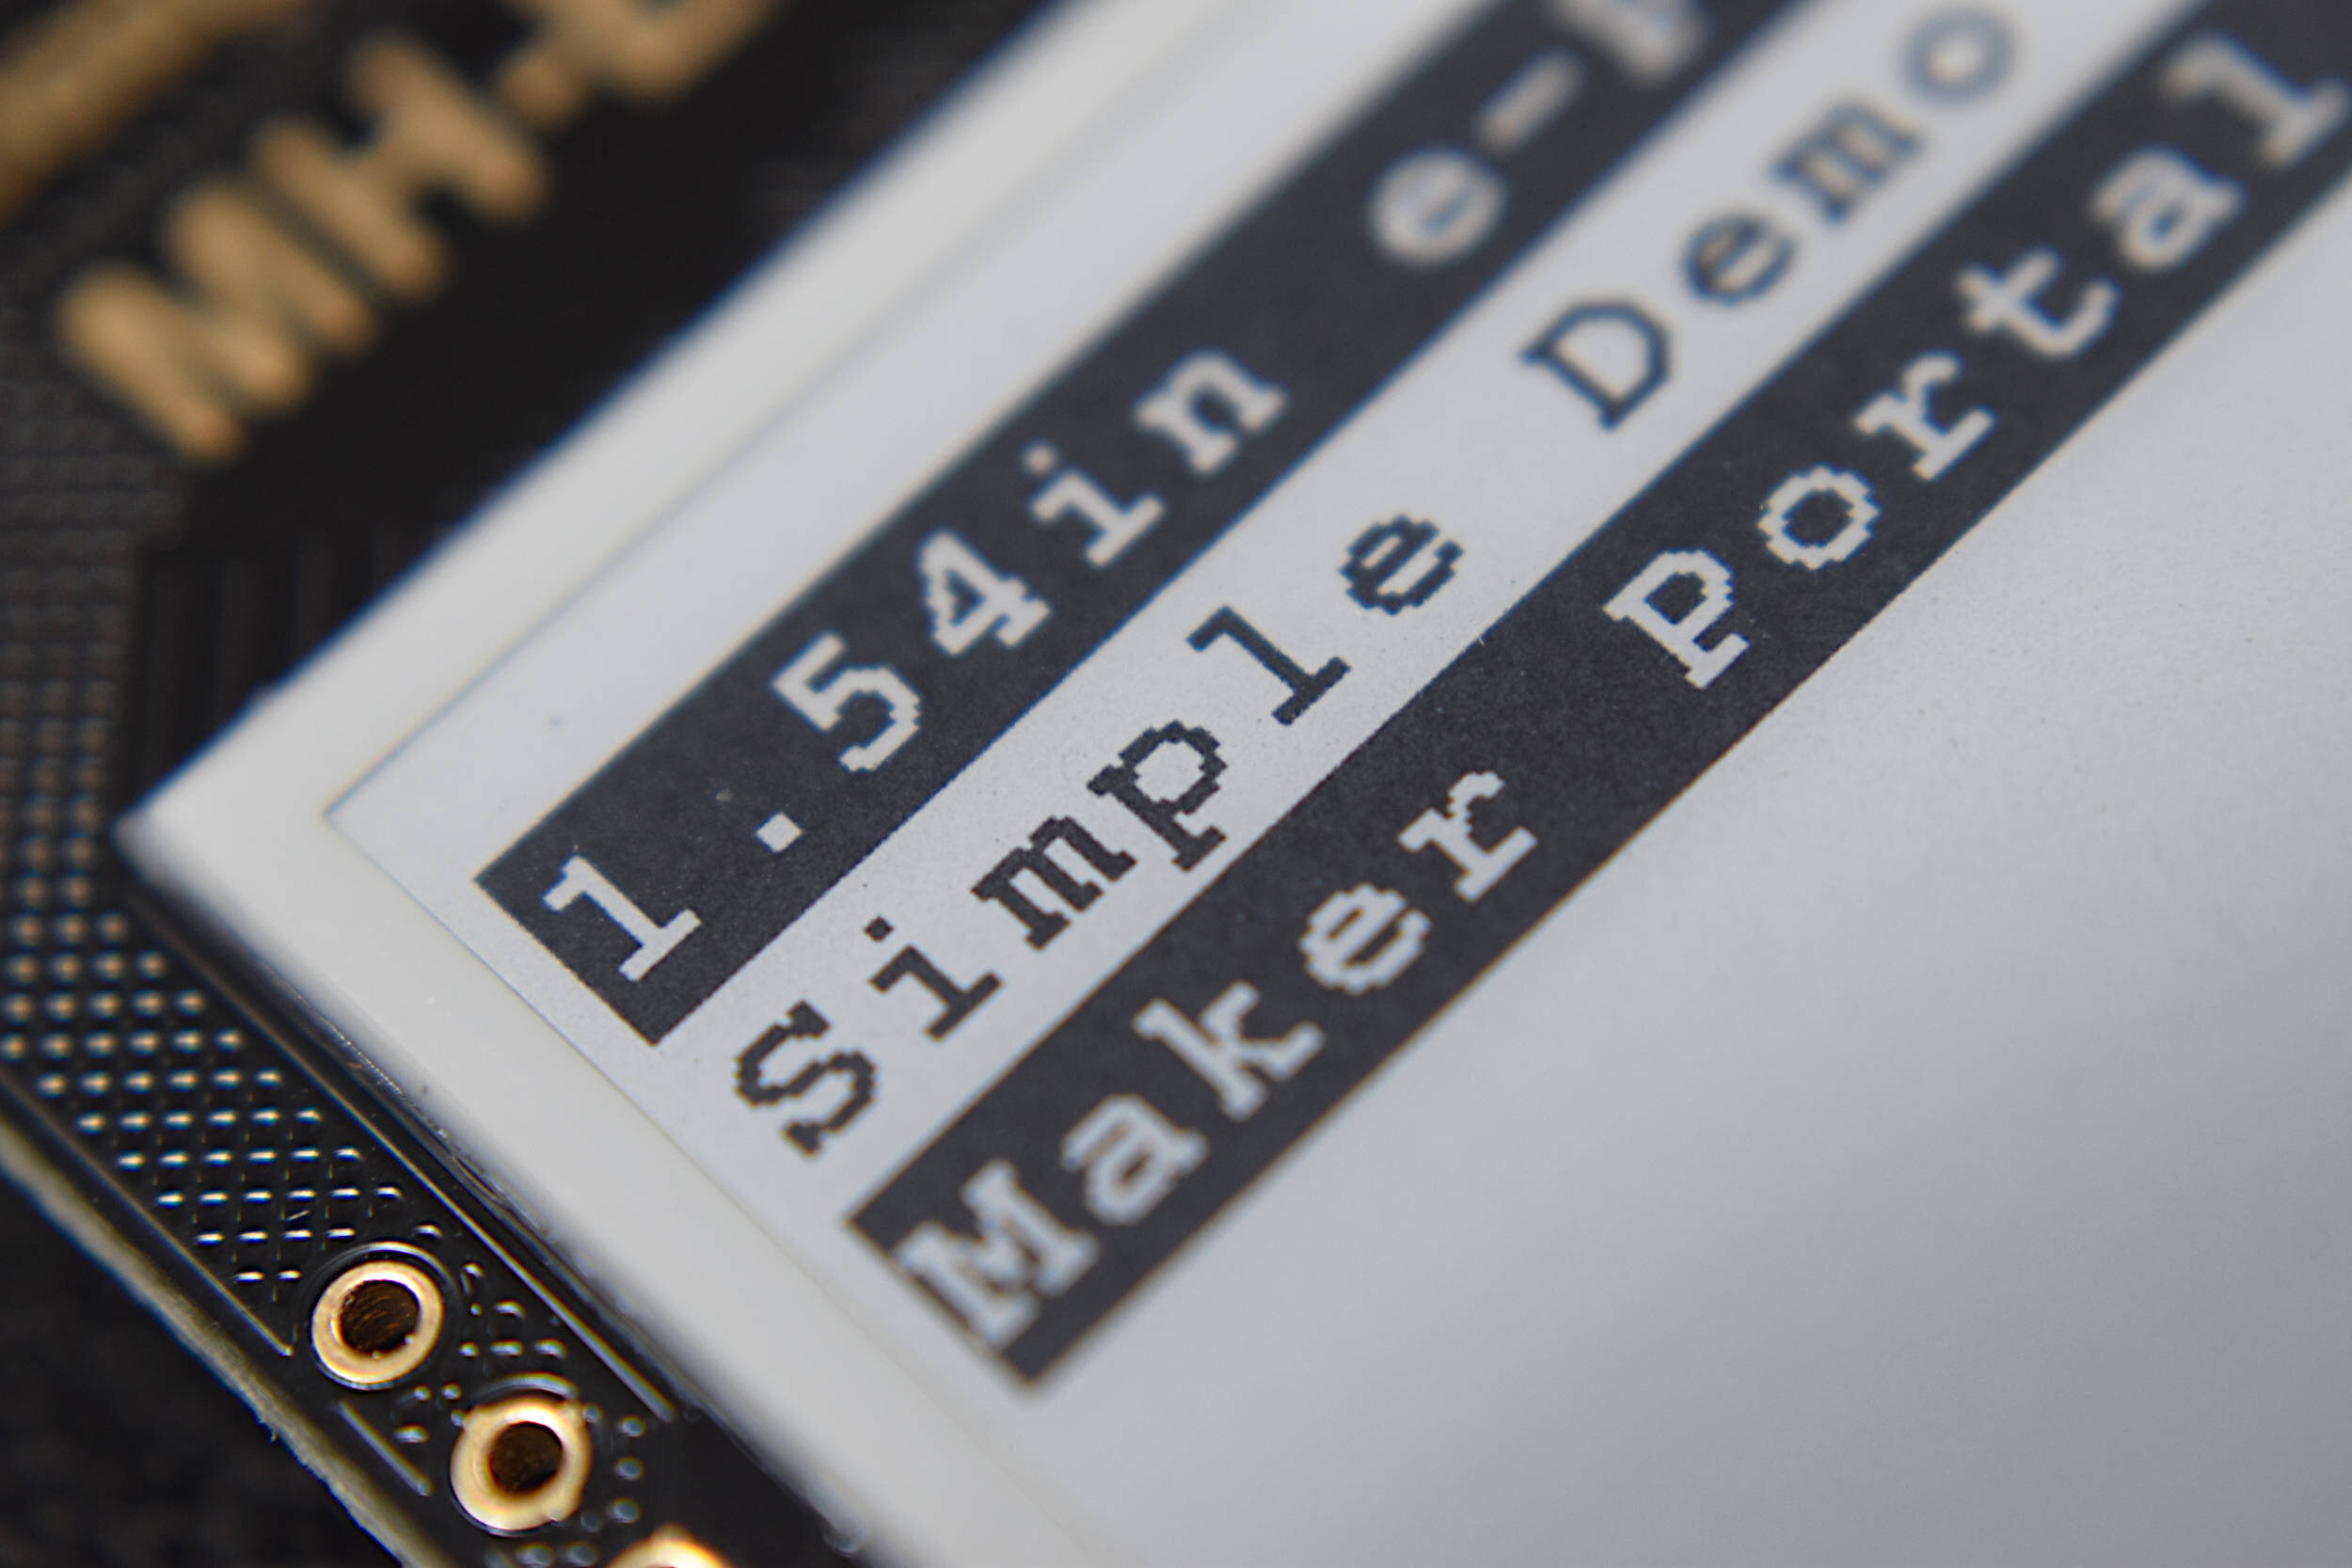
e-Paper Zoomed-In
The resolution of the 1.54 inch e-Paper display is about 185dpi, which is about 40% of the resolution of the newest smartphone devices (Apple’s iPhone 12 has a resolution of ≈460 dpi [technically ppi], and the Samsung Galaxy S21 has a resolution of ≈421 dpi). This results in a fairly decent resolution for the display at close range.
A video demonstration of the Bluetooth-enabled e-Paper display is given below, showing the speed and update routine of the Arduino and Android communication:
e-Paper displays are great alternatives to LCDs and OLEDs due to their low power requirements between refreshes and their ability to maintain high contrast during sunlight - a common issue for backlit devices such as tablets and smartphones. In this tutorial, we introduced a 1.54 inch e-Paper module and wired it to a BLE-Nano Arduino board for SPI communication. The goal of the project was to send text from a smartphone device and display it in real time on the e-Paper display. We were able to achieve this by using a BLE-Nano board and the BLExAR smartphone app communicating via Bluetooth Low Energy (BLE). Two examples were given: the first displayed a simple iterator on the e-Paper module without Bluetooth; while the second example updated its display with the text sent by the smartphone. The possibilities of this e-Paper project are endless and have the potential for applications in electronic labeling in department stores, long-term status indicators, high-contrast electronic displays, and of course, electronic readers.

We focused on the implementation of the e-Paper in this tutorial. For more in-depth understanding of the technology and physics behind electronic paper displays, see the following resources:
- Heikenfeld, J., Drzaic, P., Yeo, J. S., & Koch, T. (2011). A critical review of the present and future prospects for electronic paper. Journal of the Society for Information Display, 19(2), 129-156.
- Kreit, E., Mäthger, L. M., Hanlon, R. T., Dennis, P. B., Naik, R. R., Forsythe, E., & Heikenfeld, J. (2013). Biological versus electronic adaptive coloration: how can one inform the other?. Journal of the Royal Society Interface, 10(78), 20120601.
- Kao, W. C. (2010). Electrophoretic display controller integrated with real-time halftoning and partial region update. Journal of display technology, 6(1), 36-44.