ATtiny85 Arduino Board: How to Flash the Arduino Bootloader and Run A Simple Sketch
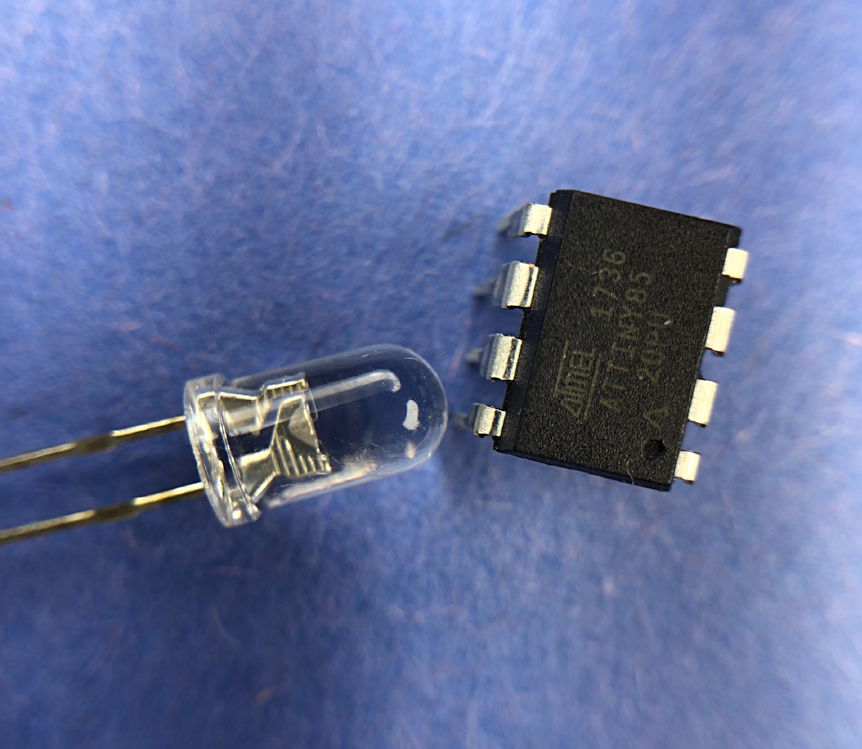
Figure 1: ATtiny85 next to a standard LED.
The ATtiny family is a series of tiny microcontrollers capable of utilizing many of the libraries available on the Arduino platform. The ATtiny85 is used here because of its small profile and widespread availability. It is an 8-pin, 8-bit, AVR microcontroller that can run the Arduino bootloader with a few modifications. One user created an entire board alteration that makes burning the bootloader even easier (see below). Several tutorials exist on using the ATtiny with Arduino, and I will be using them as guides to provide an updated and simplified method for flashing the Arduino bootloader onto the ATtiny85 using an Arduino Uno (example 1: High-Low Tech [link]; example 2: J3 on Medium [link]). The ATiny85 datasheet can be found [here], but a few of its basic features include:
10-bit ADC
4 Possible Analog Inputs
6 Possible Digital Pins
2.7-5.5V Tolerance
5mA, 1.2mA, 10uA Active/Idle/Power Down Current Consumption (8MHz)
Serial Interface
Interrupt Capabilities
Internal Crystal Oscillators (1MHz, 8MHz)
A pinout of the ATtiny is shown below with common Arduino pin options:
Figure 2: Pinout showing the capabilities of each pin on the ATtiny85 [source].
Downloading and Installing Package for ATtiny
The first thing needed to program the ATtiny as an Arduino is the ATtiny package from David A. Mellis (GitHub). First, we need add the ATtiny package to the boards manager URL list:

Step 1: Add ATtiny URL
Add ATtiny Package link [here] from David A. Mellis to Boards Manager

Step 2: Download from Boards Manager
Tools ->Board -> Boards Manager -> Type: 'attiny' -> Install
Preparing Arduino Uno to Burn Bootloader onto ATtiny85
Now that we have downloaded the ATtiny package, we can prepare the Arduino Uno board for In-System Programming (ISP). To do this, we must first upload the 'ArduinoISP' sketch to the Uno board (before wiring anything to it). This can be done the following way:
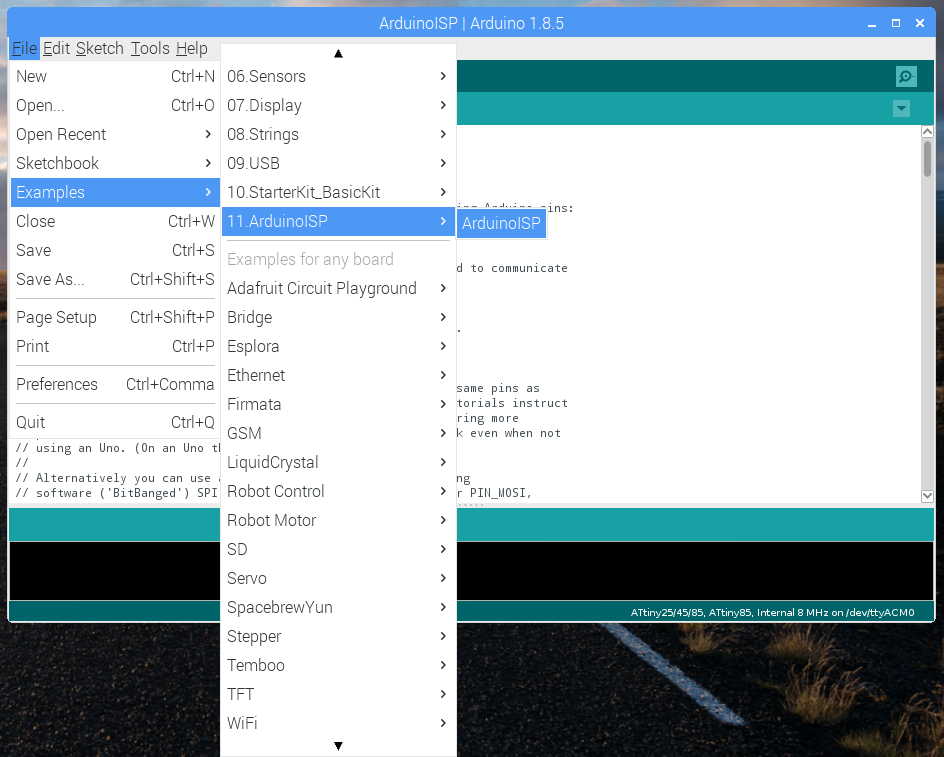
Step 3: Upload 'ArduinoISP' Sketch to Uno Board
Examples -> ArduinoISP -> ArduinoISP -> Upload
Wiring and Burning Bootloader to ATtiny
The ATtiny85 should be wired to the Uno as follows:
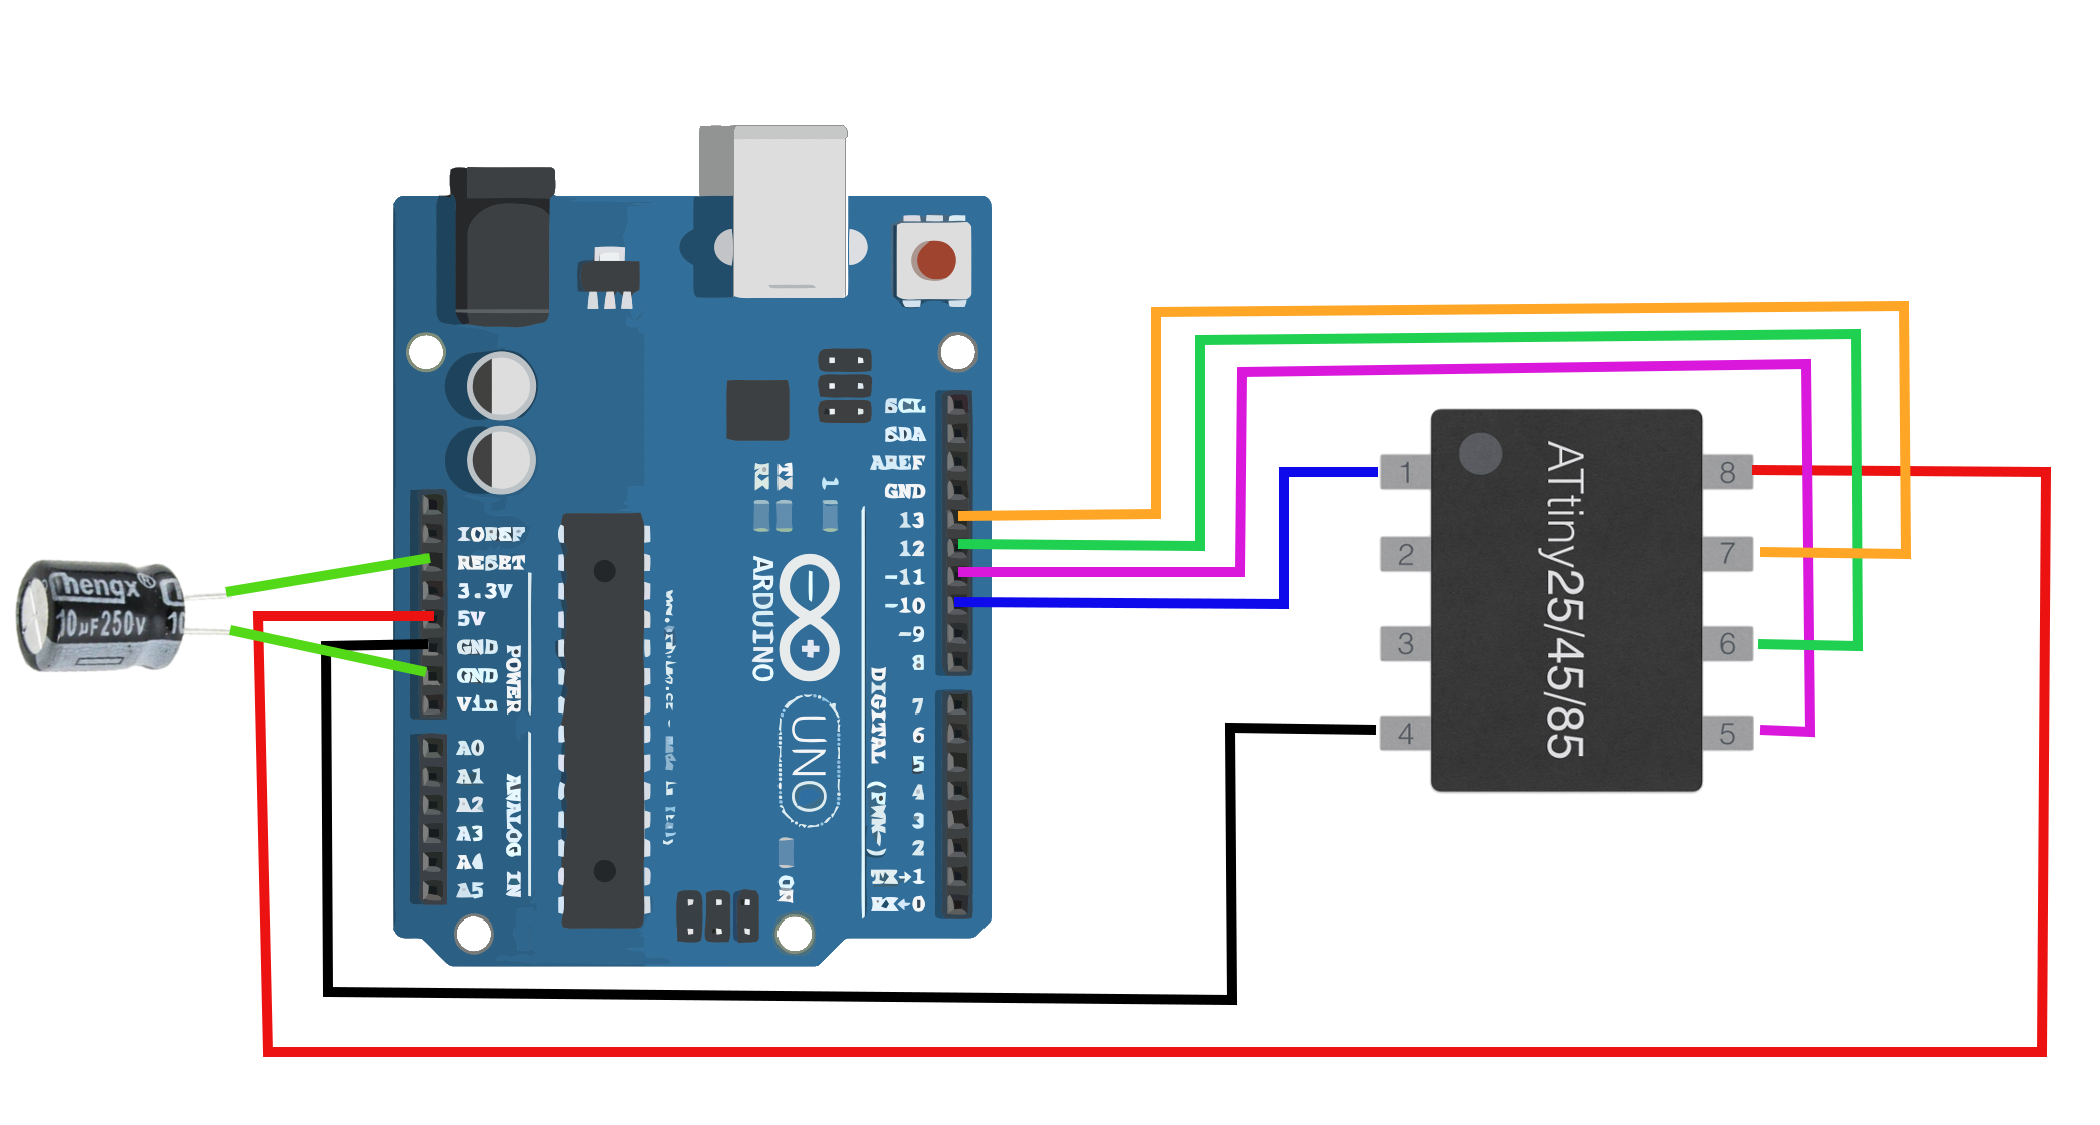
The capacitor prevents the Uno from resetting when avrdude opens the serial port as part of its auto-reset feature during each upload. The auto-reset is disabled to allow the programmer to access the ArduinoISP sketch on the Uno board, which ultimately resets the ATtiny fuses and allows the board to be programmed via its serial port (Thanks to Gene Pavlovsky in the comments for pointing this out). Here I use a 10uF capacitor. Before Burning the bootloader, be sure to configure the ATtiny85 to run with its 8MHz internal clock, and verify that the Programmer being used is 'Arduino as ISP':

Step 4: Arduino as ISP
Choose 'Arduino as ISP' as the programmer prior to burning the Arduino bootloader onto the ATtiny

Step 5: Select ATtiny85
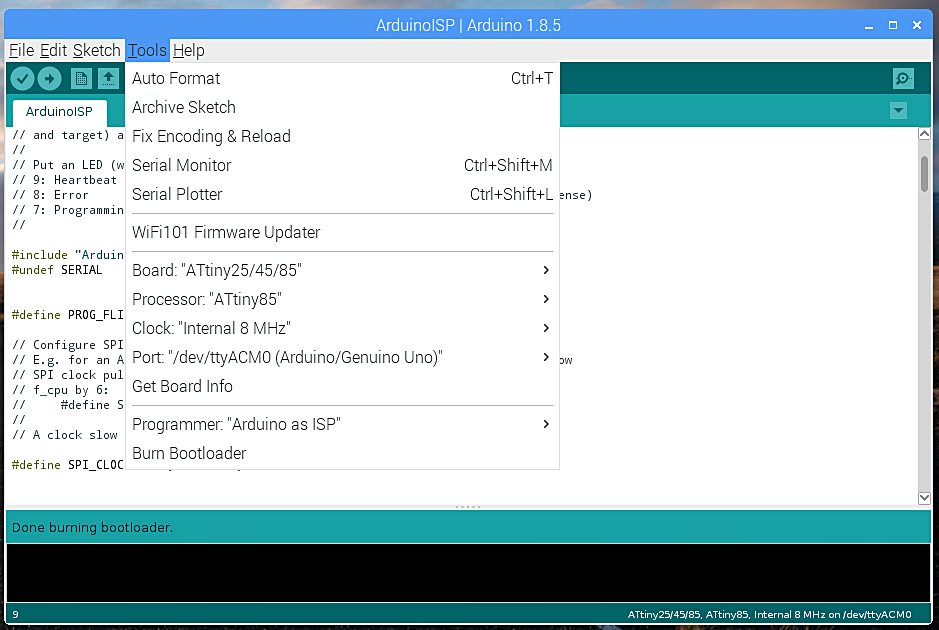
Step 6: Verify Board Properties
Clock: 'Internal 8 MHz', Processor: 'ATtiny85', Programmer: 'Arduino as ISP'
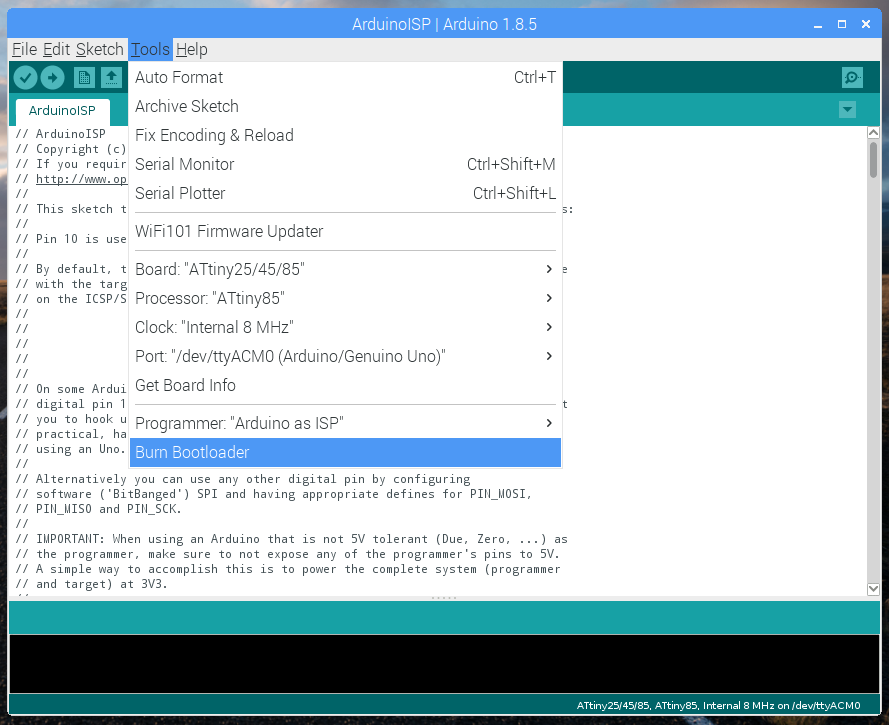
Step 7: Burn Bootloader!
ATtiny as Arduino Board
At this point, we now have an 8MHz Arduino board with several output pins. The ATtiny85 can run on 2.7-5.5V without a regulator - so a 3.7V LiPo can power the board and make a cheap, effective, slim Arduino board. The best way to verify that the ATtiny Arduino is working properly is to upload a simple sketch. I supplied a simple blink sketch here to be used with pin 4 on the ATtiny. If you are able to upload the sketch to the ATtiny85 (using the Uno board and the 'Arduino as ISP' programmer and wiring) - then you have a fully-functional Arduino ATtiny85! From here, the possibilities are nearly identical to the ATmega328p, with the exception of fewer ports and some limitations. However, the ATtiny Arduino is fully capable of handling analog read and writing, digital reading and writing, UART communication, power-down modes, SPI-interface, interrupt capabilities - many of the features of a standard Arduino board.
//ATtiny85 Blink Sketch for Testing Bootloader

int led_pin = 4;

void setup() {
  pinMode(led_pin,OUTPUT);
}

void loop(){
  digitalWrite(led_pin,HIGH);
  delay(1000);
  digitalWrite(led_pin,LOW);
  delay(1000);
}
Conclusion

In this short tutorial I showed how to use an Arduino Uno to burn the Arduino bootloader onto an ATtiny85 to create a tiny, efficient, and capable electronics board. Using an ATtiny with the Arduino bootloader opens up the world of micro-electronics to makers that are already familiar with the Arduino platform, but want to migrate away from the ATmega328p board. The ATtiny85 is tiny, but is versatile and powerful enough to handle multiple digital and analog inputs and outputs, and able to use many of the familiar libraries that are available to Arduino. The ATtiny is a great board to start creating Internet of Things projects and other small, low-power, embedded projects.
See More in Arduino:


