Controlling LEDs with A Multiplexer and Arduino

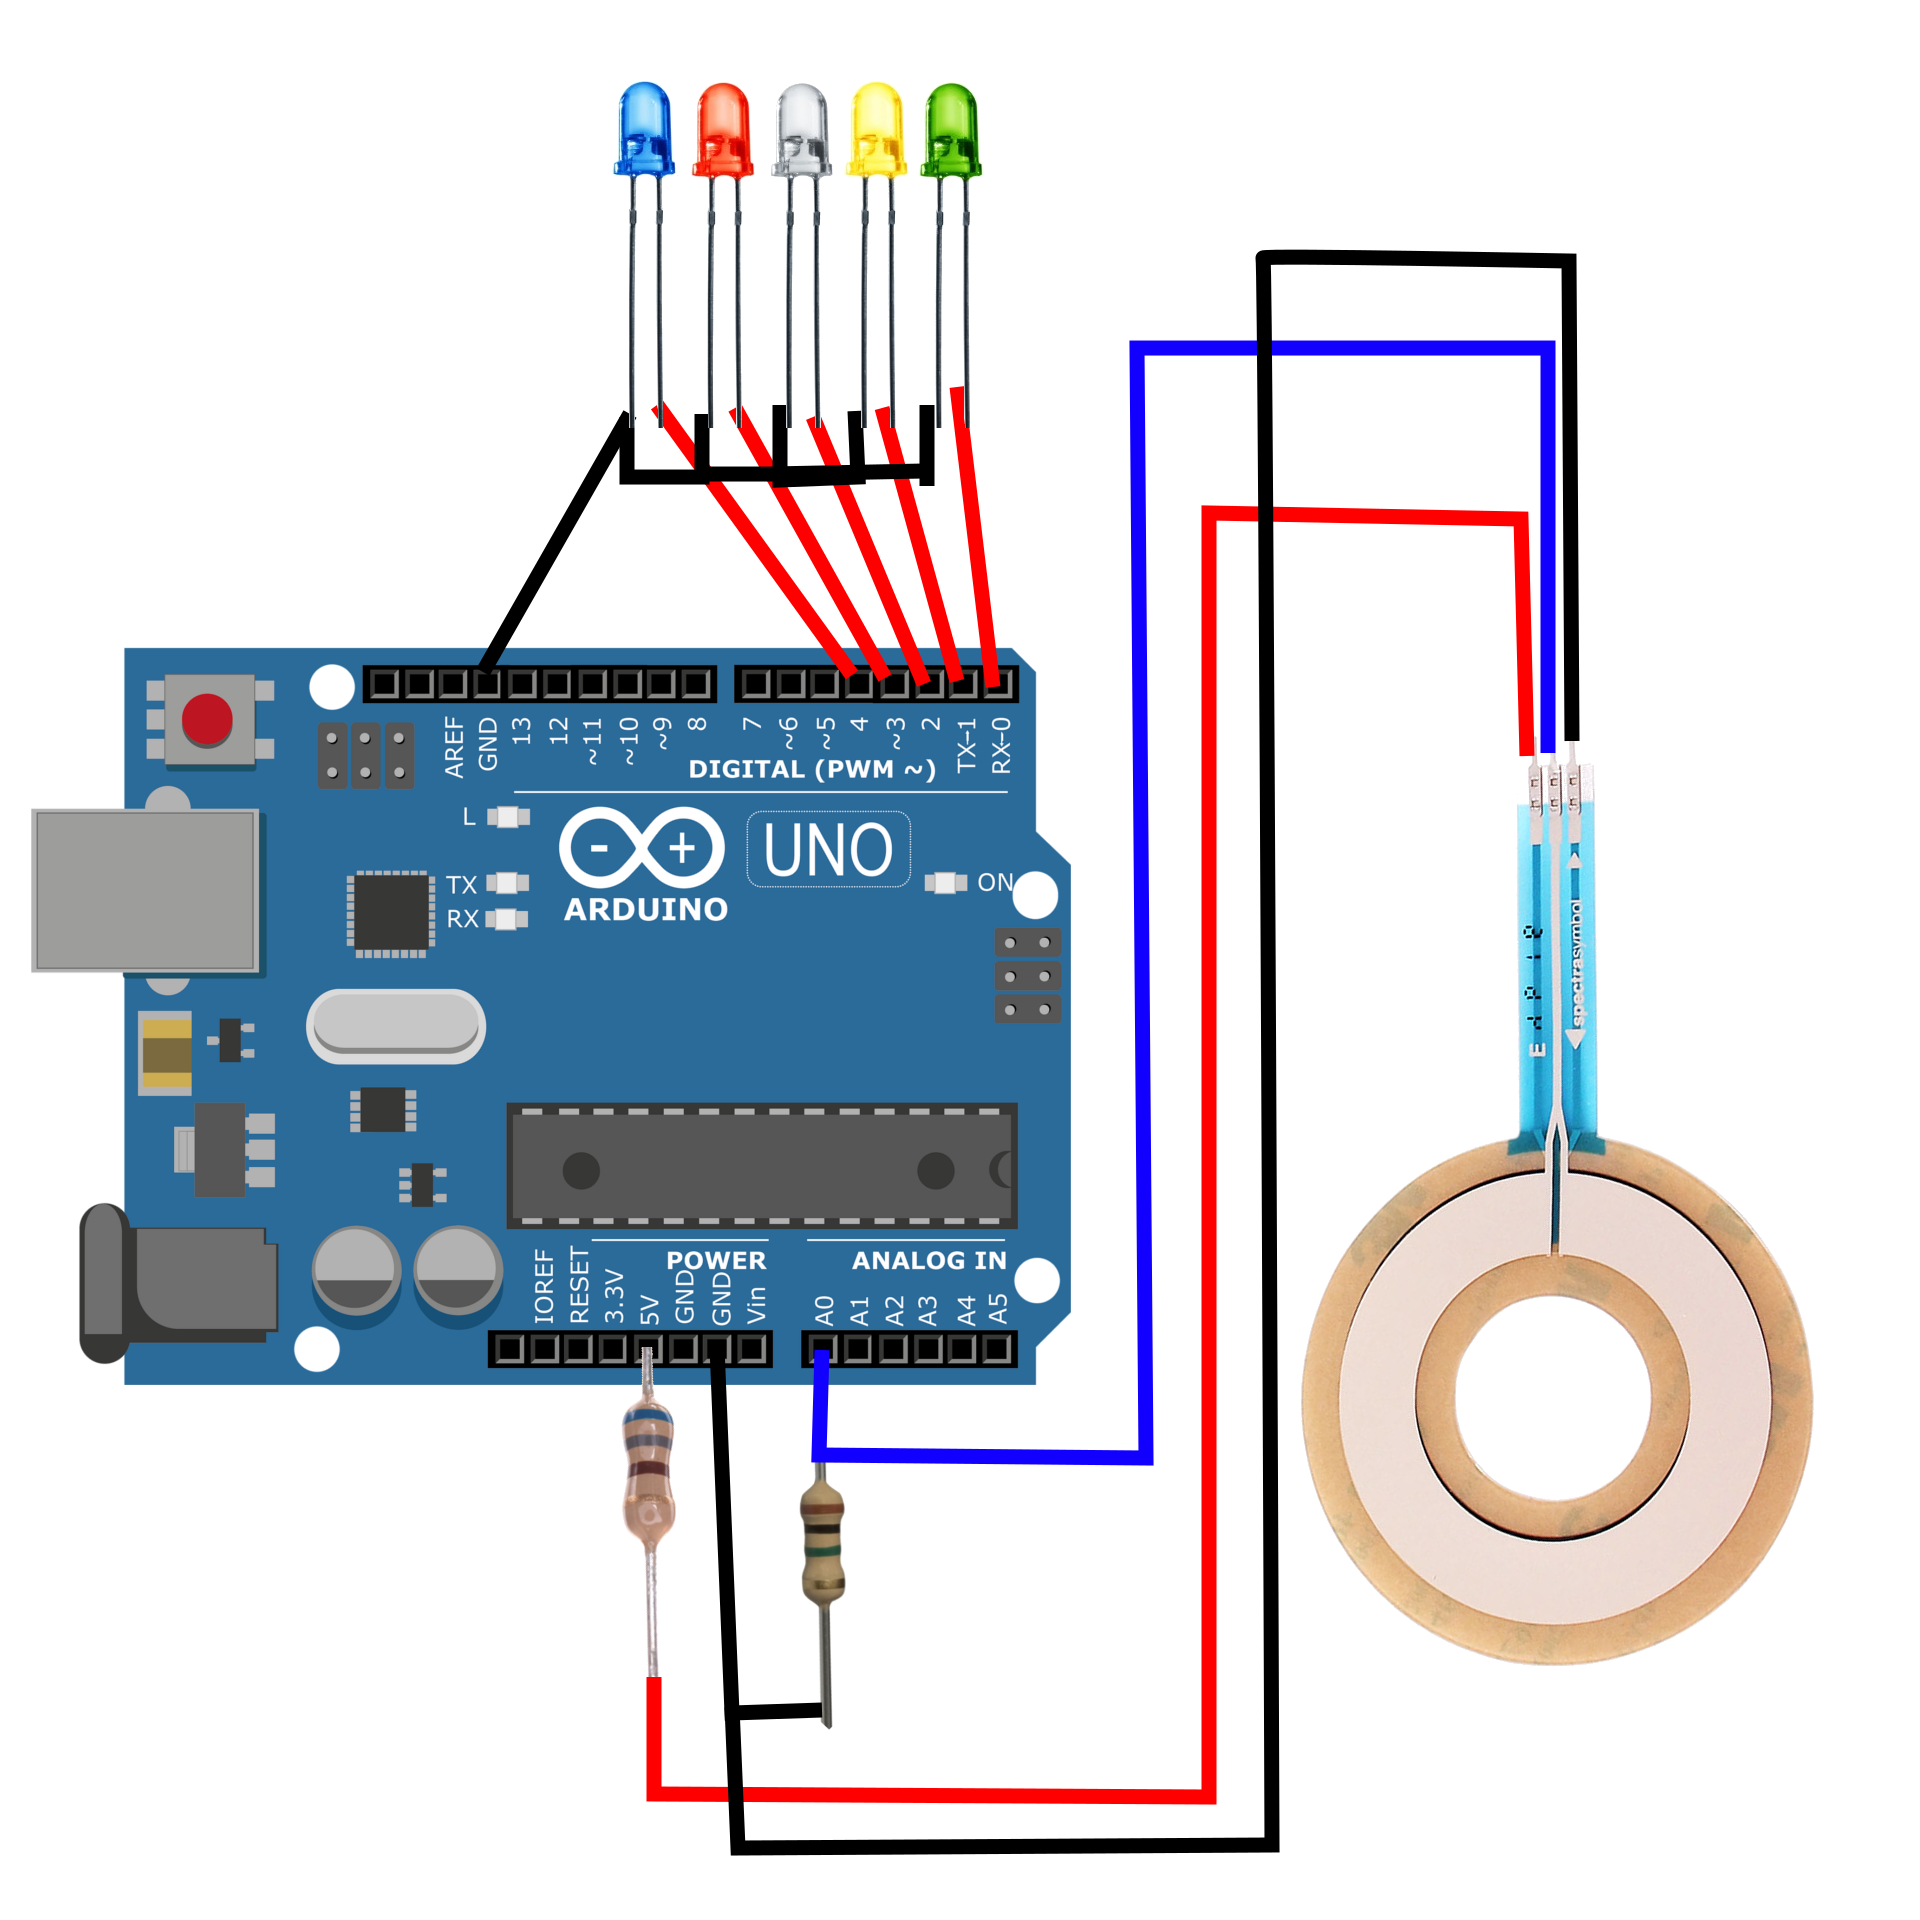
A demultiplexer will be used to control 8 LEDs using just 3 digital pins on the Arduino board. This method of demultiplexing frees up pins on the Arduino, but also makes control of multiple LEDs easier by consolidating the power given to each LED. This will allow us to use LEDs without resistors. In general, a demultiplexer uses N boolean outputs to control 2N switches. In our case, the CD4051 multiplexer will be used as a demultiplexer using 3 digital pins and boolean logic to control 8 individual LEDs. Several skills will also be developed, specifically with regard to programming in the Arduino programming language. Pulse-width modulation (or brightening and dimming) of LEDs will be explored, as well as randomization of LED blinks, along with the general selection process for boolean switching with the demultiplexer.

Read More
Raspberry Pi Vibration Analysis Experiment With a Free-Free Bar

Using the Euler-Bernoulli beam theory, the resonant frequencies of a beam will be measured using a thin film piezoelectric transducer and compared to the theoretical calculations. A Raspberry Pi will be used along with a high-frequency data acquisition system (Behringer UCA202, sample rate: 44.1kHz) and the Python programming language for analysis. The fast fourier transform will allow us to translate the subtle beam deflections into meaningful frequency content. This tutorial is meant to introduce Python and Raspberry Pi as formidable tools for vibration analysis by using measurements as validation against theory.

Read More
Loudspeaker Analysis and Experiments: Part II

Part II of the tutorial series on loudspeaker analysis and experiments. The majority of this entry focuses on finding Thiele-Small parameters to fully characterize an electrodynamic loudspeaker in free air.

Read More
Loudspeaker Analysis and Experiments: Part I

In this tutorial, a loudspeaker will be analyzed by calculating the Thiele-Small parameters from impedance measurements using an inexpensive USB data acquisition system (minimum sampling rate of 44.1 kHz). The methods used in this project will educate the user on multiple engineering topics ranging from: data acquisition, electronics, acoustics, signal processing, and computer programming.

Read More
Arduino Pitot Tube Wind Speed and Airspeed Indicator - Theory and Experiments

The pitot tube is a device used to approximate the speed of vehicles traveling by air and water. An in-depth article on NASA's website is dedicated to pitot tubes (also called pitot-static tubes, Prandtl tubes), where it cites the primary application as airspeed indicator on aircraft. For more information on design and limitations of the instrument, I recommend perusing that page. For this tutorial, only the basic theory is explored using Bernoulli's equation and a practical application. An inexpensive pitot tube and a digital differential pressure sensor are used to measure pressure, which is converted to a digital signal using an Arduino board.

Read More
Arduino Thermistor Theory, Calibration, and Experiment

Thermistor, whose name is derived from a combination of thermal and resistor, is a temperature sensing device that registers changes in internal resistance as a function of temperature. Thermistors are often chosen over thermocouples because they are more accurate, have a shorter response time, and are generally cheaper. For most applications, thermistors are the smart and easy selection for temperature sensing below 300 degrees Celsius. In our case, we will be using a Negative Temperature Coefficient (NTC) thermistor, where the resistance decreases as the temperature increases. NTC thermistors are most common in commercial products that operate in the tens of degrees like thermostats, toasters, and even 3-D printers. An NTC 3950 100k thermistor will be used, which is designed for 100kOhm resistance at 25 degrees Celsius. This tutorial will introduce methods for relating resistance to temperature by fitting factory calibration data. The performance of the thermistor will also be evaluated using an Arduino board and a simple Newton’s law of cooling experiment.

Read More
NodeMCU Tutorial Series Part II: NodeMCU Server Control Over Local Area Network

This tutorial takes full advantage of the ESP8266 WiFi chip by serving a local webpage to control the general purpose input and output (GPIO) pins on a NodeMCU microcontroller. Some basic HTML and CSS programming methods will be utilized to create a stylish webpage that is both asynchronous (AJAX) and input-driven - this will give the user the ability to control the pins on the microcontroller. For the current example, an electromagnet and LED will be controlled using pulse width modulation (PWM) and simple high/low logic, respectively. The PWM control allows the user to change the voltage to the component, altering the magnetic field of the electromagnet. For the LED, the traditional digitalWrite() method will turn the LED on and off.

Read More
NodeMCU Tutorial Series Part I: Arduino IDE and Blinking an LED

NodeMCU is a WiFi platform that integrates the ESP8266 system on chip hardware with the familiarities of open-source software. The NodeMCU is powerful because it endows users with the ability to create Internet of Things (IoT) projects at a relatively low cost with tools readily available and open to the maker community. NodeMCU is fully compatible with the Arduino IDE, which is the method for programming the board in this tutorial.

Read More
A Guide to Metal Core PCBs by PCBGOGO

The use of LED based electronics has significantly increased in the past few years. They have proven to be more efficient and nearly 5 times cheaper than normal incandescent units. But with their use came one downside: heat. Some devices tend to use a number of LEDs that remain on for a long period of time and so can overheat. The LEDs are usually mounted on PCBs and can therefore cause significant damage. There is however one alternative to common PCBs i.e. metal core printed circuits (MCPCBs).

Read More
GOES-R Satellite Latitude and Longitude Grid Projection Algorithm

Calculating latitude and longitude from a GOES-R L1b data file. The GOES-R L1b radiance files contain radiance data and geometry scan information in radians. This information is not enough to plot geographic radiance data right from the file, however, after some geometric manipulation harnessing satellite position and ellipsoid parameters, we can derive latitude and longitude values from the one-dimensional scan angles and plot our data in projected formats familiar to many geographic information tools.

Read More
Internet of Things WiFi and Bluetooth Mesh Network with Particle Argon and Xenon Boards

In the tutorial, the simplest integrated IoT mesh network is explored, where Argon (WiFi + BLE) and Xenon (BLE) Particle boards are used to create an ultrasonic range detector (HC-SR04) that notifies an LED whether a threshold value has been crossed in front of the sensor. When the threshold is reached, a ‘trip’ is communicated to the mesh network and notifies the system via Bluetooth and WiFi.

Read More
iPhone Datalogger with Arduino Using The iOS Bluetooth App BLExAR

The BLExAR app will be used in conjunction with a CC2541 (HM-10, JDY-08, AT-09, SH-M08) Bluetooth module and an Arduino (ATmega328) board to create a simple data acquisition system. A DHT22 sensor will provide temperature and humidity data to the Arduino which will be recorded by an iOS device via the BLExAR app. This experiment is a real-world example of an Arduino application demonstrating data acquisition from a real sensor. This tutorial will allow users to solve their own engineering problems using the modern Arduino platform and wireless communication through the BLExAr app, which will ultimately expand the reach and compatibility of technology in the classical sciences through exploration and experimentation.

Read More
4-Pin RGB LED Control Using iOS BLExAR App, HM-10 Bluetooth Module, and Arduino

Control an RGB LED using three PWM pins on an Arduino Uno board via Bluetooth communication. An RGB LED is a single casing with three cathode (or anode) pins and one anode (or cathode) pin. This results in a 4-pin LED. In this tutorial, I will be using an RGB LED with three anodes and one common cathode. This means that we can change the color of the LED to over 16.7 million different variations (assuming each anode produces a different luminosity for each voltage change of the Arduino PWM pin). This tutorial will help demonstrate the power of the BLExAR app, and the flexibility of an Arduino board under iOS Bluetooth control. In my case, I will be using an iPhone with the BLExAR app, but an iPad would suffice as well.

Read More
iOS and Arduino Bluetooth Communication Using The BLExAR App and CC2541 Module

An app called “BLExAR” allows Arduino users to communicate to an iOS device (iPhone or iPad) using a Bluetooth CC2541 module (different versions are called: HM-10, SH-M08, AT-09, or JDY-08). The app permits control of an Arduino board, wireless serial communication, and data acquisition. Click on the app logo shown here to download the app, as it will be used as the iOS communication software. On the Arduino side, we need to wire the CC2541 Bluetooth Low Energy (BLE) module to an Arduino board and upload the appropriate software via the Arduino IDE. In this tutorial, we will demonstrate how to verify communication between an Arduino and CC2541 Bluetooth module, and then use Bluetooth communication to send strings between an iOS device and the Arduino ATmega328p board.

Read More
Arduino SoftPot LED Meter (Membrane Potentiometer)

How to use a soft, circular-membrane potentiometer with an Arduino board. Potentiometers function by altering the voltage of a system by mechanically changing the resistance associated with a voltage divider. In a traditional potentiometer (think of turning a volume knob), we are physically changing the voltage of a system. In the case of a soft potentiometer (where the name SoftPot comes from), we are altering the resistance of the voltage divider by physically depressing the potentiometer, thereby changing the resistance at a contact point. The working principle is exactly the same, but in the SoftPot’s case, we are pressing, and for a knob we are rotating.

Read More
Arduino Tachometer - Using a Hall Effect Sensor (A3144) to Measure Rotations from a Fan

Arduino tachometer used to calculate the rotational motion of a part. Tachometers read out revolutions per minute (RPM), which tells the user how often a rotating part completes one full rotation. RPM readings are used in the automotive, aerospace, and manufacturing fields. Tachometers can indicate fuel consumption and motor speed, safety of moving parts, and even wind speed indicators. In this tutorial, the speed of a fan is measured using a hall sensor and neodymium magnet to acquire an accurate depiction of fan speed.

Read More
Capacitive Touch Sensor with Arduino

Capacitive sensing from human touch. Create a switch without any moving parts with an Arduino board and an inexpensive capacitive touch sensor.

Read More
Audio Processing in Python Part III: Guitar String Theory and Frequency Analysis

In this continuation of the audio processing in Python series, I will be discussing the live frequency spectrum and its application to tuning a guitar. I will introduce the idea of nodes and antinodes of a stringed instrument and the physical phenomena known as harmonics. This will give us a better idea of how to tune the guitar string-by-string and also discern the notes of a given chord - all calculated using the FFT function in Python.

Read More
Audio Processing in Python Part II: Exploring Windowing, Sound Pressure Levels, and A-Weighting Using an iPhone X

Raspberry Pi 3B+ acoustic analysis using Python. Audio recording and signal processing with Python, beginning with a discussion of windowing and sampling, which will outline the limitations of the Fourier space representation of a signal. Discussion of the frequency spectrum, and weighting phenomenon in relation to the human auditory system will also be explored. Lastly, the significance of microphone pressure units and conversion to the decibel will be briefly introduced and explained.

Read More
Audio Processing in Python Part I: Sampling, Nyquist, and the Fast Fourier Transform

Fourier Series has been widespread in applications of engineering ranging from heat transfer, vibration analysis, fluid mechanics, noise control, and much more. After evolutions in computation and algorithm development, the use of the Fast Fourier Transform (FFT) has also become ubiquitous in applications in acoustic analysis and even turbulence research. In this tutorial, I describe the basic process for emulating a sampled signal and then processing that signal using the FFT algorithm in Python. This will allow the user to get started with analysis of acoustic-like signals and understand the fundamentals of the Fast Fourier Transform.

Read More